Categories
Informational

How to Track Bugs in Redmine — From Issue Creation to Resolution

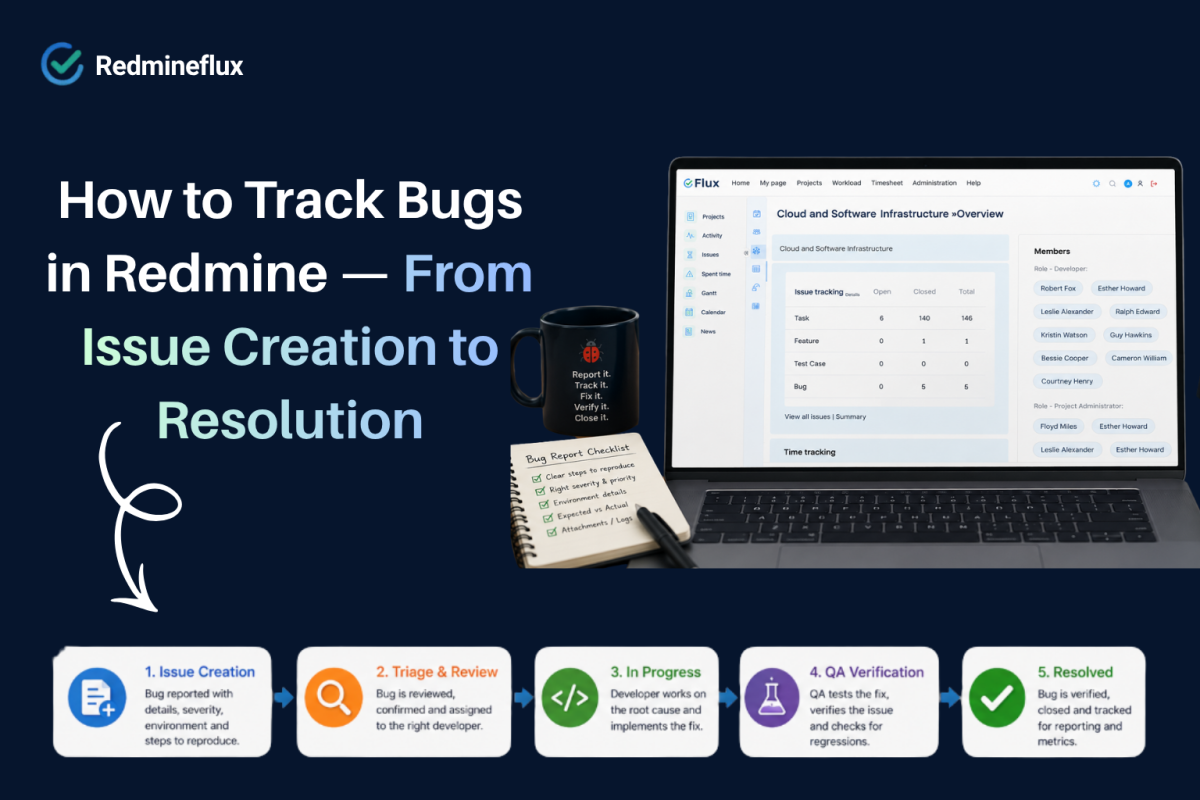
Redmine’s native issue tracking model is well-suited to bug management. A bug in Redmine is not just a task with a different label it is a distinct tracker type with its own workflow, its own required fields, and its own status transitions. That separation is what makes bug tracking in Redmine reliable rather than chaotic.

In practice, the problem most teams encounter is not that Redmine cannot handle bugs. Instead, it is that they never configure the bug tracker to reflect how bugs actually move through the team. Bugs go in, sit in a generic status, accumulate comments, and eventually get closed without a clear record of what happened, who verified it, or what environment it occurred in.

This guide covers how to track bugs in Redmine properly from setting up the Bug tracker through to QA sign-off and resolution reporting.

How Bug Tracking in Redmine Actually Works

The short answer: Redmine tracks bugs as a dedicated tracker type with configurable statuses, required fields, and role-based workflow transitions. A well-configured Bug tracker captures severity, environment, and reproduction steps at creation, routes the bug through development and QA, and closes only after verification. Combined with the Redmineflux Test Case Management Plugin, it connects bug resolution to formal QA sign-off in the same system.

In Redmine, a tracker defines the type of work an issue represents. Bug, Feature, Task, and Support are common tracker types each can have different required fields, different workflow rules, and different status transitions. That means a Bug tracker can enforce that severity is always filled in on creation, while a Task tracker does not require it.

In fact, that flexibility is what separates Redmine’s bug tracking from a generic task list. When configured correctly, every bug that enters the system carries the information needed to reproduce, fix, and verify it without relying on team discipline or comment threads to fill the gaps.

Step 1 — Configure the Bug Tracker

In Redmine, go to Administration → Trackers → New Tracker. Name it “Bug” and assign it to the relevant projects. Under Administration → Issue Statuses, create the status set that reflects how bugs actually move in your team.

A practical bug status model looks like this:

  • New — bug reported, not yet triaged
  • Confirmed — bug reproduced and accepted as valid
  • In Progress — developer actively working on the fix
  • Fixed — fix complete, awaiting QA verification
  • Verified — QA has confirmed the fix works
  • Closed — bug fully resolved and closed
  • Rejected — reported as bug but not valid or not reproducible

Not every status is mandatory for every team. However, the Verified status is the one most teams skip and its absence means bugs get closed by developers rather than confirmed by QA. That gap leads to regressions showing up in production.

Step 2 — Set Up Workflow Transitions by Role

Once statuses exist, configure which roles can move bugs between which statuses. Go to Administration → Workflow. Select the Bug tracker and configure transitions for each role.

A clean bug workflow looks like this:

  • Reporters can create bugs (New) but cannot move them beyond that
  • Developers can move bugs from Confirmed → In Progress → Fixed
  • QA Engineers can move bugs from Fixed → Verified or back to In Progress
  • Project Managers can close Verified bugs and reject invalid reports

As a result, that structure protects process quality. Specifically, a developer cannot mark a bug Verified only QA can. A reporter cannot accidentally close a bug. Each role touches only the transitions that belong to their function.

Additionally, under Administration → Workflow → Fields Permissions, you can configure which fields are required at which status transitions. For example, require the “Steps to Reproduce” field to be filled before a bug moves from New to Confirmed. That single rule eliminates most of the “I can’t reproduce this” back-and-forth.

Step 3 — Add Bug-Specific Custom Fields

In practice, custom fields capture the information that separates a useful bug report from a vague one. Go to Administration → Custom Fields → Issues and create fields for the Bug tracker specifically.

Recommended custom fields for bug tracking:

  • Severity — Critical, High, Medium, Low (list field)
  • Environment — Production, Staging, Development, QA (list field)
  • Browser / OS — for front-end bugs (text field)
  • Steps to Reproduce — ordered reproduction path (long text field)
  • Expected Behaviour — what should happen (long text field)
  • Actual Behaviour — what actually happens (long text field)

These fields appear on the bug creation form. Marking Severity and Environment as required fields means every bug that enters the system arrives with the context needed to triage it immediately. Consequently, developers spend less time asking for information and more time fixing.

Step 4 — Set Up Bug Reporting for Reporters

Not everyone who reports a bug is a developer. A QA engineer, a support agent, or even a client-facing team member may need to log bugs without understanding Redmine’s full interface.

The Redmineflux Issue Template Plugin solves this by pre-filling the bug creation form with structured prompts. When a reporter opens a new Bug issue, they see fields already labelled with guidance “Describe the steps to reproduce this bug” rather than a blank text box. Furthermore, required fields enforce completion before the issue can be saved.

The result is consistent, useful bug reports from all reporters regardless of their technical background. That consistency is what makes triage fast and development productive.

Step 5 — Connect Bugs to QA and Test Cases

Bug resolution is not complete when the fix is deployed. It is complete when QA verifies that the fix works and that the fix did not introduce a regression elsewhere. In Redmine, that verification step belongs in the same system where the bug lives not in a separate spreadsheet.

The Redmineflux Test Case Management Plugin QA workflow and test runs inside your issue tracker links test cases directly to bug issues. When a bug moves to Fixed, the associated test case activates for QA verification. The QA engineer runs the test, logs the result, and moves the bug to Verified all within Redmine.

In this way, that connection closes the loop between development and QA. It means bug resolution has a formal record: what was tested, who tested it, and when verification passed. Moreover, that record matters for release sign-off and for retrospective review of recurring defect areas.

Want to see bug tracking connected to QA sign-off in a live Redmine environment? Book a Free Demo and see the complete workflow running in 30 minutes.

Step 6 — Report on Bugs Across the Project

Once bugs flow through a consistent workflow with structured fields, reporting becomes straightforward. Redmine’s native issue filters let you report bugs by status, severity, assignee, version, or any custom field.

Useful bug reports to run regularly:

  • Open bugs by severity — how many Critical and High bugs are currently unresolved?
  • Bug age report — which open bugs have been sitting in New or Confirmed for more than seven days?
  • Bug resolution rate by sprint — how many bugs were closed versus reported in the last sprint?
  • Bugs by environment — are most issues coming from production or from QA catching them earlier?

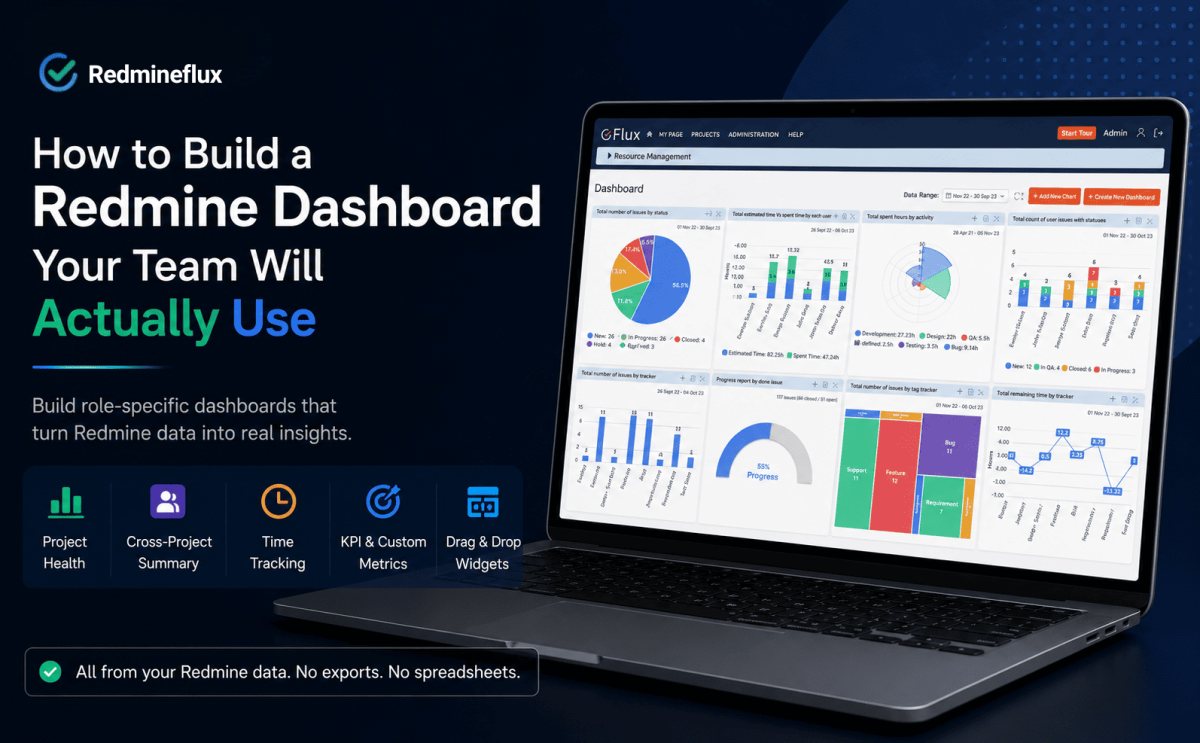
For more advanced reporting across projects, the Redmineflux Custom Dashboard Plugin adds visual bug metrics and project-level summary views. Project managers and engineering leads get the bug data they need without manually filtering the issue list every time.

What Good Bug Tracking Looks Like in Practice

Consider a development team running two-week sprints. Before configuring the Bug tracker properly, bugs came in with varying levels of detail. Some had reproduction steps. Many did not. No one tracked severity. Whoever finished working on a bug closed it with no QA verification step.

After configuration Bug tracker with required fields, role-based workflow, QA verification status, and test case links the same team saw three changes within the first sprint. Bug reports arrived with consistent severity and environment data. Developers stopped asking for reproduction steps because the template enforced them. Regressions dropped because QA verification became a formal step before closure.

Importantly, none of those improvements came from discipline alone. They came from the system making the right behaviour the easy behaviour.

Explore a complete Redmine workflow with bug tracking, QA, dashboards, and release visibility

Common Questions

Does Redmine have a built-in bug tracker?

Yes. Redmine includes a Bug tracker type as part of its native issue tracking model. You can configure its workflow, required fields, and status transitions to match how your team handles bug resolution. The base bug tracking capability ships with Redmine without any additional plugins.

How do I set up severity levels for bugs in Redmine?

Go to Administration → Custom Fields → Issues and create a new list field called “Severity” with values such as Critical, High, Medium, and Low. Assign the field to the Bug tracker and mark it as required. Every bug created after that point must include a severity rating before it can be saved.

How do I make sure bugs are verified by QA before closing?

Configure the workflow so that only the QA role can move bugs from Fixed to Verified, and only the Project Manager role can move bugs from Verified to Closed. Developers cannot bypass QA sign-off because the workflow transition is not available to their role. That single configuration change enforces the verification step without relying on process discipline.

Can Redmine link bugs to test cases for QA verification?

Yes, with the Redmineflux Test Case Management Plugin. Test cases link directly to bug issues. When a bug moves to Fixed, the associated test case activates for QA. The engineer runs the test, logs the result, and moves the bug to Verified all within Redmine, with a formal record of who verified it and when.

How do I report on open bugs by severity in Redmine?

Use the Issues filter on any Redmine project. Filter by tracker = Bug, status = open (or any specific status), and add a filter for the Severity custom field. Save the filter as a named query for repeated use. For cross-project bug dashboards, the Redmineflux Custom Dashboard Plugin adds visual metrics and summary views.

Which Redmine versions do Redmineflux plugins support?

Redmineflux tests and supports all plugins on Redmine 5.0.x, 5.1.x, and 6.0.x. Teams running Redmine 4.x should contact support before purchasing to confirm compatibility.

Bug tracking in Redmine works best when the Bug tracker is configured to match how bugs actually move through the team. Required fields at creation, role-based workflow transitions, QA verification as a formal step, and test case links for sign-off together, these turn Redmine’s issue tracker into a reliable bug management system rather than a shared to-do list.

Book a free demo and see the full Redmine bug tracking and QA workflow running live
Categories
Informational

Self-Hosted vs SaaS Project Management — Which Is Right for Your Team?

The choice between self-hosted and SaaS project management feels like a technical decision. In practice, it is a business decision about who owns your data, how costs scale with team growth, and how much control your organisation needs over its own tooling.

Most teams default to SaaS because it is the path of least resistance. Sign up, configure a workspace, invite the team. No servers, no installation, no maintenance. For many teams, that convenience is genuinely the right trade-off. For others particularly development and IT teams with specific data, compliance, or cost requirements it is a trade-off they later regret.

This guide covers the self-hosted vs SaaS project management question honestly. Both models have real strengths and real limits. The right answer depends on what your team actually values.

What Self-Hosted vs SaaS Project Management Really Means

The short answer: SaaS project management means the vendor hosts your data, manages the infrastructure, and controls the upgrade schedule. Self-hosted means you install the software on your own server and own the data entirely. The key differences are data ownership, pricing model, maintenance responsibility, and long-term cost trajectory. Neither is universally better the right choice depends on team size, compliance requirements, and how much infrastructure ownership your team can manage.

In fact, SaaS and self-hosted are not just different pricing models. They represent fundamentally different relationships between your team and your tooling.

With SaaS, the vendor makes the decisions. They decide when to upgrade the platform, which features to add or remove, and what the pricing looks like next year. Your data lives in their database. If they change their terms, raise prices, or discontinue a feature your workflow depends on, you have two options: accept the change or migrate to something else.

By contrast, with self-hosted software, your team makes the decisions. You control when to upgrade, how the system is configured, and where the data lives. The trade-off is that you or someone on your team also handles maintenance, backups, and server management.

What SaaS Project Management Delivers

SaaS project management tools are genuinely convenient. In fact, setup takes minutes rather than hours. Infrastructure management is entirely the vendor’s responsibility. Updates happen automatically in the background. The vendor handles uptime and security patching your team takes no action.

For small teams with no server management experience, or for organisations where getting everyone onto a tool quickly is the priority, SaaS removes real friction. The onboarding experience for most SaaS tools is polished, the mobile apps are well-maintained, and support is accessible through the vendor directly.

However, convenience comes with trade-offs. Per-seat pricing means costs grow linearly with headcount a team of fifty pays five times what a team of ten pays, even if usage per person stays the same. Advanced features often live behind higher pricing tiers, effectively making the advertised starting price an underestimate of what the team will actually pay. And all of your project data issues, timelines, time entries, documents lives in someone else’s infrastructure.

What Self-Hosted Project Management Delivers

In contrast, self-hosted project management gives your team full ownership. Your data lives in your database, on your infrastructure. You decide when to upgrade, what configuration the system runs, and who has access at the infrastructure level.

For development and IT teams, that ownership matters in several ways. Compliance requirements in regulated industries often mandate data residency the data must stay within specific geographic or organisational boundaries. Self-hosted satisfies that requirement without exception. Audit requirements often extend to the tool itself the ability to inspect database records directly, run custom queries, or export data in any format. Self-hosted makes that straightforward.

Additionally, the cost model works differently. Most self-hosted project management tools charge per installation or per plugin, not per user. A team of fifteen and a team of one hundred pay the same licence fee. As headcount grows, the cost stays flat. Over a three to five year horizon, the total cost of ownership for a growing team on a self-hosted tool is often significantly lower than the equivalent SaaS subscription.

The trade-off is maintenance responsibility. Someone on the team or a managed hosting provider needs to handle server maintenance, database backups, security updates, and version upgrades. For teams without that capacity, the maintenance overhead can offset the cost advantage.

See how Redmineflux gives teams self-hosted control without SaaS limitations

The Five Factors That Usually Decide the Question

Data Ownership

If your organisation has data sovereignty requirements, compliance mandates, or simply a strong preference for keeping project data inside your own infrastructure, self-hosted is the answer. SaaS tools cannot offer genuine data ownership the data lives on vendor infrastructure regardless of what the terms of service say about it.

Cost at Scale

At small team sizes, SaaS pricing is often acceptable. Beyond twenty to thirty people, the per-seat cost compounds significantly. Furthermore, advanced features portfolio planning, workload management, test case management often require higher pricing tiers or separate add-on products. Self-hosted tools with per-installation pricing remain flat as the team grows.

Maintenance Capacity

SaaS removes maintenance overhead entirely. Self-hosted requires server management, update cycles, and backup procedures. Teams with no infrastructure capacity should either choose SaaS or use a managed hosting service that handles the server layer on their behalf keeping the data ownership benefit without the maintenance burden.

Compliance and Security

Regulated industries healthcare, finance, government often have specific requirements around where data sits and who can access it. Self-hosted satisfies these requirements natively. SaaS tools can offer compliance certifications, but the data still lives on third-party infrastructure. For teams with strict compliance requirements, that distinction is not negotiable.

Vendor Dependency

SaaS tools create dependency on the vendor’s roadmap, pricing decisions, and continued operation. If a SaaS vendor raises prices, deprecates a feature, or ceases to operate, migration is your only option and it often happens on a timeline not of your choosing. Self-hosted removes that dependency. The software continues to work regardless of what the vendor does next.

Where Self-Hosted vs SaaS Lands for Development Teams

Consequently, development teams are among the most common users of self-hosted project management tools and for understandable reasons. They have the technical capacity to manage server infrastructure. They work with sensitive code and project data that they prefer to keep within their own systems. And they tend to grow steadily, which makes flat per-installation pricing significantly more attractive over time.

In contrast, non-technical teams marketing, operations, agency delivery tend to favour SaaS because they lack the infrastructure capacity for self-hosted and often prioritise ease of onboarding over data ownership.

Neither preference is wrong. The question is simply which set of trade-offs fits the team that will actually use the tool.

Redmine and Redmineflux — Self-Hosted Without the Compromise

Redmine is the most established self-hosted project management platform for development teams. It is open-source, free to install, and actively maintained. With Redmineflux plugins, it covers the full development workflow sprint boards, Gantt planning, time tracking, QA management, and workload visibility all running on your own infrastructure.

The Agile Board Plugin handles sprint planning and Kanban execution. The Gantt Chart Plugin handles release timelines and dependencies. The Timesheet Plugin handles time reporting and billing exports. Together, they deliver a feature set comparable to SaaS tools at a fraction of the long-term cost.

For teams that want the self-hosted ownership model without managing their own server infrastructure, Redmineflux Managed Cloud provides a hosted Redmine environment where Redmineflux handles maintenance, backups, and upgrades. Your data stays in your database. Redmineflux manages the server layer. It is the middle path between full self-hosted responsibility and full SaaS dependency.

Evaluating self-hosted Redmine for your team? Book a Free Demo see the full Redmineflux workflow running in a live environment in 30 minutes.

A Practical Decision Framework

Use this to cut through the debate:

Choose SaaS if: Your team has no infrastructure management capacity, onboarding speed is the top priority, team size is small and unlikely to grow significantly, and compliance requirements are minimal.

Choose self-hosted if: Data sovereignty or compliance requirements apply, team headcount is growing and per-seat pricing is a long-term concern, your team has server management experience or access to managed hosting, and you want full control over upgrade timing and system configuration.

Choose Redmineflux Managed Cloud if: You want self-hosted data ownership without managing infrastructure. You get all the control benefits of self-hosted and all the convenience benefits of managed hosting with none of the SaaS vendor dependency.

Common Questions

Is self-hosted project management more secure than SaaS?

Self-hosted gives you full control over your security posture infrastructure access, encryption, network isolation, and audit logging are all within your control. SaaS tools often have strong security certifications, but the data still lives on vendor infrastructure. For teams with strict security requirements, self-hosted provides a level of control that SaaS cannot match.

What are the hidden costs of self-hosted project management?

The main costs beyond the software licence are server infrastructure, internal administration time, and occasional upgrade work. These are real costs, but they are predictable and do not scale with headcount. For growing teams, self-hosted total cost of ownership is typically lower than SaaS over a three to five year period.

Can self-hosted project management tools match SaaS on features?

Yes, in most cases. Redmine with the Redmineflux plugin suite covers sprint management, Gantt planning, time tracking, test case management, workload visibility, and dashboards comparable to what most SaaS project management tools offer. The feature gap between leading self-hosted and leading SaaS tools has narrowed significantly over the past five years.

What happens to my data if I switch from SaaS to self-hosted?

Most SaaS tools offer data export in CSV or JSON format. That data can be imported into Redmine using the CSV import feature with field mapping. The migration complexity depends on the number of custom fields and workflow configurations in the SaaS system. Most teams complete the migration within two to four weeks.

Do I need a server to run self-hosted project management?

Yes either your own server or a managed hosting service. Redmineflux Managed Cloud provides a fully managed Redmine environment, so you get the self-hosted data ownership model without the responsibility of running your own server infrastructure.

Which Redmine versions does Redmineflux support?

Redmineflux tests and supports all plugins on Redmine 5.0.x, 5.1.x, and 6.0.x. Teams running Redmine 4.x should contact support before purchasing to confirm compatibility.

Ultimately, self-hosted and SaaS are not opposites they are different trade-offs. SaaS wins on convenience and onboarding speed. Self-hosted wins on data ownership, long-term cost, and control. For development and IT teams with growing headcount and data ownership requirements, self-hosted project management on Redmine with Redmineflux is the more practical long-term choice.

Compare the long-term cost of SaaS vs self-hosted project management with our team
Categories
Informational

How to Run a Sprint in Redmine — A Step-by-Step Guide

Redmine is not a Scrum tool by default. It does not ship with sprint boards, velocity tracking, or a structured backlog. Teams that try to run agile sprints using only the built-in feature set typically end up tracking sprint work in a version, watching the Gantt chart, and updating a spreadsheet on the side.

In practice, that approach works in the way that a workaround always works until the team grows, the sprint gets more complex, or the project manager needs reliable velocity data for planning.

Fortunately, Redmine handles sprints very well with the right setup. This guide walks through how to run a sprint in Redmine from initial backlog grooming through sprint review including what the Redmineflux Agile Board Plugin adds at each stage.

What Running a Sprint in Redmine Actually Involves

The short answer: Running a sprint in Redmine means using Versions to define sprint boundaries, Issues to represent sprint work, and a backlog view to plan what enters each sprint. With the Redmineflux Agile Board Plugin, you also get a visual sprint board, WIP limits, velocity tracking, and drag-and-drop sprint planning all working directly on top of your existing Redmine issues.

Before setting up the first sprint, it helps to understand how Redmine’s native structure maps to agile concepts. In Redmine, a Version represents a sprint or release. Issues get assigned to a Version to indicate which sprint they belong to. The backlog is the set of issues not yet assigned to any version.

That structure is the foundation. Everything else the board, the velocity chart, the sprint review builds on top of it.

Step 1 — Set Up Your Sprints as Versions

In Redmine, go to Project → Settings → Versions → New Version. Give the version a sprint name for example, “Sprint 1” or “Sprint 2026-05.” Set a start date and a due date that match your sprint length. Two-week sprints are standard, but Redmine supports any length.

Next, repeat this for each upcoming sprint. In practice, most teams create three to four sprints ahead so the backlog grooming session has somewhere to assign issues. In fact, you do not need every sprint planned in detail just the version names and dates.

Step 2 — Build the Backlog

The backlog in Redmine is all issues in the project that have no version assigned. To build a usable backlog, create issues for every piece of work the team is tracking bugs, features, tasks, and anything else. Specifically, each issue should have a subject, a tracker type, and a priority. Assignees and estimates can come later.

With the Redmineflux Agile Board Plugin, the backlog view shows all unassigned issues in priority order. Additionally, Story Points appear on each card if the team estimates in points. The backlog is sortable, filterable, and directly actionable you drag issues from the backlog into the sprint column to add them to the current sprint.

Without the plugin, you can still manage the backlog by filtering the issue list by “no version” and sorting by priority. It is less visual, but the underlying data structure is the same.

Want to see the sprint board and backlog in action? Book a Free Demo see a live Redmine environment with the full sprint workflow running in 30 minutes.

Step 3 — Run the Sprint Planning Session

Sprint planning in Redmine means deciding which backlog issues move into the current sprint version. Open the sprint planning view in the Agile Board Plugin it shows the backlog on one side and the current sprint on the other. Drag issues across as the team commits to them.

As each issue enters the sprint, confirm the assignee, the estimate, and the acceptance criteria. If issues do not have Story Points yet, this is the moment to add them. As a result, the plugin shows running sprint totals so the team can see immediately when the sprint is at capacity.

For teams using Redmine without the plugin, move issues into the sprint by editing each issue and setting its version to the current sprint. The process is the same it just requires more individual edits rather than drag-and-drop.

Step 4 — Run the Sprint Board

Once the sprint is planned, the Agile Board Plugin provides the board view the team uses for daily standups and status tracking. Specifically, each column represents a workflow status typically New, In Progress, In Review, QA, and Done. Issues move across the board as work progresses.

WIP limits keep the board honest. If the team sets a limit of three issues in the In Progress column, the board shows a warning when that limit is hit. That visible constraint is what prevents the common pattern of ten issues “in progress” with none actually moving.

The board updates in real time. When a developer moves an issue to In Review, the QA engineer sees it immediately without checking in or waiting for a daily update. That visibility is what makes the sprint board genuinely useful rather than ceremonial.

Step 5 — Track Progress During the Sprint

During the sprint, the team uses the board for day-to-day status and the burndown chart for progress tracking. Moreover, the plugin generates the burndown chart automatically no manual updates needed. It shows whether the sprint is on track or accumulating scope debt.

Additionally, the Gantt Chart view complements the sprint board for longer delivery horizons. If the current sprint is part of a larger release, the Gantt Chart Plugin shows how the sprint’s completion date fits into the release timeline. Dependencies between issues become visible before they block the sprint.

For time-sensitive projects, the Timesheet Plugin logs hours against sprint issues and surfaces effort data during sprint review. When velocity data combines with actual time logged, the team gets a much more accurate picture of what a sprint genuinely costs.

Step 6 — Run the Sprint Review and Close the Sprint

At the end of the sprint, close completed issues and move any unfinished work back to the backlog or forward into the next sprint. In the Agile Board Plugin, closing the sprint updates the version status to Closed and removes completed issues from the active board. Unfinished issues remain open and appear in the backlog for the next planning session.

The sprint review is also the moment to check velocity. The plugin records the Story Points completed in each sprint. Over three to four sprints, the team’s average velocity becomes reliable enough to use for planning. When sprint five’s planning session opens, the team knows roughly how many points the sprint can hold based on what sprints two through four actually delivered, not on optimistic estimates.

Furthermore, the sprint retrospective happens outside the tool, but the data for it comes from inside. Burndown shape, velocity trend, issue type breakdown, and time logged all sit in Redmine. The retrospective becomes a data-informed conversation rather than a memory exercise.

What the Agile Board Plugin Adds at Each Stage

The native Redmine structure handles the data layer of sprint management. However, the Agile Board Plugin sprint boards, backlog planning, and velocity tracking for Redmine adds the workflow layer that makes the data usable day-to-day.

At planning, it adds drag-and-drop sprint assignment and Story Point capacity visibility. During the sprint, it adds the board view, WIP limits, and burndown tracking. At review, it adds velocity history and sprint close workflow. Together, these transform Redmine from a capable issue tracker into a complete Scrum environment without moving issues into a separate redmine combo sprint tool or maintaining data in two places at once.

A Real Sprint Example

Consider a seven-person development team running two-week sprints. They have a backlog of forty issues a mix of features, bugs, and tasks. Their average velocity over the last three sprints is thirty-two Story Points.

At planning, the team opens the sprint board and drags issues from the backlog into Sprint 8 until the total reaches thirty-two points. The team assigns issues, confirms estimates, and checks acceptance criteria. In total, the planning session takes forty-five minutes.

During the sprint, the board runs the daily standup. Each morning, developers move their issues across columns and flag blockers. The burndown chart tracks daily progress. By day eight, the chart shows the sprint is two days behind. As a result, the team adjusts pulling in a smaller issue, deferring a larger one and finishes on time.

At review, the sprint closes with thirty Story Points completed. Velocity stays consistent. The retrospective identifies one recurring blocker. The next sprint’s planning session starts with that blocker already on the agenda to resolve.

That is what a well-run sprint in Redmine looks like in practice.

Common Questions

Does Redmine support sprint planning natively?

Redmine uses Versions to define sprint boundaries and Issues to represent sprint work. The native backlog and sprint structure is functional but not visual. The Redmineflux Agile Board Plugin adds drag-and-drop sprint planning, a visual board, WIP limits, Story Points, and velocity tracking on top of the native structure.

How do I create a sprint in Redmine?

Go to Project → Settings → Versions → New Version. Name the version after your sprint, set a start date and due date, and save. Issues assigned to that version belong to the sprint. With the Agile Board Plugin, you assign issues to sprints by dragging them from the backlog into the sprint column during planning.

Can Redmine track velocity for sprint planning?

Yes, with the Redmineflux Agile Board Plugin. The plugin records Story Points completed in each sprint and displays velocity history across sprints. After three to four sprints, the average velocity becomes a reliable planning input for future sprint capacity decisions.

How do I handle unfinished issues at the end of a sprint?

At sprint close, move unfinished issues back to the backlog or forward into the next sprint version. The Agile Board Plugin handles this during the sprint close workflow you choose what to do with each incomplete issue before the sprint officially closes.

What is the difference between a Redmine Version and a sprint?

In Redmine, a Version is the native container for grouped work. When used for sprints, a Version defines the sprint start and end dates and holds all the issues committed to that sprint. The Agile Board Plugin treats Versions as sprints and builds the board, backlog, and velocity chart around that structure.

Which Redmine versions does the Agile Board Plugin support?

Redmineflux tests and supports the Agile Board Plugin on Redmine 5.0.x, 5.1.x, and 6.0.x. Teams running Redmine 4.x should contact support before purchasing to confirm compatibility.

Overall, Redmine handles sprints well when set up correctly. The data structure Versions as sprints, Issues as work items, the backlog as unassigned issues is solid. The Agile Board Plugin adds the visual and workflow layer that makes that structure usable for a real Scrum team day-to-day. Together, they cover the full sprint cycle from planning through review without any data living outside Redmine.

Explore Managed Cloud — Redmine with the full plugin suite pre-configured

Categories
Informational

Getting Started — How to Setup Redmine and Configuration Guide

Knowing how to set up Redmine correctly from the start saves weeks of reconfiguration later. In fact, Redmine’s flexibility is its greatest strength and its biggest challenge. A blank Redmine installation presents dozens of configuration options, and the order in which you make those decisions shapes how well the system works for your team.

Specifically, this guide walks through the essential setup steps in the right order: installation, project structure, trackers, workflows, user roles, and plugins. By the end, your team has a working Redmine environment configured for real project work not a default installation they have to figure out on their own.

How Do You Set Up Redmine for the First Time?

The short answer: Setting up Redmine involves five steps in order — install Redmine on a server (or use Redmineflux Managed Cloud), configure global settings, create your project structure and trackers, set up user roles and permissions, then configure issue workflows. Plugins that extend Redmine’s capabilities Agile boards, Gantt charts, timesheets are added after the core configuration is complete. Each step builds on the previous one; skipping ahead creates configuration debt.

Step 1 — Install Redmine or Use Managed Cloud

Self-hosted installation requires a Linux server (Ubuntu or CentOS recommended), Ruby, a database (MySQL or PostgreSQL), and Passenger or Puma as the application server. The official Redmine installation guide covers the process in detail. Plan for 2–4 hours of setup time and ongoing server maintenance.

Redmineflux Managed Cloud eliminates the installation step entirely. Specifically, your Redmine environment is provisioned, configured, and running with all Redmineflux plugins pre-installed within minutes. No server setup, no plugin installation, no version management. For teams that want to start tracking work quickly without infrastructure overhead, Managed Cloud is the practical starting point.

Step 2 — Configure Global Settings

After installation, configure the global settings before creating any projects or users.

Go to Administration → Settings and review:

  • Application title — set your organisation or team name
  • Host name — set the public URL of your Redmine instance (used in email notifications)
  • Text formatting — choose Markdown or Textile (most teams choose Markdown for its readability)
  • Email notifications — configure your SMTP server for outbound email
  • Authentication — set password policy, session duration, and whether self-registration is allowed

Getting these right at the start avoids reconfiguring notifications and authentication after users are already active. Additionally, without SMTP configured here, assignees will not receive email alerts when issues are created or updated. Consequently, email setup should be your first action before adding any team members.

Step 3 — Create Your Tracker Types

Trackers are the issue types in Redmine Bug, Feature, Task, Support, and any custom types your team needs. Furthermore, each tracker can have its own fields, workflow, and permissions.

Go to Administration → Trackers → New Tracker.

A standard development team setup uses four trackers:

  • Bug — defects found in testing or production
  • Feature — new functionality requests
  • Task — internal work items and technical tasks
  • Support — client or internal support requests (if not using the Helpdesk Plugin)

Create only the trackers your team will actually use. Each additional tracker creates maintenance overhead for workflows and permissions. Consequently, starting with three to four trackers is almost always the right call.

Step 4 — Define Issue Statuses and Workflows

Issue statuses represent the stages an issue moves through from creation to resolution. Go to Administration → Issue Statuses → New Status.

A minimal effective workflow for development teams:

New → In Progress → In Review → Resolved → Closed

Additionally, add a Rejected status for issues the team declines without resolution.

After creating statuses, configure the workflow which transitions each role can make per tracker. Go to Administration → Workflow. Select a tracker and a role, then define which statuses that role can move issues to.

This is where most teams underinvest. In practice, a developer should move issues from New to In Progress but not from In Review directly to Closed without QA approval. Define these constraints here they enforce your team’s process without requiring manual policing.

Step 5 — Set Up Roles and Permissions

Redmine’s role system defines what each type of user can see and do. Go to Administration → Roles and Permissions → New Role.

Typical roles for a development team:

  • Manager — full access including user management, version management, and project configuration
  • Developer — can create, edit, and close issues; log time; comment
  • Reporter — can create and comment on issues; cannot edit or close
  • Viewer — read-only access (useful for clients or stakeholders)

Moreover, configure permissions for each role carefully. The most common setup mistake is giving all users Manager permissions this removes the governance that makes Redmine useful at scale. As a result, restrict Manager access to project leads and IT administrators from the start.

Step 6 — Create Your First Project

Go to Projects → New Project. Fill in:

  • Name — the project name as it appears in navigation
  • Identifier — the URL slug (e.g., “mobile-app” → redmineflux.com/projects/mobile-app)
  • Trackers — select which trackers this project uses
  • Modules — enable the features this project needs (Issue Tracking, Time Tracking, Wiki, Repository, etc.)

Add team members under Project → Settings → Members and assign each member their role.

Next, create Versions (Project → Settings → Versions) for your first sprint or release milestone. Versions act as sprint containers when using the Agile Board Plugin and as milestone markers when using the Gantt Chart Plugin.

Step 7 — Add Plugins for Your Team’s Workflow

Redmine’s default installation covers issue tracking, time logging, and documentation. However, for development teams that need agile boards, Gantt planning, timesheet approvals, and workload visibility, plugins add these capabilities without replacing the core system.

The Redmineflux plugins most commonly added at setup:

  • Agile Board — Kanban boards, Scrum sprints, WIP limits
  • Gantt Chart — release planning with dependencies and baselines
  • Timesheet — time tracking with approval workflows and billing reports
  • Workload — team capacity visibility across projects
  • Issue Template — standardised issue creation per tracker type
  • Notification — in-app alerts and condition-based notification rules

For teams on Managed Cloud, the Redmineflux team pre-installs all plugins. No additional installation steps are required.

Prefer a guided setup rather than self-configuration? Book a Free Demo → — the Redmineflux team walks through project setup, workflow configuration, and plugin installation in 30 minutes.

Common Configuration Mistakes to Avoid

Too many trackers. Every tracker needs a configured workflow. Start with three to four trackers. Add more only when there is a genuine need that existing trackers cannot meet.

No workflow constraints. Leaving workflow transitions unrestricted means anyone can move any issue to any status. Consequently, define at least the key transitions (who can close issues, who can move to resolved) from the start.

Giving everyone Manager access. Manager access allows project restructuring, user management, and configuration changes. Restrict this to the people who actually need it typically project leads and IT administrators.

Not configuring email notifications. Without email configured, assignees do not receive alerts when issues are created or updated. Therefore, configure SMTP settings in Step 2 before creating users.

Common Questions
How do I set up Redmine for my team?

Install Redmine on a server or use Redmineflux Managed Cloud. Configure global settings (host name, email, authentication). Create trackers and issue statuses. Define workflow transitions per tracker and role. Set up user roles and permissions. Create your first project with versions for sprints or milestones. Finally, add plugins for agile boards, Gantt charts, and timesheets as needed.

How long does it take to set up Redmine?

A self-hosted Redmine installation takes 2–4 hours for server setup, plus 2–3 hours for project configuration. In contrast, Redmineflux Managed Cloud eliminates the server setup project configuration for a new team takes approximately 2–3 hours from first login to first active issue.

What are the first things to configure in Redmine?

In order: global settings (email, host name), trackers, issue statuses and workflows, roles and permissions, first project structure, and team member access. Specifically, add plugins only after the core configuration is stable.

Do I need technical skills to set up Redmine?

Self-hosted Redmine installation requires Linux server experience. For Redmineflux Managed Cloud, however, you need no technical skills the Redmineflux team handles provisioning and configuration. Project configuration (trackers, workflows, roles) involves no technical skills and runs through the Redmine admin interface.

Overall, Redmine rewards teams that invest in setup. A well-configured Redmine environment right trackers, clear workflows, appropriate role permissions, and the plugins that match your delivery process runs without friction. In short, the setup work done in week one determines how useful the system is in week fifty.

Explore the Full Plugin Suite — add Agile boards, Gantt, Timesheet, and more

Related Reading


Categories
Informational

Redmine Time Tracking Best Practices — Log Hours Your Team and Clients Can Trust

The problem is never the tool. It is always the habits behind it.

In fact, most teams turn on Redmine time tracking on day one and never revisit the setup. Engineers log hours. Managers pull reports. Finance exports to a spreadsheet and manually cleans the data before billing. However, that gap between what Redmine records and what your team can actually use is entirely fixable. It does not require a new tool. It requires consistent habits and the right structure from the start.

What Are Redmine Time Tracking Best Practices?

Log time against issues (not projects), define activity types before anyone starts logging, add a comment on every entry, log on the same day work happens, run weekly spent time checks, and separate billable from non-billable work. These seven habits produce time data that managers, finance teams, and clients can trust.

Why Most Redmine Time Logs Cannot Be Trusted

The issue is not Redmine. Instead, the issue is that most teams configure time tracking without agreeing on what they are actually measuring.

Here is what inconsistent time logging looks like in practice:

  • Wrong level — one engineer logs against the issue, another logs against the project
  • Random activities — “Design” used for development work, “Support” used for team meetings
  • Memory logging — hours entered Friday afternoon for a full week of work
  • Empty comments — “Working on this.” “Done.” No context, no record
  • No review — time is submitted and never checked until billing runs into a problem

When any of these habits exist, no report Redmine produces is reliable. As a result, a delivery manager asking “how long did this feature take?” cannot trust the answer. A finance team asking for billable hours has to rebuild the data before they can use it.

Fortunately, the fix is seven habits, applied consistently.

Step 1 — Define Activity Types Before Anyone Logs a Single Hour

Redmine time tracking organises entries by activity type. However, most teams leave the defaults unchanged and never agree on what each activity actually means. That is the first thing to fix.

Set up a short, clear list of activities that maps to how your team works:

Activity What it covers
Development Writing, reviewing, or debugging code
Design UI, UX, wireframes, visual assets
Testing QA, test case execution, bug verification
Project Management Planning, standups, status reporting
Client Communication Calls, emails, written updates to clients
Documentation Specs, guides, internal documentation
Support Handling tickets or post-delivery issues

Keep the list to 6–8 activities maximum. In practice, every activity your team has to think about before selecting is an activity that will be chosen incorrectly.

Admin: Set your activity list under Administration → Enumerations → Activities. Disable any defaults that do not match your workflow.

Step 2 — One Rule: Log Time on the Issue, Never the Project

Redmine allows time to be logged against a project or against a specific issue. However, most teams mix both without realising it.

Consequently, project-level time logging gives you a number with no context. You know 12 hours went into the project. You do not know what those hours were for. That data cannot support sprint reviews, client billing, or delivery planning.

Set one rule and enforce it log time against the issue, always. If there is no issue for the work, create one before logging. As a result, this single change makes every spent time report meaningful, because every hour traces back to a specific piece of work.

Step 3 — A Comment on Every Time Entry. No Exceptions.

The comment field in Redmine’s time entry is marked optional. However, treat it as required.

A useful time entry has three things: hours, the right activity, and a comment that explains what was done.

Weak Strong
“Development work” “Refactored API authentication — removed deprecated token method”
“Done” “QA pass on invoice export — 3 bugs filed, 2 resolved”
“Meeting” “Sprint planning — agreed scope for release 2.4, updated issue priorities”

One sentence is enough. In fact, that sentence is what transforms a log entry into a record your team can stand behind during a client review, a sprint retrospective, or an audit.

Get a free demo of the Redmineflux Timesheet Plugin →

Step 4 — Log on the Day. Not at the End of the Week.

End-of-week time logging is the most common accuracy problem in Redmine time tracking.

Specifically, hours logged from memory are consistently inaccurate. By contrast, same-day entries are more precise. A developer who logs daily gives you data you can rely on. A developer who reconstructs a full week on Friday afternoon gives you an estimate dressed as a record.

Set a clear team norm log time on the day the work happened.

For teams where this feels like friction, the Redmineflux Time Tracker Desktop App lets engineers log time directly from their desktop without opening a browser or navigating to the Redmine issue. As a result, the barrier to daily logging drops to a single click.

Step 5 — Run the Spent Time Report Every Week

Most teams run time reports at the end of the month when they need the numbers for billing. By then, errors are baked in and corrections take time.

In contrast, a weekly check takes 10 minutes. Correcting a month of bad data takes much longer.

At the end of each week, pull the spent time report and scan for:

  • Missing entries — someone forgot to log for two days
  • Unusual spikes — an engineer logged 16 hours on a single day
  • Activity mismatches — QA work logged under Development
  • Blank comments — entries with no usable context

In Redmine: Project → Spent Time → Filter by this week. Export to CSV if you need to share it or keep a weekly record.

Step 6 — Separate Billable from Non-Billable Work

Redmine does not distinguish between billable and non-billable time by default. For teams that bill clients, this separation must therefore come from your activity setup or from a plugin.

The manual approach — paired activity names:

Billable Non-Billable
Development (Billable) Development (Internal)
Testing (Billable) Testing (Internal)
Client Communication Team Communication

This works for small teams with simple billing. However, for teams managing multiple clients at different rates, manual activity naming becomes difficult to maintain and easy to get wrong.

The Redmineflux Timesheet Plugin handles billable classification and per-user billing rates directly without building workarounds into your activity list. Billing rates are set per user or role. Additionally, reports export in client-ready format. No spreadsheet cleanup required.

See how the Timesheet Plugin handles client billing →

Step 7 — Add an Approval Step Before You Bill Anything

If a manager reviews work before invoicing, Redmine’s native spent time report is not built for that workflow. It shows the data. However, it does not let anyone approve or reject it.

Teams that need an approval step use one of two approaches:

Option A — Manual export: Export to spreadsheet, mark rows as approved, send to finance. Workable for very small teams. Difficult to scale. Error-prone.

Option B — Structured approval inside Redmine: The team submits time entries, a manager reviews and approves or returns them all inside Redmine. Approved entries lock. Rejected entries go back with a reason. Finance gets a clean export.

If your process involves client billing, payroll reporting, or regular timesheet sign-off, Option B removes the spreadsheet and keeps every step in one place.

What Accurate Redmine Time Tracking Actually Looks Like

When these seven habits are in place, your time reports become genuinely useful:

  • A project manager sees exactly how long each issue took — not just a project total
  • A delivery lead compares estimated hours against actual hours per sprint — reliably
  • A finance team exports billable hours without cleanup before invoicing
  • A client receives a report that reflects reviewed, approved effort — not raw entries

Ultimately, none of this requires replacing Redmine. It requires consistent habits and when the manual approach reaches its limit the right plugin to handle the approval and billing layer.

Explore the Redmineflux Timesheet Plugin — from $499 →

FAQ

What are the most important Redmine time tracking best practices?

Log time against issues not projects, define a short clear list of activity types before anyone starts logging, require a comment on every entry, log on the same day the work happens, and run a weekly spent time check. These five habits produce time data your team, managers, and clients can rely on.

Can I enforce time tracking standards in Redmine without a plugin?

You can set expectations through team policy required comments, daily logging norms, agreed activity types. However, Redmine does not have built-in validation that blocks blank comments or enforces same-day entry. For structured enforcement with submission deadlines and approval workflows, you need a timesheet plugin.

What is the difference between Redmine spent time and a timesheet?

Spent time is Redmine’s raw log hours recorded against issues and projects. A timesheet, however, is a structured, period-based view of that data with a submission and approval workflow. Redmine provides the former natively. The Redmineflux Timesheet Plugin provides the latter with approval routing, billing rate assignment, and locked entries after sign-off.

How do I export a billable hours report from Redmine?

Filter the spent time report by project, date range, and your billable activity types, then export to CSV. For automated billable reports with per-client rates and client-ready formatting, the Redmineflux Timesheet Plugin generates this directly no manual formatting required.

Does Redmine time tracking work across multiple projects?

Yes. The spent time report filters across all projects or scopes to a single one. Furthermore, cross-project time visibility in one unified view is one of Redmine’s structural advantages over single-project tools.

Key takeaway: Redmine time tracking is only as reliable as the habits behind it. Define activities. Log to issues. Write comments. Log daily. Check weekly. Separate billable work. Add approval before billing. When the manual approach reaches its limit, the Redmineflux Timesheet Plugin handles the rest.

Start a free demo → · Explore Managed Cloud →
Categories
Informational

What Is Redmine? A Plain-English Guide for Project Managers

If your team evaluates project management software, Redmine comes up quickly. Development teams at software companies, government agencies, and engineering firms worldwide use it to manage projects, track issues, and coordinate work. In fact, it remains one of the most widely deployed open-source project management platforms available today.

However, “free, open-source project management software” is a description, not an explanation. Project managers evaluating Redmine want to understand what it actually does in practice what problems it solves, where it falls short, and whether it fits their team’s way of working.

This guide answers those questions plainly.

What Is Redmine?

The short answer: Redmine is free, open-source project management software built around structured issue tracking. Teams use it to create projects, break work into issues, assign them to team members, track status, log time, and manage versions. It runs on your own server under the GNU GPL licence. Redmine does not do Kanban boards, Gantt charts with dependencies, or custom dashboards natively those capabilities come from plugins.

Redmine was first released in 2006 by Jean-Philippe Lang. It runs on Ruby on Rails and uses a relational database (MySQL, PostgreSQL, or SQLite) to store project data. Since its release, its maintainers have kept it actively updated, and it now ranks among the most widely deployed open-source project management platforms in the world.

The core of Redmine is the issue. Everything else projects, trackers, statuses, priorities, categories, versions, time logs exists to describe, organise, and report on issues. If your team’s work can be expressed as a set of tasks with statuses and assignees, Redmine can manage it.

What Does Redmine Do Well?

Redmine’s strengths are consistent and have stayed that way across nearly two decades of active use.

Structured Issue Tracking

Redmine’s issue tracker is its strongest feature. Each issue carries a type (tracker), a status, a priority, an assignee, a due date, estimated time, and custom fields. Teams can also relate issues to each other blocks, duplicates, relates to, precedes. Each issue holds a full comment and history log, and Redmine records every change automatically.

For development teams managing requirements, bugs, features, and tasks, this structure gives teams exactly what they need. Consequently, issues do not disappear or change without a full audit trail.

Multiple Projects with Role-Based Access

Redmine supports an unlimited number of projects. Each project carries its own issue tracker, wiki, repository integration, news feed, and forum. Furthermore, team members can participate in multiple projects simultaneously with different roles developer on one project, reporter on another.

Role-based access control is granular. Project administrators define what each role can see and do: create issues, edit issues, manage versions, assign to others, delete, export. As a result, organisations managing several client projects or internal products simultaneously gain clear governance without added complexity.

Time Tracking and Reporting

Every issue in Redmine accepts time entries directly. Developers log hours by activity type development, testing, support against the relevant issue. Redmine then aggregates this data into time reports filterable by project, user, activity, version, and date range.

As a result, teams billing by project or managing budgets against estimated time gain accurate project-level visibility without a separate tool.

Wiki and Documentation Per Project

Every Redmine project includes a built-in wiki. Teams use it to document requirements, architecture decisions, onboarding processes, and meeting notes stored in the same place as the issues they relate to. Additionally, the wiki is searchable and versioned, so teams can track how documentation evolves over time.

See how Redmine works in a fully configured project environment

Repository Integration

Redmine integrates with Git, Subversion, Mercurial, and other version control systems. When commits reference issue numbers in their message, those commits automatically appear in the issue history. As a result, teams can trace which code changes relate to which issues without ever leaving Redmine.

What Redmine Does Not Do Natively

However, Redmine’s default installation has clear gaps that development teams encounter quickly.

No Kanban board. Redmine shows issues in list views with filters there is no visual board, no drag-and-drop status update, and no WIP limit. Consequently, teams that want a Kanban workflow must add a board plugin or run a parallel tool.

No Gantt chart with dependencies. Redmine includes a basic Gantt view that shows issues as bars on a timeline. However, it is read-only and carries no dependency links between issues. You cannot drag to reschedule. For release planning that involves task dependencies and milestone tracking, therefore, the native Gantt falls short.

No custom dashboards. Every user sees a “My page” view with a fixed set of widgets assigned issues, reported issues, a calendar. In practice, there is no project health dashboard, no cross-project summary, and no configurable KPI view.

No sprint containers. Redmine has no native sprint or iteration concept. Teams running Scrum typically use Redmine versions as sprint proxies, which works, but this approach lacks sprint burndown tracking, backlog prioritisation, and story point management.

No in-app notifications. Redmine sends email notifications for issue changes, but there is no in-app notification feed. As a result, developers who are not monitoring email miss updates until they return to the issue manually.

Who Uses Redmine?

Teams across a wide range of industries and use cases run Redmine. The most common examples are:

Software development teams — tracking features, bugs, and releases across product or service code. Redmine fits naturally into development workflows because its issue structure maps directly to software work: requirements become issues, bugs become issues, and pull request reviews become issues.

IT and operations teams — managing internal IT requests, infrastructure changes, and support tickets. Redmine’s role-based access and project structure helps IT departments manage multiple systems simultaneously without overlap.

Engineering and manufacturing teams — tracking engineering change orders, compliance tasks, and project milestones. Redmine’s custom fields and flexible tracker configuration let non-software teams adapt it to their specific workflows.

Agencies and consultancies — managing client projects with time tracking and milestone visibility. The per-project structure and time reporting make Redmine particularly useful for agencies that need to track work and time separately per client.

Explore Redmine with sprint boards, dashboards, Gantt charts, and workflow plugins included

Redmine vs Commercial Alternatives

The most common question project managers ask after understanding Redmine is how it compares to Jira, Azure DevOps, or ClickUp.

In short, Redmine trades commercial features for control and cost. It does not have the polish or built-in integrations of a $15-per-user-per-month SaaS product. It also requires a server, plugin management, and occasional maintenance. In return, however, your team owns the data, pays nothing per user, and can extend Redmine’s functionality without vendor permission.

For teams that need structured issue tracking, time reporting, and multi-project governance without per-user SaaS costs, Redmine is a strong fit. For teams that need deep integrations with Slack, Salesforce, and cloud CI/CD pipelines out of the box and have the budget for per-user SaaS pricing a commercial alternative may be faster to get running.

Ultimately, the decision comes down to control and cost versus convenience and integrations.

What Is Redmineflux?

Redmineflux is Redmine with a full plugin suite pre-integrated and configured and optionally hosted.

Specifically, the Redmineflux plugin suite adds the capabilities Redmine does not have natively: a Kanban and Scrum board, a Gantt chart with dependencies, custom dashboards, timesheet approval workflows, workload visibility, knowledge base management, test case management, and more.

Teams that prefer to self-host can buy Redmineflux plugins as individual licences. Teams that want infrastructure handled can choose Redmineflux Managed Cloud, which provides a fully hosted Redmine environment with all plugins pre-installed.

As a result, teams get a Redmine installation ready to use from day one without plugin compatibility research, server configuration, or manual updates.

Common Questions

Is Redmine free?

Yes. Redmine itself is free and open-source, released under the GNU GPL. There is no per-user fee and no licence cost for the core software. Running Redmine does require a server and technical setup. For extended functionality, teams can separately purchase plugins such as the Redmineflux suite.

Is Redmine still actively maintained?

Yes. Redmine receives regular updates from its maintainers. Currently, version 5.x and 6.x are the supported releases. The project also carries an active community and a consistent release history since 2006. Enterprise teams should therefore check plugin compatibility before upgrading Redmine versions.

Is Redmine cloud-based or self-hosted?

Redmine is self-hosted by default you install it on a server you control. However, cloud-based options exist, including Redmineflux Managed Cloud, where the Redmineflux team manages the infrastructure and provides a fully hosted environment with all plugins pre-installed.

How many users can Redmine support?

Redmine scales to hundreds of users on appropriately sized infrastructure. Notably, licensing is not per-user you pay nothing per seat regardless of team size. Performance at scale therefore depends on server resources, not the software licence.

Can Redmine be used for non-software projects?

Yes. Teams can adapt Redmine’s trackers, custom fields, and workflow configuration to any structured project management use case IT operations, engineering projects, content production, and compliance tracking. In practice, the issue structure is flexible enough to represent most types of structured work.

Overall, Redmine is one of the most proven open-source tools in project management. It handles structured issue tracking reliably, scales across multiple projects and teams, and gives organisations full control over their data. Its limitations no visual boards, no Gantt with dependencies, no custom dashboards are well-understood, and the Redmineflux plugin suite addresses all of them directly.

If your team is evaluating Redmine as a foundation, the question is not whether Redmine works. It does. Instead, the question is whether the default installation covers your workflow or whether a configured, extended version is the right starting point.

Book a free demo and explore a complete Redmine workflow running live!


Categories
Informational

Redmine Test Case Management — How to Track QA and Testing in Redmine

Development teams that use Redmine for issue tracking eventually face the same problem when QA work grows: Redmine tracks bugs well, but it was not built to manage test cases. There is no test plan structure, no test run container, no pass/fail result per test case, and no direct link from a failed test case to the bug it created. As a result, QA teams work around this by writing test cases as issues, using custom fields to approximate results, and managing test coverage in spreadsheets alongside Redmine.

The result is two parallel systems Redmine for development work, a spreadsheet for QA that drift apart over time and give no one a clear picture of release readiness.

The Redmineflux Testcase Management Plugin adds structured test management directly inside Redmine. Test plans, test cases, test runs, and result tracking sit in the same system as your development issues. QA leads can link a failed test case to a bug issue in one action. Project managers can see test coverage and pass rates without leaving Redmine.

Does Redmine Have Built-In Test Case Management?

The short answer: Redmine does not have built-in test case management. Its issue tracker handles bug reporting and task tracking but has no test plan, test run, or pass/fail result structure. The Redmineflux Testcase Management Plugin is a dedicated Redmine testing plugin that adds structured test management to Redmine test plans, test case libraries, test run execution, pass/fail/blocked tracking, and bug linking within your existing Redmine instance.

Redmine’s issue tracker is flexible enough that some teams create a “Test Case” tracker type and use custom fields to record expected results, actual results, and test status. This approach works at small scale 20 to 50 test cases across one or two projects but breaks down as coverage grows. There is no aggregated pass rate, no run history, and no structured relationship between test cases and the versions being tested.

What the Testcase Management Plugin Adds

The Redmineflux Testcase Management Plugin introduces a dedicated test management layer to Redmine without replacing the issue tracker. Both systems issue tracking for development, test management for QA operate within the same Redmine instance and share the same projects, members, and versions.

Test Case Library

The plugin adds a test case library to each project. Each test case includes:

  • Title — the name of the test scenario
  • Description — steps to execute and expected result
  • Category — grouping by feature, module, or test type (regression, smoke, functional)
  • Priority — critical, high, normal, low

Importantly, test cases in the library are reusable. The same test case can appear in multiple test plans and run across different versions. Updating a test case in the library applies the change to all future runs automatically.

Test Plans

A test plan groups a set of test cases for execution against a specific version or release. For a v2.4 release, the QA lead creates a test plan, selects the relevant test cases from the library, and assigns the plan to the version being tested.

In practice, test plans give project managers a clear scope: here are the test cases that must pass before this version ships. Before the plugin, teams typically managed this scope in a spreadsheet separate from Redmine.

Test Run Execution

When a QA engineer executes a test plan, the plugin creates a test run. Each test case in the run shows its current execution status:

  • Not Run — not yet started
  • Pass — executed and passed
  • Fail — executed and failed
  • Blocked — unable to execute due to a dependency or environment issue

During execution, the QA engineer updates each test case status. The plugin records the time and user for every result update. The plugin also retains the full test run history for any future reference.

Bug Linking from Failed Test Cases

When a test case fails, the QA engineer can create a Redmine bug issue directly from the failed test case record. The plugin pre-links the new issue to the test case, so the relationship between failure and bug is visible in both directions.

As a result, this removes a manual step that most teams forget linking bugs back to the test cases that found them and gives QA leads traceability from failure to resolution.

Get expert help configuring QA workflows inside Redmine

Test Coverage and Pass Rate Reporting

In addition, the plugin provides test run summary views showing:

  • Total test cases in the run
  • Number passed, failed, blocked, and not yet run
  • Pass percentage for the current test plan
  • Comparison across test runs (e.g., v2.3 vs v2.4 pass rates)

Project managers use this to assess release readiness objectively. “87% pass rate, 4 critical fails remaining” is a clear release decision input. A spreadsheet with 200 rows of test case status does not give that at a glance. Redmine QA tracking becomes measurable rather than estimated pass rate data is live throughout the test run, not assembled manually after the fact.

Want to see test case management running inside a live Redmine instance? Book a Free Demo — the QA workflow from test plan to bug creation takes 30 minutes to walk through.

How to Manage Test Cases in Redmine — The Core Workflow

Managing test cases in Redmine with the plugin follows a four-step cycle that mirrors how QA teams already work:

  1. Build the test case library — create reusable test cases organised by feature area, regression coverage, and priority
  2. Create a test plan for each release — select the relevant cases from the library and assign them to the version being tested
  3. Execute the test run — QA engineers work through assigned cases, recording pass, fail, or blocked results directly in Redmine
  4. Link failures to bug issues — failed test cases generate linked Redmine bug issues in one action, keeping QA and development work in the same system

This cycle replaces the spreadsheet layer that most teams use for test management in Redmine today. Every step happens inside Redmine visible to the project manager, linked to the development workflow, and stored as release history.

How QA Teams Use This in Practice

Before a Release

The QA lead creates a test plan for the upcoming version. They select all regression test cases plus any new cases for features added in this version. They assign the test plan to the version in Redmine.

The QA team executes the run over the testing period. Results update in real-time. Consequently, the project manager can check pass rate at any point without asking the QA lead for a status update.

During Execution

When a test case fails, the QA engineer creates a bug issue directly from the failed case record. From there, the bug enters the Redmine issue tracker with a link back to the test case. Then, the development team picks up the bug through the normal issue workflow.

Once the fix is deployed, the QA engineer re-executes the failed test case. The status updates. Consequently, the test case links to both the original failure and the re-run pass.

After a Release

The completed test run stays in the system as a record of what was tested and what passed for the version that shipped. If a regression is reported in production, the QA lead can check whether the affected area was covered in the release test plan and whether the test case was passing or absent.

How Test Case Management Connects to the Agile Board

For teams running sprints with the Redmineflux Agile Board Plugin, test case management connects to sprint delivery directly. The Testcase Management Plugin tracks QA work for a sprint’s issues. Furthermore, failed test cases generate bug issues that appear on the sprint board as new cards automatically.

The QA lead sees the test run summary for the sprint. Meanwhile, the project manager sees the sprint board. Both views draw from the same Redmine data the plugin stores test results against the version under test, and bug issues flow into the normal issue workflow.

Common Questions

Does Redmine support test case management natively?

No. Redmine does not have a built-in test plan, test run, or pass/fail result structure. Some teams use a custom issue tracker type to approximate test cases, but this approach lacks test run containers, pass rate reporting, and structured bug linking. The Redmineflux Testcase Management Plugin adds full test case management to Redmine.

Can I link a failed test case to a Redmine bug issue?

Yes. The Testcase Management Plugin lets QA engineers create a Redmine bug issue directly from a failed test case. The new issue is pre-linked to the test case. The relationship is visible from both the issue and the test case record.

Can I reuse test cases across multiple test plans?

Yes. The library stores test cases at the project level, making them available for multiple test plans. Updating a test case applies the change to all future test plans. However, past test run records preserve the version of the test case the team executed at that time.

Does the plugin track who executed each test case?

Yes. Each test case result update records the user who made the change and the timestamp. The test run history is fully auditable project managers and QA leads can see who marked each case as pass, fail, or blocked and when.

Which Redmine versions does the Testcase Management Plugin support?

The Redmineflux Testcase Management Plugin supports Redmine 5.0.x, 5.1.x, and 6.0.x. Teams on earlier versions should contact support before purchasing to confirm compatibility.

QA work that lives outside Redmine is QA work that nobody can see in context. Test cases in spreadsheets cannot be linked to the bugs they found, cannot be traced to the version they covered, and cannot show a project manager the pass rate needed to make a release decision. SThe Testcase Management Plugin brings that work inside Redmine where the rest of the project already is.

Explore Managed Cloud — Redmine with all plugins pre-installed, including Testcase Management

Categories
Informational

How to Create a Gantt Chart in Redmine – A Practical Guide

Redmine has a Gantt view built in. Most teams find it early, use it briefly, and then quietly stop.

The reason is always the same. The default view shows your issues as bars on a timeline. Start date on the left, due date on the right. Filtering by project, tracker, or assignee narrows the view, and the chart can be printed directly. But drag-and-drop rescheduling is not possible there are no dependency lines between issues, and comparing today’s schedule against the original plan requires manual work outside the tool. When a project slips, the default Gantt has no way to show you how far it has moved.

For small projects with short timelines and a single team, that is often enough. For software releases with cross-team dependencies, client deliveries with fixed milestones, or IT portfolios where one overloaded developer can hold up three projects the default Gantt runs out of road quickly.

This guide covers how to create a Gantt chart in Redmine using both the built-in view and the Redmineflux Gantt Chart Plugin, and when each approach is the right one.

What Redmine’s Built-In Gantt View Does

The short answer: Redmine’s built-in Gantt view displays issues on a timeline based on start and due dates. It is read-only, does not support dependencies or baselines, and does not let you reschedule work directly. For basic timeline visibility, it works. For active project planning, it requires the Redmineflux Gantt Chart Plugin to be useful.

To access the built-in view, open any Redmine project and click the Gantt tab in the project menu. Any issue with a start date and a due date appears as a bar on the timeline. You can filter by tracker, assignee, version, or priority to narrow the view.

That is genuinely useful when all you need is a quick visual of what is scheduled and when. A project manager checking whether the team’s work is spread across the month, or whether a set of issues is clustered too close to a release date, gets value from this view with no additional setup required.

Where the Default View Falls Short

The limitations become visible quickly when teams try to use it for active planning. Dependencies between issues are not tracked nothing shows which tasks must finish before others can start. Baseline comparisons are not available, so measuring how far the schedule has drifted from the original plan requires manual work. Resource loading across assignees is also not visible, and the chart is not interactive moving a bar does not reschedule the issue in Redmine. Every date change has to be made individually inside each issue.

Plan software releases visually instead of managing timelines manually in spreadsheets

How to Create a More Complete Gantt Chart in Redmine

The Redmineflux Gantt Chart Plugin adds the planning layer that the built-in view is missing. Dependencies, baselines, milestones, resource loading, drag-and-drop rescheduling, and cross-project timelines all working directly on top of your existing Redmine issues.

Here is how to set it up from scratch.

Redmine Gantt chart plugin showing project timelines, milestone tracking, dependencies, and real-time project planning
Visualize project timelines, dependencies, milestones, and sprint progress with the Redmineflux Gantt Chart Plugin

Step 1 — Install the plugin

Upload the plugin folder to Redmine/plugins/gantt_chart. Run bundle install to install required gems. Run the database migration for your environment:

RAILS_ENV=production bundle exec rails redmine:plugins:migrate

Restart Redmine. The plugin is now installed.

Step 2 — Enable Gantt Chart for your project

Go to Project → Settings → Modules tab. Check the Gantt Chart module and save. The project menu now shows a Gantt Chart tab alongside Issues, Agile Board, and other enabled modules.

Step 3 — Make sure your issues have dates

For any issue to appear on the Gantt chart, it needs a start date and a due date. You can set these on individual issues via the issue edit form. You can also assign dates directly by dragging on the Gantt canvas click and drag on an empty row for an issue that has no dates yet, and the plugin creates the date range immediately.

If your team has been skipping start dates because the built-in view was not useful, this is the step where the habit needs to change. A Gantt chart without dates is an empty chart.

Step 4 — Add dependencies between issues

Open any issue and scroll to the Relations section. Add a “follows” relation meaning this issue follows another issue and cannot start until the predecessor is complete. Save the issue.

Back on the Gantt chart, you will now see a connector line between the two issues. If the predecessor’s due date is later than the dependent issue’s start date, the schedule conflict is immediately visible on the chart. This is the moment where most teams realise how many implicit dependencies existed in their project that were never formally tracked.

Step 5 — Set a baseline

Open the Gantt Chart view and click Set Baseline. The plugin saves the current schedule every issue’s start and end dates as your reference plan.

From this point forward, the Gantt chart shows two bars for every issue: the baseline bar showing the original planned dates, and the current bar showing today’s dates. When an issue moves, the gap between the two bars makes the slippage immediately visible without any manual comparison.

Set a baseline at the start of each sprint, release, or project phase. It takes one click and gives you an honest record of how delivery tracked against the original commitment.

Step 6 — Add milestones

The Gantt Chart Plugin links milestones to Redmine versions. Go to Project → Settings → Versions → New Version. Give it a name and a target date. Save it.

Back on the Gantt chart, that version appears as a diamond marker on the timeline visible alongside all the issues working toward it. This is the view you share with stakeholders or clients when they ask for a delivery timeline. It shows the target date, the issues scheduled before it, and how current progress sits relative to the milestone.

Step 7 — Review resource loading

The Gantt Chart Plugin shows team member workload on the timeline. Scroll to the resource section of the view to see which team members are assigned to work on which dates.

Before scheduling a new piece of work or pulling an issue forward on the timeline, check whether the assigned person has capacity on those dates. Most scheduling conflicts that surface mid-sprint were visible at planning time they just had no tool to surface them.

Book a free demo and explore Gantt planning in a live Redmine environment

What This Looks Like in a Real Project

Consider a software team planning a release. The release has four phases: design, development, QA, and deployment. Development cannot start until design is complete. QA cannot start until development is done. Deployment is blocked until QA sign-off.

Without dependencies on the Gantt, that sequence is implicit everyone knows it, but nothing in the schedule reflects it. When design runs two days late, no one immediately updates the development start date. QA does not know their window has shifted. The release date stays fixed on the calendar while the schedule underneath it silently compresses.

With the Gantt Chart Plugin, you link those four phases as Finish-to-Start dependencies. When design slips two days, the dependent phases update on the chart automatically. The project manager sees the impact on the release date before anyone misses it. A conversation happens at replanning, not at the release date.

That is the practical difference between a timeline view and a planning tool.

Where the Gantt Chart Plugin Fits in the Wider Workflow

The Gantt chart works best when it connects to the rest of your Redmine workflow, not when teams use it in isolation.

Agile Board — daily work meets delivery timeline

If your team runs sprints on the Agile Board Plugin, those sprint issues appear automatically on the Gantt. Daily board work and delivery timeline planning stay in sync without any manual transfer. Use the board for day-to-day standups and the Gantt for release-level planning both views draw from the same issues.

Timesheet Plugin — effort alongside schedule

Time entries logged through the Timesheet Plugin sit against the same issues the Gantt displays. Effort visibility and schedule visibility come from one place. If an issue takes longer than estimated, the logged hours show you exactly why the bar moved.

Workload Plugin — capacity before commitment

If resource loading is a recurring concern, the Workload Plugin gives the team a dedicated capacity view. Used alongside the Gantt, it means you plan delivery dates knowing who is actually available rather than discovering overloads after you have already made commitments.

Common Questions

Does Redmine have a built-in Gantt chart?

Yes. Redmine includes a read-only Gantt view that displays issues on a timeline based on start and due dates. It supports basic filtering but does not allow dependencies, baselines, milestones, or drag-and-drop rescheduling. The Redmineflux Gantt Chart Plugin adds those capabilities on top of Redmine’s existing issue data.

How do I add dependencies between issues in Redmine?

Open an issue, scroll to the Relations section, and add a “follows” relation pointing to the predecessor issue. Once saved, the dependency appears as a connector line on the Gantt chart. Dependent issues update visually when predecessor dates change, making schedule impacts immediately visible.

What is a Gantt baseline in Redmine and how do I set one?

A baseline is a saved snapshot of your planned schedule at a specific point in time. To set one, open the Gantt Chart view and click Set Baseline. The current issue dates are saved as the reference plan. Future views show both baseline and current dates, making schedule slippage visible at a glance.

Can I view multiple Redmine projects on one Gantt chart?

Yes. The Redmineflux Gantt Chart Plugin includes a cross-project Gantt view. You select the projects to include and view all their issues on a single timeline. This is particularly useful for programme managers and IT directors overseeing several concurrent workstreams from one view.

Can I drag and drop issues to reschedule them on the Gantt?

Yes. The plugin supports drag-and-drop rescheduling directly on the Gantt canvas. Dragging an issue bar to a new position updates the issue’s start and due dates in Redmine on save. Dependent issues shift in line with the rescheduled predecessor.

Which Redmine versions does the Gantt Chart Plugin support?

Redmineflux tests and supports the plugin on Redmine 5.0.x, 5.1.x, and 6.0.x. Teams running Redmine 4.x should contact support before purchasing to confirm compatibility.

Redmine’s built-in Gantt view is a starting point useful for visibility, limited for planning. The Redmineflux Gantt Chart Plugin turns it into an active planning tool where dependencies are tracked, you can measure slippage against a baseline, and resource conflicts surface before they affect delivery.

Explore Managed Cloud Managed Redmine with the Gantt Chart Plugin pre-configured
Categories
Informational

How to Build a Redmine Dashboard Your Team Will Actually Use

Redmine captures everything your team produces: issue status, time logs, sprint progress, version milestones. The problem is not the data it is the default view.

Redmine’s built-in “My page” is a personal productivity screen. It shows what a single user is assigned to. However, it does not show whether the sprint is on track, which projects are at risk, or how the team’s time compares to budget. As a result, project managers face one recurring outcome: manual status summaries built outside Redmine, every time a status update is needed.

The Redmineflux Custom Dashboard Plugin changes that. It adds configurable project dashboards inside Redmine pulling from the data already there, structured for the specific questions each role actually needs to answer.

What Is a Redmine Dashboard — and What Can It Show?

A Redmine dashboard is a configurable project health view showing open issues by status, sprint completion, time logged against budget, overdue items, and upcoming milestones drawn directly from live Redmine data. The Redmineflux Custom Dashboard Plugin adds this capability with a drag-and-drop builder, custom metric widgets, and a cross-project summary view. No coding or data exports required.

Redmine’s default “My page” answers one question well: what does this individual user need to do today? That is useful for developers. However, it is not enough for project managers, engineering leads, or operations teams who need project-level visibility across the full team.

The Custom Dashboard Plugin adds that project-level layer turning Redmine from a task list into a real-time project health view.

Want to see what a configured Redmine dashboard actually looks like? Book a free 30-minute demo →

What Redmine’s Default “My Page” Is Missing

Redmine designed “My page” for individual contributors. It surfaces:

  • Issues assigned to you
  • Issues you reported
  • A personal calendar
  • A recent activity feed

These widgets answer what do I need to work on not how is the project tracking.

The widget set is also fixed. You cannot add a sprint completion chart, a cross-project summary, or a custom KPI widget. Rearranging is possible; extending is not. As a result, that limitation pushes project managers toward spreadsheets pulling data out of Redmine rather than reading it inside Redmine.

Most teams build their own status reports because Redmine’s default view was never built for project-level visibility. The Custom Dashboard Plugin fills that gap directly.

What the Custom Dashboard Plugin Adds to Redmine

Redmine dashboard infographic showing real-time project insights, KPI widgets, milestone tracking, and cross-project reporting

The Custom Dashboard Plugin adds a configurable dashboard layer on top of your existing Redmine data. No exports. No separate reporting tool. Just the data already in Redmine, assembled into the view you need.

Drag-and-Drop Widget Layout

The plugin adds a dashboard canvas where you place, resize, and arrange widgets by dragging. No technical configuration required the builder is fully point-and-click.

A project manager who wants sprint progress at the top and the time budget below it drags them into position in under a minute. In addition, each user gets their own layout a developer’s dashboard emphasises assigned issues and personal time logs, while a project manager’s dashboard shows sprint completion, open blockers, and milestone proximity. Same Redmine data, different angles.

Project Health Widgets

Instead of flat issue lists, the plugin surfaces data as structured, scannable widgets:

  • Open issues by status — visualises how many issues are in each stage (New, In Progress, Testing, Resolved)
  • Sprint progress — shows closed vs. open issues for the current sprint at a glance
  • Time logged this week — compares hours logged against the project time budget
  • Overdue issues — lists items past their due date with assignee and days overdue
  • Upcoming milestones — shows version due dates within a configurable look-ahead window

Moreover, every widget links directly to the underlying filtered Redmine view. Clicking “overdue issues” opens the exact issue list no separate navigation step.

Cross-Project Summary View

For managers overseeing multiple concurrent projects, the cross-project summary widget is the most valuable addition. It shows open issues, sprint completion rate, and hours logged for multiple projects in a single row.

Instead, project managers see every project’s status in one row no clicking through each project, no manual summary. That single view turns Redmine from a per-project tool into a portfolio-level management system.

Custom Metric Widgets

Specifically, the plugin supports custom metric widgets built from Redmine’s query filters. A project manager can create a widget showing “critical priority open bugs right now” or “issues closed this sprint by the QA team” any filter combination the native query engine supports.

The result is a dashboard specific to how your team measures project health not a generic template applied uniformly to every project.

Running multiple client projects or managing cross-team delivery? See the cross-project dashboard configured for your use case →

How to Set Up a Redmine Dashboard That Gets Used

Setup is configuration work, not development work. Three steps determine whether a dashboard becomes a daily tool or an ignored screen.

Step 1 — Define the Questions First

Before placing any widgets, write down what the dashboard must answer at a glance. For most project managers, those questions are:

  • Is the sprint on track?
  • Are there overdue issues blocking delivery?
  • Is the team logging time in line with the project budget?
  • Is the next milestone at risk?

Specifically, each question maps to a widget. For example, a dashboard built around sprint health and overdue issues stays useful long-term. However, a dashboard built by placing every available widget becomes noise within a week.

Step 2 — Build One Dashboard Per Role

Therefore, the most effective setups create a separate view for each primary role:

Role Priority Widgets
Project Manager Sprint progress, overdue issues, upcoming milestones, time vs. budget
Engineering Lead Open issues by assignee, issues in Testing, blockers open 48h+
Operations / Billing Time logged by project, hours by activity type, open issues on billable work

As a result, each role sees the data relevant to their decisions — without wading through metrics that do not apply to them.

Step 3 — Align Widgets to Your Reporting Cycle

Finally, configure each widget to match the cadence your team already uses. For instance, if your sprint review runs every two weeks, set the sprint widget to the current sprint period. Similarly, if billing runs monthly, set the time widget to show the current month. A dashboard that matches the actual reporting rhythm surfaces relevant data at the right moment not a snapshot that requires manual reinterpretation.

A well-configured dashboard is read before stand-up not built after one.

Want a guided setup for your team structure? We’ll walk through dashboard configuration in 30 minutes — book a demo →

How the Redmine Dashboard Connects to Your Existing Workflow

The Custom Dashboard Plugin does not create a new data layer. It reads from the same issue records, time entries, and version milestones every other Redmine view uses which means it is always current.

When a developer closes an issue, the sprint widget updates. When someone logs time, the budget widget reflects it. No manual refresh. No sync delay.

Specifically, here is how the dashboard connects to the broader Redmine setup:

First, sprint and issue data flows from teams managing Kanban boards and Scrum sprints with daily delivery tracking. The sprint board work feeds the dashboard’s sprint progress and issue status widgets in real time.

Similarly, time and billing data comes from teams capturing billable hours with built-in approval and reporting workflows. Hours logged against issues appear in the dashboard’s time budget widgets no duplicate entry.

Additionally, release and milestone data comes from teams planning delivery timelines with dependencies and baselines. Version due dates populate the upcoming milestones widget automatically so project managers see release proximity on the dashboard without opening the Gantt separately.

Finally, capacity and workload data connects via the plugin that shows how work is distributed across each team member. Overloaded team members visible in the workload view are the same people whose overdue issues surface on the dashboard linking two signals that default Redmine keeps separate.

If you are on Redmineflux Managed Cloud, all four plugins come pre-installed and connected from day one. Dashboard setup begins immediately no installation steps, no version compatibility issues.

Common Questions

Does Redmine have a project dashboard?

Redmine includes a personal “My page” with basic widgets assigned issues, reported issues, calendar, and recent activity. It is a personal productivity view, not a project health view. The Redmineflux Custom Dashboard Plugin adds configurable project dashboards with sprint progress, time tracking, cross-project summaries, and KPI widgets built from live Redmine data.

Can I add custom widgets to Redmine?

However, not with native Redmine the “My page” widget set is fixed. Instead, the Custom Dashboard Plugin adds a drag-and-drop builder where you place, resize, and configure widgets specific to your project and role. In addition, you build custom metric widgets from any Redmine issue query filter, with no coding required.

Can Redmine show a dashboard across multiple projects?

However, native Redmine does not provide a visual cross-project summary. Instead, the Custom Dashboard Plugin includes a cross-project widget showing open issues, sprint completion, and hours logged across multiple projects in a single view without navigating to each project individually.

What is the difference between Redmine “My page” and the Custom Dashboard Plugin?

“My page” is a personal productivity view fixed widgets, personal scope, individual issue focus. The Custom Dashboard Plugin is a configurable project reporting layer drag-and-drop layout, project or cross-project scope, and widgets for sprint health, time budget, overdue issues, and milestones. Both pull from the same Redmine data.

Do dashboard changes affect Redmine performance?

No. The Custom Dashboard Plugin reads from Redmine’s existing database. Therefore, it does not introduce separate data stores or background sync processes. Dashboard load times match standard Redmine report pages.

Which Redmine versions does the Custom Dashboard Plugin support?

Redmineflux tests and supports the Custom Dashboard Plugin on Redmine 5.0.x, 5.1.x, and 6.0.x. Teams running Redmine 4.x should contact support before purchasing to confirm compatibility.

Redmine already has the data your team needs to manage projects well. Yet what it has lacked is a layer that makes that data readable at a glance structured around the questions each role actually asks, updated in real time, without exports or spreadsheets.

Fortunately, the Custom Dashboard Plugin adds that layer. As a result, project managers stop building manual summaries. Instead, stand-up starts with actual project data. Status calls run from the dashboard not from whoever prepared the update last night.

Explore the Custom Dashboard Plugin — configurable project visibility for Redmine 

Related Reading


Categories
Informational

Redmine vs Jira 2026 — Which Should Your Team Choose?

Most teams land on this question the same way. They are running Redmine and someone asks whether Jira would be better. Or they are on Jira and the bill has grown to a point where the question is unavoidable.

Redmine and Jira both handle issue tracking and project delivery. They have been direct competitors for over a decade. The teams they suit best are genuinely different, though.

This guide is a practical Redmine vs Jira comparison not a verdict shaped by a marketing angle. It covers what each tool does well, where each runs into limits, and what the decision usually comes down to in 2026.

What Redmine and Jira Actually Are

The short answer: Redmine is an open-source project management and issue tracking platform that you host and control. Jira is a commercial SaaS product from Atlassian, built for software teams at any scale. Both track work and manage workflows — but they sit in fundamentally different deployment and pricing models.

Redmine has been around since 2006. It is open-source, built on Ruby on Rails, and free to download. You run it on your own infrastructure. That means you control the data, the configuration, and the upgrade schedule. Issue tracking, Gantt views, time tracking, role-based permissions, and project wikis all ship with the base platform.

Jira launched around the same time but moved in a very different direction. Atlassian built Jira into the centrepiece of a wider product suite. Confluence handles documentation. Jira Service Management handles support tickets. Bitbucket handles code. Advanced Roadmaps handles portfolio planning. Each of those is a separate product with its own pricing.

That context matters before any feature comparison. Choosing between Redmine and Jira is partly a question of philosophy. Do you want a single self-hosted platform you extend with plugins? Or a cloud ecosystem you subscribe to layer by layer?

See how Redmineflux replaces Jira without increasing costs as your team grows

Redmine vs Jira: How the Core Features Compare

Infographic comparing Redmine and Jira project management tools, showing differences in pricing, hosting, scalability, agile features, and team suitability for 2026.

A visual comparison of Redmine and Jira highlighting pricing, flexibility, hosting, scalability, and team use cases in 2026.

Issue Tracking

Both tools handle issue tracking competently. Redmine calls them issues. Jira calls them tickets or stories. Both support custom fields, workflow states, priorities, assignees, and due dates.

The real difference is in how workflows get configured. Jira uses schemes workflow schemes, permission schemes, notification schemes. Administrators get precise control, but the setup adds significant complexity. Redmine’s workflow is simpler: you configure transitions by tracker and role, and the logic stays readable.

For small to mid-size teams, Redmine works well without a dedicated tool administrator. For enterprise teams running dozens of projects with complex permission structures, Jira’s scheme-based model is more powerful.

Agile Boards

Jira’s Scrum and Kanban boards are genuinely strong. Sprint planning, backlog grooming, velocity tracking, and burndown charts all ship at the Standard plan level and above.

Redmine has no agile board in its default installation. The built-in feature set is issue-list-based. To get Scrum and Kanban boards and sprint planning on Redmine, you need a plugin such as the Redmineflux Agile Board Plugin. Once that plugin is in place, the day-to-day capability is comparable for most teams. Sprint management, WIP limits, swimlanes, and backlog planning all work as expected.

Gantt and Timeline Planning

Redmine ships with a basic Gantt view read-only, no drag-and-drop, no dependency lines. Jira’s timeline view requires a paid plan, and Advanced Roadmaps (Premium tier) adds cross-team dependency planning.

Both platforms need either an upgrade or a plugin to reach full Gantt capability. Redmine with the Redmineflux Gantt Chart Plugin delivers dependencies, baselines, milestones, drag-and-drop rescheduling, and resource loading. That covers what most teams actually use in Jira’s timeline features. The Redmine Gantt chart guide walks through setup in full.

Time Tracking

Redmine includes basic time tracking natively. Jira includes basic time logging on all paid plans, but advanced reporting requires Tempo Timesheets a third-party add-on at additional per-seat cost.

For teams that need detailed time reports, approval workflows, or billing integration, the Redmineflux Timesheet Plugin extends Redmine’s native capability significantly. It sits inside the same system where issues and sprints already live.

Test Case Management

This is one area where Redmine holds a clear structural advantage. The Redmineflux catalogue includes a dedicated Test Case Management Plugin. It integrates QA workflow directly into the issue tracker.

Jira has no native test case management. Teams on Jira use Xray or Zephyr both third-party add-ons, both at additional per-seat cost. If QA and test tracking inside the issue tracker matter to your team, that gap is meaningful.

Jira vs Redmine — Feature Summary Table

For teams that want a reference before reading the full breakdown:

Feature Redmine + Redmineflux Jira Standard Jira Premium
Pricing model Plugin: per-install one-time · Cloud: from $1.99/seat/month Per-user/month Per-user/month
15-user annual cost ~$1,977 yr 1 · ~$480/yr after† ~$1,470/yr ~$2,880/yr
50-user annual cost ~$2,076 yr 1 · ~$480/yr after† ~$4,890/yr ~$9,600/yr
Self-hosted ✅ Yes ❌ No ❌ No
Agile boards ✅ Plugin ✅ Built-in ✅ Built-in
Gantt / roadmap ✅ Plugin ❌ Basic only ✅ Advanced Roadmaps
Time tracking ✅ Native + plugin ✅ Basic ✅ Basic (Tempo extra)
Test case management ✅ Built-in plugin ❌ Xray / Zephyr (paid) ❌ Xray / Zephyr (paid)
Knowledge base ✅ Built-in plugin ❌ Confluence (paid add-on) ❌ Confluence (paid add-on)
Data ownership ✅ Full ❌ Atlassian-hosted ❌ Atlassian-hosted
Admin complexity Low–Medium Medium High

† Self-hosted: 3 core plugins (Agile Board + Gantt + Timesheet at $499 each = $1,497 one-time per installation) + VPS server (~$40/month). Plugin licence does not change as team grows — only server scales slightly.

Note: Jira pricing is approximate and updated frequently. Verify at atlassian.com before making a final decision.

Pricing: Where Redmine vs Jira Diverges Most

This is where the two platforms separate most sharply in 2026.

Jira Pricing

Jira Cloud charges per user per month. The Standard plan runs approximately $8.15 per user per month. The Premium plan which includes Advanced Roadmaps, capacity planning, and automation runs approximately $16 per user per month.

That is Jira alone. Add Confluence for documentation, Jira Service Management for support, and Xray for test cases. Each carries its own per-seat subscription. A 50-person development team running Jira Premium, Confluence, and Jira Service Management can reach $25,000–$35,000 per year or more.

Redmine Pricing

Redmine itself is free and open-source. You pay for hosting and for any plugins you add.

Redmineflux plugins are licensed per installation, not per user. A 10-person team and a 100-person team pay the same licence fee. Key plugin prices (per installation, one-time): Agile Board $499 · Gantt Chart $499 · Timesheet $499 · Workload $499 · Custom Dashboard $499 · Testcase Management $499 · Knowledge Base $299 · Issue Template $99 · Checklist $49. Three plugins cost $1,497 total. Six cost $2,994. The licence does not change as your team grows.

At 50 users, the annual Jira Premium licence alone ($9,600/year) costs more than the entire Redmineflux plugin catalogue combined. If you prefer managed hosting, Redmineflux Managed Cloud (Pro plan) is $3.99/seat/month billed monthly or $3.27/seat/month billed yearly (save 18%) — that is $199.50/month for 50 users, versus $800+/month for Jira Premium at the same headcount.

A Scenario That Shows the Difference Clearly

Consider a 30-person development team at a growing MSME. They run three projects simultaneously. They need sprint boards, a Gantt view for the release timeline, and time tracking for client billing.

On Jira Standard, that team pays roughly $2,900 per year for Jira alone. Advanced Roadmaps for Gantt planning requires an upgrade to Jira Premium now roughly $5,800 per year. Add Tempo Timesheets for billing-quality time reports another $3,000 or more per year. Total cost: close to $9,000 per year, and that is before Confluence or Jira Service Management.

On Redmine with Redmineflux plugins, the same team installs Agile Board, Gantt Chart, and Timesheet plugins. The combined licence cost is a one-time or annual fee per installation the same whether the team is 10 people or 100. Self-hosting costs the price of a small server. The total is a fraction of the Jira equivalent, and it stays flat as the team grows.

That is the practical difference. Not just a features list a cost trajectory that compounds over time.

Deployment and Data Ownership

Jira Cloud stores your project data on Atlassian’s infrastructure. That is convenient no server management, automatic updates, Atlassian handles uptime. It also means your data sits in someone else’s database, subject to Atlassian’s terms, pricing decisions, and product roadmap.

Redmine runs on your own server. Your data stays in your database. You can back it up, migrate it, inspect it, and export it without asking permission. For teams in regulated industries, organisations with data sovereignty requirements, or teams that prefer not to depend on a SaaS vendor’s roadmap, this matters.

If you want managed hosting without SaaS lock-in, Redmineflux Managed Cloud provides a hosted Redmine environment where Redmineflux handles the infrastructure and the data stays yours.

Where Each Tool Fits Best

There is no universal answer. The teams that do well on Jira and the teams that do well on Redmine are solving slightly different problems.

Jira is the right choice when:

  • Your team already uses Confluence, Bitbucket, and Jira Service Management actively
  • Your organisation has a dedicated Jira administrator to manage scheme configuration
  • Enterprise-grade compliance certifications (SOC 2, FedRAMP) are a hard requirement
  • Per-seat pricing is manageable at your current team size and headcount trajectory
  • You want zero infrastructure responsibility and accept SaaS vendor dependency

Redmine with Redmineflux is the right choice when:

  • Your team is already on Redmine and migration is not on the table
  • Data ownership and self-hosted deployment are firm requirements
  • You need test case management built into the issue tracker without a third-party add-on
  • Per-seat pricing at Jira’s scale is a significant concern over a 3–5 year horizon
  • Your team wants a simpler administration model that does not need a dedicated tool expert

What Migration Looks Like in Each Direction

Teams moving from Jira to Redmine can use Jira’s built-in export or its API to extract issues, projects, and attachments. Community-maintained migration tools handle the import step. Field mapping between Jira issue types and Redmine trackers takes some planning, but the process has clear documentation. Running both systems in parallel for 30–60 days before full cutover is the recommended approach.

Teams moving from Redmine to Jira export issues via Redmine’s CSV export and import into Jira using its CSV import feature. The harder step is rebuilding Redmine’s workflow logic inside Jira’s scheme-based model. That takes more time than the data migration itself, especially for teams that have built out detailed tracker-level workflows in Redmine.

Common Questions

Is Redmine better than Jira for small teams?

For small teams under 15 people, Redmine is often the more practical choice. The administration model is simpler, the cost is lower, and the base feature set covers the essentials without a suite of add-ons. Jira’s strength shows at scale, when the investment in Atlassian tooling is already in place.

Can Redmine do everything Jira does?

With the right plugins, Redmine covers most of what development teams actually use in Jira agile boards, Gantt planning, time tracking, test case management, dashboards, and helpdesk workflows. The areas where Jira has no Redmine equivalent are primarily enterprise-scale features: deep Atlassian ecosystem integrations, SOC 2 / FedRAMP compliance certifications, and some Advanced Roadmaps portfolio planning capabilities.

Is Jira worth the price?

For teams already invested in the Atlassian ecosystem at scale, yes. For teams starting fresh or evaluating at 30 or more users, Redmine with a structured plugin layer often delivers comparable day-to-day functionality at significantly lower total cost.

How do I migrate from Jira to Redmine?

Export your Jira projects via CSV or the Jira API. Import into Redmine using the CSV import feature, mapping Jira issue types to Redmine trackers and Jira workflow states to Redmine statuses. Install Redmineflux plugins to replace the Jira capabilities your team relied on. Plan for 30–60 days of parallel operation before full cutover.

Which Redmine versions do Redmineflux plugins support?

Redmineflux tests and supports all plugins on Redmine 5.0.x, 5.1.x, and 6.0.x. Teams running Redmine 4.x should contact support before purchasing to confirm compatibility.

Does Redmine have a free trial?

Redmine is free and open-source you can install it and use it without cost. Redmineflux offers a free demo of the plugin suite running in a live Redmine environment. That is the fastest way to see the full capability without committing to an installation.

Jira has scale, ecosystem depth, and the full Atlassian suite behind it. Redmine has openness, simplicity, data ownership, and a cost model that does not penalise team growth. The right choice depends less on which tool has more features and more on which model fits how your team works and what you expect to pay for it over the next three to five years.

Compare Redmineflux vs Jira in detail – Full feature and pricing comparison. See Redmineflux running in a live Redmine environment Explore Managed Cloud – Hosted Redmine with the full plugin suite pre-configured.

Book a free demo and see Redmineflux workflows live