Categories
Informational

How to Build a Redmine Dashboard Your Team Will Actually Use

Redmine captures everything your team produces: issue status, time logs, sprint progress, version milestones. The problem is not the data it is the default view.

Redmine’s built-in “My page” is a personal productivity screen. It shows what a single user is assigned to. However, it does not show whether the sprint is on track, which projects are at risk, or how the team’s time compares to budget. As a result, project managers face one recurring outcome: manual status summaries built outside Redmine, every time a status update is needed.

The Redmineflux Custom Dashboard Plugin changes that. It adds configurable project dashboards inside Redmine pulling from the data already there, structured for the specific questions each role actually needs to answer.

What Is a Redmine Dashboard — and What Can It Show?

A Redmine dashboard is a configurable project health view showing open issues by status, sprint completion, time logged against budget, overdue items, and upcoming milestones drawn directly from live Redmine data. The Redmineflux Custom Dashboard Plugin adds this capability with a drag-and-drop builder, custom metric widgets, and a cross-project summary view. No coding or data exports required.

Redmine’s default “My page” answers one question well: what does this individual user need to do today? That is useful for developers. However, it is not enough for project managers, engineering leads, or operations teams who need project-level visibility across the full team.

The Custom Dashboard Plugin adds that project-level layer turning Redmine from a task list into a real-time project health view.

Want to see what a configured Redmine dashboard actually looks like? Book a free 30-minute demo →

What Redmine’s Default “My Page” Is Missing

Redmine designed “My page” for individual contributors. It surfaces:

  • Issues assigned to you
  • Issues you reported
  • A personal calendar
  • A recent activity feed

These widgets answer what do I need to work on not how is the project tracking.

The widget set is also fixed. You cannot add a sprint completion chart, a cross-project summary, or a custom KPI widget. Rearranging is possible; extending is not. As a result, that limitation pushes project managers toward spreadsheets pulling data out of Redmine rather than reading it inside Redmine.

Most teams build their own status reports because Redmine’s default view was never built for project-level visibility. The Custom Dashboard Plugin fills that gap directly.

What the Custom Dashboard Plugin Adds to Redmine
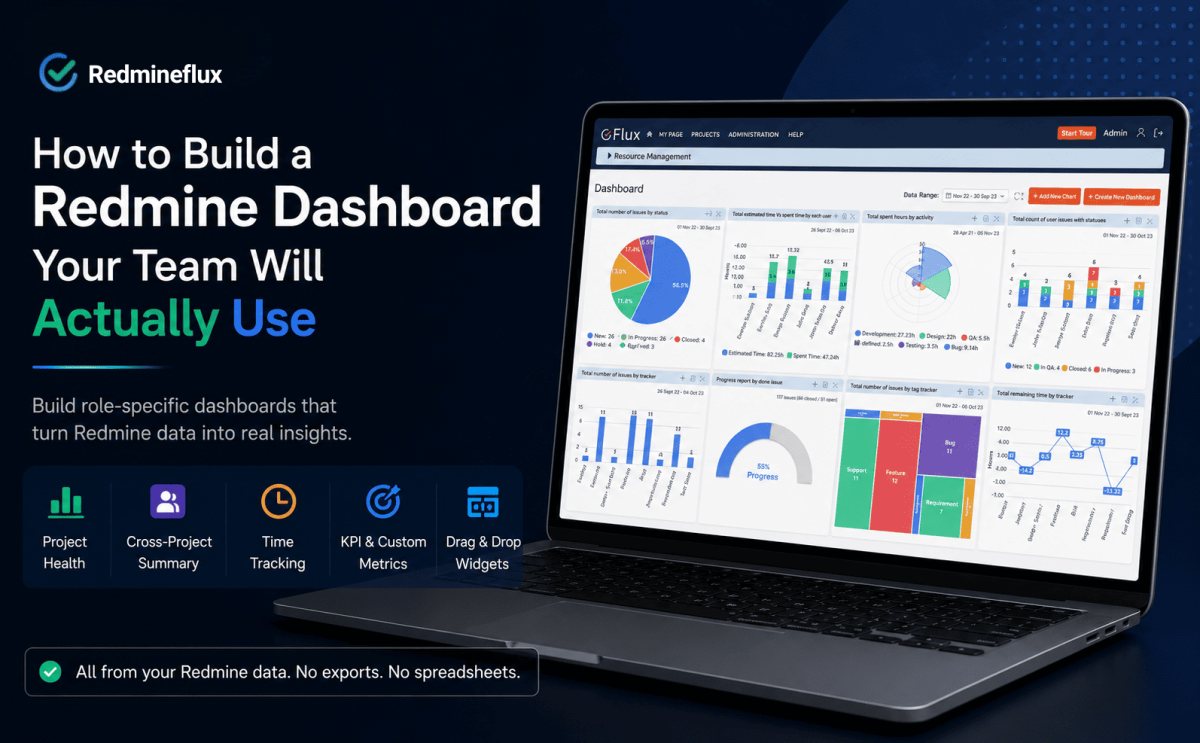
Redmine dashboard infographic showing real-time project insights, KPI widgets, milestone tracking, and cross-project reporting

The Custom Dashboard Plugin adds a configurable dashboard layer on top of your existing Redmine data. No exports. No separate reporting tool. Just the data already in Redmine, assembled into the view you need.

Drag-and-Drop Widget Layout

The plugin adds a dashboard canvas where you place, resize, and arrange widgets by dragging. No technical configuration required the builder is fully point-and-click.

A project manager who wants sprint progress at the top and the time budget below it drags them into position in under a minute. In addition, each user gets their own layout a developer’s dashboard emphasises assigned issues and personal time logs, while a project manager’s dashboard shows sprint completion, open blockers, and milestone proximity. Same Redmine data, different angles.

Project Health Widgets

Instead of flat issue lists, the plugin surfaces data as structured, scannable widgets:

  • Open issues by status — visualises how many issues are in each stage (New, In Progress, Testing, Resolved)
  • Sprint progress — shows closed vs. open issues for the current sprint at a glance
  • Time logged this week — compares hours logged against the project time budget
  • Overdue issues — lists items past their due date with assignee and days overdue
  • Upcoming milestones — shows version due dates within a configurable look-ahead window

Moreover, every widget links directly to the underlying filtered Redmine view. Clicking “overdue issues” opens the exact issue list no separate navigation step.

Cross-Project Summary View

For managers overseeing multiple concurrent projects, the cross-project summary widget is the most valuable addition. It shows open issues, sprint completion rate, and hours logged for multiple projects in a single row.

Instead, project managers see every project’s status in one row no clicking through each project, no manual summary. That single view turns Redmine from a per-project tool into a portfolio-level management system.

Custom Metric Widgets

Specifically, the plugin supports custom metric widgets built from Redmine’s query filters. A project manager can create a widget showing “critical priority open bugs right now” or “issues closed this sprint by the QA team” any filter combination the native query engine supports.

The result is a dashboard specific to how your team measures project health not a generic template applied uniformly to every project.

Running multiple client projects or managing cross-team delivery? See the cross-project dashboard configured for your use case →

How to Set Up a Redmine Dashboard That Gets Used

Setup is configuration work, not development work. Three steps determine whether a dashboard becomes a daily tool or an ignored screen.

Step 1 — Define the Questions First

Before placing any widgets, write down what the dashboard must answer at a glance. For most project managers, those questions are:

  • Is the sprint on track?
  • Are there overdue issues blocking delivery?
  • Is the team logging time in line with the project budget?
  • Is the next milestone at risk?

Specifically, each question maps to a widget. For example, a dashboard built around sprint health and overdue issues stays useful long-term. However, a dashboard built by placing every available widget becomes noise within a week.

Step 2 — Build One Dashboard Per Role

Therefore, the most effective setups create a separate view for each primary role:

Role Priority Widgets
Project Manager Sprint progress, overdue issues, upcoming milestones, time vs. budget
Engineering Lead Open issues by assignee, issues in Testing, blockers open 48h+
Operations / Billing Time logged by project, hours by activity type, open issues on billable work

As a result, each role sees the data relevant to their decisions — without wading through metrics that do not apply to them.

Step 3 — Align Widgets to Your Reporting Cycle

Finally, configure each widget to match the cadence your team already uses. For instance, if your sprint review runs every two weeks, set the sprint widget to the current sprint period. Similarly, if billing runs monthly, set the time widget to show the current month. A dashboard that matches the actual reporting rhythm surfaces relevant data at the right moment not a snapshot that requires manual reinterpretation.

A well-configured dashboard is read before stand-up not built after one.

Want a guided setup for your team structure? We’ll walk through dashboard configuration in 30 minutes — book a demo →

How the Redmine Dashboard Connects to Your Existing Workflow

The Custom Dashboard Plugin does not create a new data layer. It reads from the same issue records, time entries, and version milestones every other Redmine view uses which means it is always current.

When a developer closes an issue, the sprint widget updates. When someone logs time, the budget widget reflects it. No manual refresh. No sync delay.

Specifically, here is how the dashboard connects to the broader Redmine setup:

First, sprint and issue data flows from teams managing Kanban boards and Scrum sprints with daily delivery tracking. The sprint board work feeds the dashboard’s sprint progress and issue status widgets in real time.

Similarly, time and billing data comes from teams capturing billable hours with built-in approval and reporting workflows. Hours logged against issues appear in the dashboard’s time budget widgets no duplicate entry.

Additionally, release and milestone data comes from teams planning delivery timelines with dependencies and baselines. Version due dates populate the upcoming milestones widget automatically so project managers see release proximity on the dashboard without opening the Gantt separately.

Finally, capacity and workload data connects via the plugin that shows how work is distributed across each team member. Overloaded team members visible in the workload view are the same people whose overdue issues surface on the dashboard linking two signals that default Redmine keeps separate.

If you are on Redmineflux Managed Cloud, all four plugins come pre-installed and connected from day one. Dashboard setup begins immediately no installation steps, no version compatibility issues.

Common Questions

Does Redmine have a project dashboard?

Redmine includes a personal “My page” with basic widgets assigned issues, reported issues, calendar, and recent activity. It is a personal productivity view, not a project health view. The Redmineflux Custom Dashboard Plugin adds configurable project dashboards with sprint progress, time tracking, cross-project summaries, and KPI widgets built from live Redmine data.

Can I add custom widgets to Redmine?

However, not with native Redmine the “My page” widget set is fixed. Instead, the Custom Dashboard Plugin adds a drag-and-drop builder where you place, resize, and configure widgets specific to your project and role. In addition, you build custom metric widgets from any Redmine issue query filter, with no coding required.

Can Redmine show a dashboard across multiple projects?

However, native Redmine does not provide a visual cross-project summary. Instead, the Custom Dashboard Plugin includes a cross-project widget showing open issues, sprint completion, and hours logged across multiple projects in a single view without navigating to each project individually.

What is the difference between Redmine “My page” and the Custom Dashboard Plugin?

“My page” is a personal productivity view fixed widgets, personal scope, individual issue focus. The Custom Dashboard Plugin is a configurable project reporting layer drag-and-drop layout, project or cross-project scope, and widgets for sprint health, time budget, overdue issues, and milestones. Both pull from the same Redmine data.

Do dashboard changes affect Redmine performance?

No. The Custom Dashboard Plugin reads from Redmine’s existing database. Therefore, it does not introduce separate data stores or background sync processes. Dashboard load times match standard Redmine report pages.

Which Redmine versions does the Custom Dashboard Plugin support?

Redmineflux tests and supports the Custom Dashboard Plugin on Redmine 5.0.x, 5.1.x, and 6.0.x. Teams running Redmine 4.x should contact support before purchasing to confirm compatibility.

Redmine already has the data your team needs to manage projects well. Yet what it has lacked is a layer that makes that data readable at a glance structured around the questions each role actually asks, updated in real time, without exports or spreadsheets.

Fortunately, the Custom Dashboard Plugin adds that layer. As a result, project managers stop building manual summaries. Instead, stand-up starts with actual project data. Status calls run from the dashboard not from whoever prepared the update last night.

Explore the Custom Dashboard Plugin — configurable project visibility for Redmine 

Related Reading


Categories
Informational

Redmine vs Jira 2026 — Which Should Your Team Choose?

Most teams land on this question the same way. They are running Redmine and someone asks whether Jira would be better. Or they are on Jira and the bill has grown to a point where the question is unavoidable.

Redmine and Jira both handle issue tracking and project delivery. They have been direct competitors for over a decade. The teams they suit best are genuinely different, though.

This guide is a practical Redmine vs Jira comparison not a verdict shaped by a marketing angle. It covers what each tool does well, where each runs into limits, and what the decision usually comes down to in 2026.

What Redmine and Jira Actually Are

The short answer: Redmine is an open-source project management and issue tracking platform that you host and control. Jira is a commercial SaaS product from Atlassian, built for software teams at any scale. Both track work and manage workflows — but they sit in fundamentally different deployment and pricing models.

Redmine has been around since 2006. It is open-source, built on Ruby on Rails, and free to download. You run it on your own infrastructure. That means you control the data, the configuration, and the upgrade schedule. Issue tracking, Gantt views, time tracking, role-based permissions, and project wikis all ship with the base platform.

Jira launched around the same time but moved in a very different direction. Atlassian built Jira into the centrepiece of a wider product suite. Confluence handles documentation. Jira Service Management handles support tickets. Bitbucket handles code. Advanced Roadmaps handles portfolio planning. Each of those is a separate product with its own pricing.

That context matters before any feature comparison. Choosing between Redmine and Jira is partly a question of philosophy. Do you want a single self-hosted platform you extend with plugins? Or a cloud ecosystem you subscribe to layer by layer?

See how Redmineflux replaces Jira without increasing costs as your team grows

Redmine vs Jira: How the Core Features Compare

Infographic comparing Redmine and Jira project management tools, showing differences in pricing, hosting, scalability, agile features, and team suitability for 2026.

A visual comparison of Redmine and Jira highlighting pricing, flexibility, hosting, scalability, and team use cases in 2026.


Issue Tracking

Both tools handle issue tracking competently. Redmine calls them issues. Jira calls them tickets or stories. Both support custom fields, workflow states, priorities, assignees, and due dates.

The real difference is in how workflows get configured. Jira uses schemes workflow schemes, permission schemes, notification schemes. Administrators get precise control, but the setup adds significant complexity. Redmine’s workflow is simpler: you configure transitions by tracker and role, and the logic stays readable.

For small to mid-size teams, Redmine works well without a dedicated tool administrator. For enterprise teams running dozens of projects with complex permission structures, Jira’s scheme-based model is more powerful.

Agile Boards

Jira’s Scrum and Kanban boards are genuinely strong. Sprint planning, backlog grooming, velocity tracking, and burndown charts all ship at the Standard plan level and above.

Redmine has no agile board in its default installation. The built-in feature set is issue-list-based. To get Scrum and Kanban boards and sprint planning on Redmine, you need a plugin such as the Redmineflux Agile Board Plugin. Once that plugin is in place, the day-to-day capability is comparable for most teams. Sprint management, WIP limits, swimlanes, and backlog planning all work as expected.

Gantt and Timeline Planning

Redmine ships with a basic Gantt view read-only, no drag-and-drop, no dependency lines. Jira’s timeline view requires a paid plan, and Advanced Roadmaps (Premium tier) adds cross-team dependency planning.

Both platforms need either an upgrade or a plugin to reach full Gantt capability. Redmine with the Redmineflux Gantt Chart Plugin delivers dependencies, baselines, milestones, drag-and-drop rescheduling, and resource loading. That covers what most teams actually use in Jira’s timeline features. The Redmine Gantt chart guide walks through setup in full.

Time Tracking

Redmine includes basic time tracking natively. Jira includes basic time logging on all paid plans, but advanced reporting requires Tempo Timesheets a third-party add-on at additional per-seat cost.

For teams that need detailed time reports, approval workflows, or billing integration, the Redmineflux Timesheet Plugin extends Redmine’s native capability significantly. It sits inside the same system where issues and sprints already live.

Test Case Management

This is one area where Redmine holds a clear structural advantage. The Redmineflux catalogue includes a dedicated Test Case Management Plugin. It integrates QA workflow directly into the issue tracker.

Jira has no native test case management. Teams on Jira use Xray or Zephyr both third-party add-ons, both at additional per-seat cost. If QA and test tracking inside the issue tracker matter to your team, that gap is meaningful.

Pricing: Where Redmine vs Jira Diverges Most

This is where the two platforms separate most sharply in 2026.

Jira Pricing

Jira Cloud charges per user per month. The Standard plan runs approximately $8.15 per user per month. The Premium plan which includes Advanced Roadmaps, capacity planning, and automation runs approximately $16 per user per month.

That is Jira alone. Add Confluence for documentation, Jira Service Management for support, and Xray for test cases. Each carries its own per-seat subscription. A 50-person development team running Jira Premium, Confluence, and Jira Service Management can reach $25,000–$35,000 per year or more.

Redmine Pricing

Redmine itself is free and open-source. You pay for hosting and for any plugins you add.

Redmineflux plugins are licensed per installation, not per user. A 10-person team and a 100-person team pay the same plugin licence fee. The full Redmineflux plugin suite including Agile Board, Gantt Chart, Timesheet, Workload, Dashboard, and Test Case Management is available as an All Plugins Pack. At 50 users, the annual Jira Premium licence alone costs more than the full Redmineflux stack across several years.

A Scenario That Shows the Difference Clearly

Consider a 30-person development team at a growing MSME. They run three projects simultaneously. They need sprint boards, a Gantt view for the release timeline, and time tracking for client billing.

On Jira Standard, that team pays roughly $2,900 per year for Jira alone. Advanced Roadmaps for Gantt planning requires an upgrade to Jira Premium now roughly $5,800 per year. Add Tempo Timesheets for billing-quality time reports another $3,000 or more per year. Total cost: close to $9,000 per year, and that is before Confluence or Jira Service Management.

On Redmine with Redmineflux plugins, the same team installs Agile Board, Gantt Chart, and Timesheet plugins. The combined licence cost is a one-time or annual fee per installation the same whether the team is 10 people or 100. Self-hosting costs the price of a small server. The total is a fraction of the Jira equivalent, and it stays flat as the team grows.

That is the practical difference. Not just a features list a cost trajectory that compounds over time.

Deployment and Data Ownership

Jira Cloud stores your project data on Atlassian’s infrastructure. That is convenient no server management, automatic updates, Atlassian handles uptime. It also means your data sits in someone else’s database, subject to Atlassian’s terms, pricing decisions, and product roadmap.

Redmine runs on your own server. Your data stays in your database. You can back it up, migrate it, inspect it, and export it without asking permission. For teams in regulated industries, organisations with data sovereignty requirements, or teams that prefer not to depend on a SaaS vendor’s roadmap, this matters.

If you want managed hosting without SaaS lock-in, Redmineflux Managed Cloud provides a hosted Redmine environment where Redmineflux handles the infrastructure and the data stays yours.

Where Each Tool Fits Best

There is no universal answer. The teams that do well on Jira and the teams that do well on Redmine are solving slightly different problems.

Jira is the right choice when:

  • Your team already uses Confluence, Bitbucket, and Jira Service Management actively
  • Your organisation has a dedicated Jira administrator to manage scheme configuration
  • Enterprise-grade compliance certifications (SOC 2, FedRAMP) are a hard requirement
  • Per-seat pricing is manageable at your current team size and headcount trajectory
  • You want zero infrastructure responsibility and accept SaaS vendor dependency

Redmine with Redmineflux is the right choice when:

  • Your team is already on Redmine and migration is not on the table
  • Data ownership and self-hosted deployment are firm requirements
  • You need test case management built into the issue tracker without a third-party add-on
  • Per-seat pricing at Jira’s scale is a significant concern over a 3–5 year horizon
  • Your team wants a simpler administration model that does not need a dedicated tool expert

What Migration Looks Like in Each Direction

Teams moving from Jira to Redmine can use Jira’s built-in export or its API to extract issues, projects, and attachments. Community-maintained migration tools handle the import step. Field mapping between Jira issue types and Redmine trackers takes some planning, but the process has clear documentation. Running both systems in parallel for 30–60 days before full cutover is the recommended approach.

Teams moving from Redmine to Jira export issues via Redmine’s CSV export and import into Jira using its CSV import feature. The harder step is rebuilding Redmine’s workflow logic inside Jira’s scheme-based model. That takes more time than the data migration itself, especially for teams that have built out detailed tracker-level workflows in Redmine.

Common Questions

Is Redmine better than Jira for small teams?

For small teams under 15 people, Redmine is often the more practical choice. The administration model is simpler, the cost is lower, and the base feature set covers the essentials without a suite of add-ons. Jira’s strength shows at scale, when the investment in Atlassian tooling is already in place.

Can Redmine do everything Jira does?

With the right plugins, Redmine covers most of what development teams actually use in Jira agile boards, Gantt planning, time tracking, test case management, dashboards, and helpdesk workflows. The areas where Jira has no Redmine equivalent are primarily enterprise-scale features: deep Atlassian ecosystem integrations, SOC 2 / FedRAMP compliance certifications, and some Advanced Roadmaps portfolio planning capabilities.

Is Jira worth the price?

For teams already invested in the Atlassian ecosystem at scale, yes. For teams starting fresh or evaluating at 30 or more users, Redmine with a structured plugin layer often delivers comparable day-to-day functionality at significantly lower total cost.

How do I migrate from Jira to Redmine?

Export your Jira projects via CSV or the Jira API. Import into Redmine using the CSV import feature, mapping Jira issue types to Redmine trackers and Jira workflow states to Redmine statuses. Install Redmineflux plugins to replace the Jira capabilities your team relied on. Plan for 30–60 days of parallel operation before full cutover.

Which Redmine versions do Redmineflux plugins support?

Redmineflux tests and supports all plugins on Redmine 5.0.x, 5.1.x, and 6.0.x. Teams running Redmine 4.x should contact support before purchasing to confirm compatibility.

Does Redmine have a free trial?

Redmine is free and open-source you can install it and use it without cost. Redmineflux offers a free demo of the plugin suite running in a live Redmine environment. That is the fastest way to see the full capability without committing to an installation.

Jira has scale, ecosystem depth, and the full Atlassian suite behind it. Redmine has openness, simplicity, data ownership, and a cost model that does not penalise team growth. The right choice depends less on which tool has more features and more on which model fits how your team works and what you expect to pay for it over the next three to five years.

Compare Redmineflux vs Jira in detail – Full feature and pricing comparison. See Redmineflux running in a live Redmine environment Explore Managed Cloud – Hosted Redmine with the full plugin suite pre-configured.

Book a free demo and see Redmineflux workflows live
Categories
Informational

Redmine Gantt Chart for Release Planning — Dependencies, Milestones, and Baselines

Sprint planning and release planning are not the same problem.

Sprint planning is a two-week cycle. The team commits to a set of issues, delivers them, and closes the sprint. The Agile Board Plugin handles this well issues move through columns, daily stand-ups track blockers, and the sprint closes with a clear record of what shipped.

Release planning operates at a different scale. A software release typically spans multiple sprints. It has external dependencies — the API must be complete before the front-end can integrate, the staging environment must be ready before QA can run, legal review must finish before the release date is confirmed. It has milestone commitments made to clients or stakeholders. And it has a history  the original plan against which the current state must be compared at every sprint review.

The agile board does not handle that level. The Redmineflux Gantt Chart Plugin does with dependency tracking, milestone markers, and baseline comparison built directly inside Redmine.

What Makes Release Planning Different from Sprint Planning?

The short answer: Sprint boards track daily execution within a two-week cycle. Release planning requires a different layer phase dependencies showing which work blocks which, milestone markers representing external commitments, and baseline comparison showing how the timeline has moved from the original plan. The Redmineflux Gantt Chart Plugin adds all three directly inside Redmine, operating on the same issues the team tracks on the sprint board.

A typical software release involves phases that depend on each other in sequence. Design must finish before development begins. Development must be code-complete before QA can start a full regression. QA sign-off must happen before the deployment window opens.

Without dependency tracking, those relationships live only in the team’s collective memory. When design overruns by four days, someone needs to manually recalculate whether QA still has enough time before the release date. That calculation happens too late in a stand-up, after the damage is already done.

Furthermore, release plans are made to stakeholders and clients. The milestone “version 2.4 ships on June 15” is a commitment, not an estimate. When the timeline shifts, the project manager needs to show exactly how far the current schedule has moved from the original commitment. A sprint board cannot produce that view.

Setting Up the Redmine Gantt Chart Plugin for Release Planning

The setup for release planning on the Gantt chart follows a consistent pattern: map the release phases to Redmine issues and versions, link the phases with dependencies, mark the milestones, and save a baseline before work begins.

Map Release Phases to Redmine Versions

In Redmine, versions represent sprints or release milestones. For release planning, create one version per release phase Design, Development, QA, Deployment each with a target due date. Go to Project → Settings → Versions → New Version for each phase.

Each version appears on the Gantt chart as a milestone marker at its due date. The project manager sees the full release timeline phase by phase before any dependency lines are added.

Assign Issues to Phases

For each issue in the release, assign it to the version (phase) it belongs to. Design tasks go to the Design version, development tasks go to the Development version, and so on. Issues assigned to a version group together under that milestone on the Gantt chart.

This grouping shows at a glance how many issues sit in each phase and how they distribute across the timeline. If development issues are scheduled after the QA milestone, the Gantt makes that conflict visible immediately.

Add Finish-to-Start Dependencies

Open any issue that cannot start until another issue completes. In the Relations section of the issue, add a “follows” relation pointing to the predecessor. Save the issue.

Back on the Gantt chart, a dependency arrow appears between the two issues. When the predecessor’s due date is later than the dependent issue’s start date, the Gantt shows the conflict. For a release with four sequential phases, add three dependency links: Development follows Design, QA follows Development, Deployment follows QA.

That chain defines the critical path. Any slip in Design now shows its downstream impact on QA and the release date automatically without any manual calculation.

Save the Baseline at Kickoff

Before the release begins active execution, save the current schedule as a baseline. On the Gantt chart view, click Set Baseline. The plugin stores every issue’s start and due date as the reference plan.

From that point forward, the Gantt displays two bars for every issue: the baseline bar showing the original planned dates, and the current bar showing today’s dates. When an issue moves, the gap between the two bars shows the slippage no manual comparison needed.

Save a new baseline at the start of each sprint within the release cycle. That creates a record of how the release timeline evolved useful for retrospectives and client-facing reporting.

Want to see release planning with dependencies and baselines in a live Redmine environment? Book a Free Demo → 30 minutes covers the full release Gantt setup from phase mapping to baseline tracking.

Reading the Release Gantt at Sprint Reviews

The most practical use of the release Gantt is the sprint review check-in. At the end of each sprint within the release cycle, the project manager opens the Gantt and reads three signals:

How far have issue dates moved from the baseline?
The baseline comparison shows, for every remaining issue, how many days it has shifted from the original plan. An issue planned to start on June 1 but currently scheduled for June 7 shows a six-day slip on the baseline bar.

Are any dependencies now in conflict?
When issues slip, the dependency arrows show whether the slip has created a downstream conflict. If the Development phase slipped four days and QA was planned to start the day after Development’s original due date, the Gantt shows the overlap immediately.

Is the release milestone still achievable?
The milestone marker shows the committed release date. The project manager can see whether the current issue schedule still delivers before that date or whether the milestone needs to be renegotiated.

These three signals come from a single view. The project manager reads them in two minutes at the start of each sprint review rather than spending time rebuilding the picture manually from individual issue filters.

How the Gantt Chart Plugin Connects to the Rest of Redmine

The Gantt chart operates on the same issues the team tracks on the sprint board. There is no separate planning layer and no data to synchronise.

The Agile Board Plugin handles sprint-level execution. When a developer closes an issue on the sprint board, the corresponding bar on the Gantt chart updates automatically. The project manager and the development team are always looking at the same underlying data — from different angles.

Logged time from the Timesheet Plugin connects to the same issues displayed on the Gantt. When an issue takes longer than estimated, the time log explains why the bar moved. The project manager can see both the schedule impact and the effort variance from one system.

The Workload Plugin shows team capacity across the same timeline the Gantt displays. Before rescheduling an issue on the Gantt, the project manager can confirm the assigned developer has capacity on those dates — avoiding overloads that create further slips.

For teams that want the release health view alongside sprint metrics, the Custom Dashboard Plugin shows upcoming milestones from Gantt versions as a dashboard widget so the project manager sees release proximity without opening the Gantt view separately.

Common Questions

What is a Finish-to-Start dependency in Redmine Gantt?

A Finish-to-Start dependency means Issue B cannot start until Issue A is complete. In the Redmineflux Gantt Chart Plugin, you set this by adding a “follows” relation on Issue B pointing to Issue A. When Issue A slips, the chart shows the downstream impact on Issue B automatically no manual recalculation required.

How do I track release milestones on a Redmine Gantt chart?

Create a Redmine version with a due date for each milestone in Project → Settings → Versions. The Redmineflux Gantt Chart Plugin displays each version as a milestone marker on the Gantt timeline. Issues assigned to that version group under the milestone in a single view alongside all the issues working toward it.

What is a Gantt baseline and why does it matter for release planning?

A baseline is a saved snapshot of the release schedule at a specific point in time typically project kickoff or the start of each sprint. The plugin stores baseline dates separately from the live schedule. As the release progresses, the Gantt shows both the original plan and the current schedule side by side essential for client reporting and retrospective review.

Can I view multiple sprints on a single Gantt chart for release planning?

Yes. The Redmineflux Gantt Chart Plugin displays all issues across a project’s versions on a single timeline. You can view every sprint and phase within a release on one chart with milestone markers, dependency arrows, and baseline comparison across the full release scope.

Can I export the release Gantt to PDF for client reporting?

Yes. The Redmineflux Gantt Chart Plugin includes PDF and PNG export. The exported chart includes the current schedule, baseline comparison if a baseline has been saved, and dependency arrows formatted for client status reports and release sign-off documents.

Which Redmine versions does the Gantt Chart Plugin support?

Redmineflux tests and supports the Gantt Chart Plugin on Redmine 5.0.x, 5.1.x, and 6.0.x. Teams running Redmine 4.x should contact support before purchasing to confirm compatibility.

Sprint boards keep daily delivery on track. The Redmine Gantt Chart Plugin keeps the release on track with the dependency chain, milestone markers, and baseline comparison that tell the project manager whether the original commitment is still achievable. Both views draw from the same Redmine issues. The team sees the work from two angles without managing two systems.

Ready to Plan Releases with Full Dependency Tracking?

Explore Managed Cloud → Redmine with the Gantt Chart Plugin and full plugin suite pre-installed, hosted, and managed.

Categories
Informational

How to Modernise Redmine’s Interface — Themes, Dark Mode, and UI Plugins

Redmine’s default interface is functional. It is also dated. If your team’s first reaction to a new Redmine installation is “does this have a modern version?” that reaction is understandable, and it has a practical answer.

The functionality behind the interface is solid. The issue tracking model, role-based workflows, time tracking, and project structure are well-designed. But the visual layer was not a priority when Redmine was built, and the default theme reflects that.

The good news is that the interface is separate from the functionality. Redmineflux themes and UI plugins change what Redmine looks like without touching how it works. Your issues, workflows, custom fields, and project data stay exactly as they are. The team just stops working in a visually outdated environment.

This guide covers what Redmine’s modern UI options actually look like in practice themes, dark mode, inline editing, and mobile rendering.

What Does Redmine’s Interface Look Like by Default?

The short answer: Redmine’s default theme is functional but visually plain grey sidebar, table-heavy issue lists, and a dense layout that prioritises data density over usability. Redmine themes replace the visual layer without changing the underlying data or workflow. UI plugins like the Inline Editor Plugin go further adding interaction patterns that reduce clicks per action. Together, they make Redmine feel like a current tool rather than a legacy one.

The default Redmine interface ships with two built-in themes: Default and Alternate. Both are table-based, low-contrast, and not optimised for modern screens. They work. They do not feel good to use, particularly for teams coming from modern SaaS tools.

That gap in visual quality is often the first objection when an engineering manager evaluates Redmine against newer alternatives. It is also the easiest objection to resolve, because the interface is entirely separable from the platform.

What Redmine Themes Actually Change

A Redmine theme is a CSS and layout layer applied on top of the platform. It changes colours, typography, spacing, sidebar layout, and visual hierarchy without modifying any Redmine functionality.

A well-designed theme changes several things that affect daily usability:

Visual hierarchy — Redmine’s default layout treats all information as equally important. A good theme creates clear visual separation between primary content (the issue you are working on) and supporting content (the sidebar, the metadata, the related issues).

Navigation clarity — The default navigation bar is functional but cramped. Modern themes restructure it to be readable at a glance, particularly on wider screens.

Issue list readability — The default issue list is a dense table. Themes can open up the row spacing, improve contrast, and make priority and status indicators visually distinct rather than text-only.

Mobile rendering — The default theme does not adapt well to mobile screens. Responsive themes fix layout breakpoints so Redmine is usable on a phone or tablet relevant for teams that check project status outside the office.

What UI Plugins Add Beyond Visual Changes

Themes change how Redmine looks. UI plugins change how it behaves. The two work together, but they solve different problems.

The most impactful UI plugin for daily use is the Redmineflux Inline Editor Plugin. By default, editing a Redmine issue requires opening the full edit form, making changes, and saving. The Inline Editor Plugin lets team members update the status, assignee, priority, or custom fields directly on the issue detail page a single click rather than a form submission.

That interaction change reduces friction significantly in daily use. Developers moving issues through a sprint board, QA engineers updating test results, and project managers adjusting priorities all benefit from the reduced clicks per action.

Furthermore, improved issue detail views group related information more logically. Activity, related issues, time entries, and attachments get organised into clear sections rather than a single scrolling column. That organisation matters on issues with a long history the team can find what they need without scrolling through every comment.

The Redmineflux Theme — What It Adds

The Redmineflux theme is built specifically for Redmine 5.x and 6.x. It addresses the most common visual complaints about the default interface:

  • Clean, high-contrast layout with clear visual hierarchy
  • Responsive design that adapts correctly to laptop, desktop, and tablet screens
  • Improved navigation structure with clearer project switching
  • Modern typography and spacing that reduces visual fatigue on long sessions
  • Status and priority indicators that are colour-coded and immediately readable

The theme works across all Redmineflux plugins the Agile Board sprint view, Gantt Chart timeline, Custom Dashboard, and Timesheet views all inherit the same visual language. Teams do not see a mix of old and new interface styles as they move between the base Redmine views and plugin-added views.

Want to see what a fully themed and configured Redmine environment looks like? Book a Free Demo see the Redmineflux interface running live in 30 minutes.

Dark Mode in Redmine

Redmine does not include dark mode in its default themes. Dark mode requires either a third-party theme built with dark mode support or a custom CSS layer applied on top of an existing theme.

The Redmineflux theme includes a dark mode option. Teams that prefer dark mode for extended coding sessions or that work in low-light environments can switch without installing a separate tool or writing custom CSS.

Dark mode is applied at the user level in supported themes. Each team member sets their own preference without affecting anyone else’s view.

Mobile Redmine — The Honest Picture

Redmine’s core functionality works on mobile, but the default interface was not designed for it. Dense tables, small tap targets, and a navigation structure built for wide screens make the default Redmine experience on a phone frustrating.

Responsive themes fix the layout layer. They reflow the sidebar, enlarge tap targets, and collapse the navigation into a usable mobile menu. However, some Redmine workflows creating complex issues, managing the Gantt chart, reviewing sprint boards remain better suited to desktop even with a responsive theme applied.

For teams that only need to check issue status, update a field, or log time from a mobile device, a responsive theme makes that genuinely usable. For teams that need to do complex project management work on mobile, Redmine is not the right tool regardless of theme.

How to Apply a Theme in Redmine

Applying a theme in Redmine is an administration task, not a development task.

  1. Download or install the theme files into the public/themes/ directory on your Redmine server
  2. Restart the Redmine application
  3. Go to Administration → Display and select the theme from the dropdown
  4. Save the theme applies immediately across the entire instance

For managed hosting environments including Redmineflux Managed Cloud the theme is pre-installed and pre-configured. No file access or server restart is needed.

Common Questions

Does Redmine have a modern UI?

Redmine’s default interface is functional but dated. The underlying platform is modern and actively maintained. The visual layer the default themes has not changed significantly in several years. Third-party themes and UI plugins, including the Redmineflux theme, bring the interface up to current standards without affecting the platform’s functionality.

Can I change the Redmine theme?

Yes. Redmine supports custom themes applied through the administration panel. Themes are installed into the public/themes/ directory and selected in Administration → Display. No custom development is required to switch themes. The Redmineflux theme is compatible with Redmine 5.0.x, 5.1.x, and 6.0.x.

Does Redmine have dark mode?

Not natively. Dark mode requires a theme that includes it. The Redmineflux theme includes a dark mode option that individual users can enable from their account settings without affecting other team members’ views.

What is the best Redmine theme in 2026?

For development teams running Redmineflux plugins, the Redmineflux theme is the practical choice it is built specifically for the Redmine versions Redmineflux supports and is visually consistent across all plugin-added views including the Agile Board, Gantt Chart, and Custom Dashboard.

Will changing the Redmine theme affect my data or workflows?

No. A theme is a visual layer only. Changing the theme does not affect issues, workflows, custom fields, project data, or any configuration. The theme change is immediate and fully reversible switching back to the default theme restores the original appearance with no data loss.

Do Redmineflux themes work on all Redmine versions?

Redmineflux tests and supports its theme on Redmine 5.0.x, 5.1.x, and 6.0.x. Teams running Redmine 4.x should contact support before purchasing to confirm compatibility.

Redmine’s interface is one of the most common reasons teams hesitate to adopt it. That hesitation is reasonable given the default theme but it is also the most straightforward problem to solve. A properly configured Redmine environment with the right theme and UI plugins looks and feels like a current tool. The functionality was always there. The visual layer just needed updating.

See the Redmineflux interface running live in a demo

Related Reading

Categories
Informational

Redmine Pricing Explained — What You Pay and What Stays Free

Redmine pricing confuses a lot of teams at first. The software itself is free. The plugins are not. Hosting is a separate decision. And unlike most project management tools, there are no per-user fees at any stage.

That cost model is one of the strongest reasons development teams choose Redmine but only once they understand how it actually works. Teams that approach Redmine expecting a SaaS pricing page are often surprised. Teams that understand the structure from the start make much better decisions about what to buy and when.

This guide explains Redmine pricing across all three layers the software, the plugins, and the hosting so you can plan the full cost before committing.

How Much Does Redmine Actually Cost?

The short answer: Redmine the software is free and open-source you can install it at no cost on your own server. Plugins are licensed per installation, not per user, so a team of ten and a team of one hundred pay the same licence fee. Hosting adds a server cost if you self-host, or a flat managed hosting fee if you use a service like Redmineflux Managed Cloud. There are no per-seat fees, no pricing tiers, and no feature paywalls based on team size.

The three cost layers are independent of each other.

Redmine can be run for free on your own infrastructure without requiring any plugins. Plugins can be added later without needing to modify your hosting setup. If needed, you can also switch to managed hosting without affecting your existing plugin licenses. Each layer is a separate decision.

Redmine Software: Free and Open-Source

Redmine is released under the GNU General Public License. The full software issue tracking, project wikis, time tracking, role management, Gantt view, and email notifications is available at no cost. There is no paid version of Redmine itself. The community maintains and updates it actively; Redmine 6.x is the current stable release.

What “free” means in practice: you download and install Redmine on a server you control. The server has a cost either a cloud VM, a physical machine, or a managed hosting service. The software itself has none.

What “open-source” means in practice: you can inspect the code, modify it, and self-host it indefinitely. You are not locked into any vendor’s upgrade schedule or pricing decisions. If Redmine releases a new version, you upgrade on your own timeline. If you want to run an older version, nothing forces you to upgrade.

Plugin Pricing: Per Installation, Not Per User

Most Redmine plugins including all Redmineflux plugins are licensed per installation. You buy the plugin once and it runs on your Redmine instance for all users, across all projects. The licence fee does not change whether you have 5 users or 500.

That model is the key cost difference between Redmine and SaaS project management tools. SaaS tools charge per user per month. As your team grows, the bill grows at the same rate. Redmine plugin licences stay flat.

What this means across a 3-year horizon:

A team that grows from 15 to 40 people on a typical SaaS tool sees their subscription cost nearly triple over those three years. On Redmine with Redmineflux plugins, the plugin licence does not change. The only cost that grows is the server and server costs scale on infrastructure usage, not headcount.

Plugin options from Redmineflux:

You can buy plugins individually or as a bundle. The All Plugins Pack covers the full Redmineflux suite Agile Board, Gantt Chart, Timesheet, Workload, Custom Dashboard, Test Case Management, Issue Template, and more at a lower combined cost than buying each plugin separately. For teams that need more than two or three plugins, the pack is the practical choice.

See exact plugin pricing on the Redmineflux pricing page.

Hosting: Three Options at Different Cost Points

Self-Hosted on Your Own Server

You manage the server infrastructure. You handle installation, upgrades, backups, and security patches. The cost is your server bill typically a VPS or dedicated machine from a cloud provider.

For a team of 20 to 50 people, a mid-range VPS handles Redmine comfortably. That is the only recurring cost beyond any plugin licences you have purchased.

Best for: Teams with server management experience who want full data control and the lowest possible running cost.

Redmineflux Managed Cloud

Redmineflux manages the server, handles Redmine upgrades, runs backups, and provides support. Your team gets a fully configured Redmine environment with the plugin suite pre-installed. You own the data and the configuration. Redmineflux handles the infrastructure layer.

The cost is a flat managed hosting fee not per user. It does not change as your team grows.

Best for: Teams that want self-hosted data ownership without the administration overhead of running their own server.

Third-Party Managed Hosting

Several hosting providers offer managed Redmine environments. The quality and pricing vary significantly. These are not Redmineflux products confirm plugin compatibility before purchasing.

What Redmine Costs in Practice — A Real Example

Consider a 25-person development team that needs sprint boards, Gantt planning, time tracking, and QA management.

On a typical SaaS project management tool at the feature tier required for all four capabilities, that team spends a meaningful amount monthly and the bill increases every time a new developer joins.

With Redmine and the Redmineflux All Plugins Pack:

  • Redmine software: free
  • All Plugins Pack: one-time or annual licence, fixed regardless of headcount
  • Managed Cloud hosting: flat monthly fee the same whether the team is 25 or 50

At 25 people the cost difference is noticeable. At 50 people it is significant. Over three years with a growing team, the total cost of ownership for Redmine is typically a fraction of what the equivalent SaaS subscription costs.

Want to see the full Redmineflux stack running before you make any decisions? Book a Free Demo 30 minutes in a live environment answers most pricing questions more clearly than any guide can.

What Affects Your Actual Redmine Budget

Four factors determine what Redmine genuinely costs your team:

1. How many plugins you need A team that only needs the Agile Board Plugin pays far less than a team that needs the full suite. Start with the plugins that close your most pressing workflow gaps.

2. Whether you self-host or use managed hosting Self-hosting has lower ongoing costs but requires internal administration time. Managed hosting trades a higher monthly fee for zero administration overhead. For most teams, the administration time is the larger real cost.

3. Team size — but only for server costs Plugin licences do not change with headcount. Server costs do scale slightly as usage grows, but the relationship is not linear. A server handling 30 users handles 60 users with a modest upgrade not a doubled bill.

4. How long you plan to stay on Redmine If your team commits to Redmine for three or more years, the per-installation plugin model becomes significantly more cost-effective than SaaS subscriptions. The savings compound with team growth and time.

Common Questions

Is Redmine free to use?

Yes. Redmine is free and open-source software released under the GNU General Public License. You can install, use, and modify it at no cost. You need a server to run it either your own or a managed hosting service. The software itself has no licence fee.

How much do Redmine plugins cost?

Redmineflux plugins are licensed per installation, not per user. You pay once for the plugin and it runs for all users on that Redmine instance. Individual plugin prices and bundle options are listed on the Redmineflux pricing page. The All Plugins Pack covers the full suite at a lower combined cost than individual purchases.

Does Redmine charge per user?

No. Redmine itself has no per-user fee. Redmineflux plugin licences are also per installation, not per user. A team of 10 and a team of 100 pay the same plugin licence fee. This is one of the primary reasons growing development teams choose Redmine over per-seat SaaS tools.

What is the cheapest way to run Redmine for a growing team?

Install Redmine on a VPS (typically low monthly cost), add only the plugins your team needs from Redmineflux, and manage the server yourself if you have the capacity. As the team grows, the plugin costs stay flat and server costs scale modestly with usage. This approach delivers the lowest total cost of ownership over a three-to-five year horizon.

What does Redmineflux Managed Cloud include?

Redmineflux Managed Cloud includes a fully configured Redmine environment with the Redmineflux plugin suite pre-installed, ongoing server management, automated backups, Redmine upgrades, and technical support. It is a flat monthly fee — not per user. You own the data and configuration. Redmineflux manages everything at the infrastructure layer.

Which Redmine versions do Redmineflux plugins support?

Redmineflux tests and supports all plugins on Redmine 5.0.x, 5.1.x, and 6.0.x. Teams running Redmine 4.x should contact support before purchasing to confirm compatibility.

Redmine pricing works differently from almost every other project management tool in the market. The software is free. The plugins are flat-rate per installation. Hosting is a separate cost that scales with infrastructure, not headcount. For teams that plan to grow, that model produces a total cost of ownership significantly lower than per-seat alternatives and the gap widens every time a new team member joins.

Categories
Informational

Jira Alternatives for Small Teams — A Practical Guide for 2026

Small teams find Jira the same way. Someone on the team has used it before, or it comes up in a recommendation thread, or it is simply the most visible name in the space. The setup happens quickly. The first sprint starts. Everything feels manageable.

Then the team grows. The bill grows with it. The workflow schemes that seemed straightforward at setup start accumulating configuration debt. Someone needs to know why the notification rules behave unexpectedly. A new project manager joins and spends two weeks learning how Jira works before they can run a sprint.

At some point, a reasonable question surfaces: is Jira the right tool for a team of this size, or is it a tool built for a scale that this team has not reached yet?

This guide is for teams at that point. It covers what to look for in a Jira alternative for small teams and what a purpose-built solution that fits the actual workflow looks like in 2026.

Why Small Teams Look for Jira Alternatives

The short answer: Jira is a powerful tool built for large engineering organisations. For small teams, the per-seat pricing grows linearly with headcount, the administration overhead requires ongoing expertise, and full capability depends on the wider Atlassian ecosystem at additional cost. A good Jira alternative for small teams delivers the same workflow coverage issue tracking, sprint management, time tracking, and reporting at lower cost and with simpler administration.

The reasons small teams look for Jira alternatives are almost always the same three.

Cost that grows with headcount

Jira charges per user per month. The Standard plan runs approximately $8.15 per user per month. The Premium plan required for Advanced Roadmaps, automation, and cross-team capacity planning runs approximately $16 per user per month. For a 15-person team on Premium, that is roughly $2,900 per year for Jira alone. Add Confluence for documentation and the bill climbs further.

Administration complexity that requires expertise

Jira’s power comes from its scheme-based configuration model. Workflow schemes, permission schemes, issue type schemes, and notification schemes give administrators precise control over how the tool behaves. That is genuinely useful at scale, where dozens of projects and multiple teams need consistent, governed configuration.

For a small team, that same system is often more configuration than the team has capacity to maintain well. Without a dedicated Jira administrator, schemes drift. Permissions become inconsistent. Automations conflict with each other. The tool that was supposed to reduce overhead starts adding it.

Capability that requires the full Atlassian stack

Jira is designed to work alongside the rest of the Atlassian ecosystem. Documentation lives in Confluence. Support tickets live in Jira Service Management. Test cases live in Xray or Zephyr. Advanced portfolio planning lives in Advanced Roadmaps on the Premium tier.

For a small team that just needs to track work, run sprints, and report time against issues, subscribing to multiple Atlassian products to unlock core capabilities is a poor cost-to-value trade.

What a Good Jira Alternative for Small Teams Actually Needs

Not every cheaper tool is a good Jira alternative. The right alternative needs to cover the same workflow surface without the cost structure or administration overhead that drove the search in the first place.

A credible Jira alternative for a small development team needs to deliver:

  • Issue tracking with real workflow control — trackers, statuses, and role-based transitions, not just task cards
  • Sprint and backlog management — planning, velocity tracking, and scope management across releases
  • Time tracking against issues — hours logged directly against work items, not in a separate tool
  • Gantt and timeline planning — delivery timeline visibility with dependencies and milestones
  • Test case and QA management — without a third-party add-on at additional cost
  • Simple administration — manageable without a dedicated tool administrator
  • Predictable pricing — a cost model that does not grow linearly with headcount

A tool that covers four of those seven is a partial answer. A tool that covers all seven at lower cost and with simpler configuration is a genuine alternative.

Evaluating Redmineflux as your Jira alternative? Book a Free Demo see every capability above running in a live Redmine environment in 30 minutes.

Why Redmine with Redmineflux Is the Right Answer for Small Teams

Redmine is an open-source project management and issue tracking platform. Developers have maintained it actively since 2006. Small teams around the world use it as the foundation for structured development workflows and it covers the core of what Jira does without the per-seat pricing model.

What Redmine Delivers Out of the Box

Redmine includes structured issue tracking with tracker types, configurable statuses, and role-based workflow transitions. Time tracking is native hours log directly against issues and projects without a third-party add-on. Role and permission management is granular. Project wikis, document management, and a basic Gantt view all ship with the base platform.

The administration model is simpler than Jira’s scheme-based system. A project manager at a small team can configure Redmine’s workflows, permissions, and trackers without becoming a Jira-certified administrator. That difference matters when no one on the team has dedicated tool-admin capacity.

Redmine is free and open-source. Your data stays on your server. You can back it up, export it, and migrate it without asking permission from a vendor.

What Redmineflux Adds on Top

The base Redmine platform covers the foundation. Redmineflux adds the workflow layer that makes it a complete Jira replacement for small teams.

The Agile Board Plugin — sprint boards and backlog management for Redmine delivers Scrum and Kanban boards, sprint planning, WIP limits, swimlanes, and velocity tracking. Every card on the board is a live Redmine issue. There is no sync, no duplication, and no data living in two places at once.

The Gantt Chart Plugin — delivery timelines, dependencies, and baseline tracking adds Finish-to-Start dependencies, milestone markers, baseline comparison, and drag-and-drop rescheduling. When a task slips, the downstream impact on the release date shows immediately. No separate roadmap tool is needed.

The Timesheet Plugin — billing-quality time reports against your Redmine issues adds detailed time reporting, approval workflows, and export formats for client billing all drawing from the same time entries your team logs against issues every day.

The Test Case Management Plugin — QA workflow and test runs inside your issue tracker keeps test case management inside Redmine. Test cases link directly to the issues they cover. Sign-off happens in the same system where development work lives not in a spreadsheet alongside it.

Together, these four plugins cover everything a small development team typically relies on Jira for at a per-installation licence fee that does not grow as the team grows.

See the full plugin suite find which plugins cover your team’s current Jira use cases.

The Cost Difference Over Three Years

This is where the Jira alternative question becomes concrete for most small teams.

A 20-person team on Jira Premium pays approximately $3,840 per year. That is Jira alone no Confluence, no Jira Service Management, no test case add-on. If the team grows to 30 people, the bill reaches $5,760. Over three years at that growth rate, the total Jira spend approaches $15,000 to $20,000 for the base product.

Redmineflux licenses plugins per installation, not per user. A 20-person team and a 40-person team pay the same licence fee. The full plugin suite is available as an All Plugins Pack. Hosting costs the price of a server. For teams that want managed hosting without the administration overhead, Redmineflux Managed Cloud provides a fully configured Redmine environment maintained, updated, and supported at a predictable annual fee that does not increase with headcount.

Over three years, the cost difference between Jira Premium and Redmine with Redmineflux for a growing small team is significant. For many teams, that gap alone closes the evaluation.

What the Switch Actually Looks Like

Moving from Jira to Redmine is a documented process with clear steps. The concern most teams have that the migration will be painful is usually larger in anticipation than in practice.

Export from Jira using the built-in CSV export or the Jira API. The export captures issues, projects, attachments, and field data. Import into Redmine using the CSV import feature, mapping Jira issue types to Redmine trackers and Jira workflow statuses to Redmine statuses. The field mapping step takes planning but not expertise.

Install the Redmineflux plugins that cover your team’s Jira use cases. Configure the Agile Board for sprint execution. Set up the Gantt Chart Plugin for release planning. Enable the Timesheet Plugin for time reporting. The guide to setting up Redmine issue tracking covers the tracker and workflow configuration that underpins all of these.

Run both systems in parallel for 30 days before cutting over. That window gives the team time to verify data completeness, adjust workflow configuration, and confirm that the new system covers everything the old one did.

Most small teams complete the full migration from export to working Redmineflux environment within two to three weeks.

Common Questions

Is Redmine a good Jira alternative for small development teams?

Yes. Redmine covers the core Jira use case structured issue tracking with workflow control, role-based permissions, time tracking, and project reporting without per-seat pricing. With Redmineflux plugins, it adds sprint boards, Gantt planning, test case management, and workload visibility. For small teams under 30 people, it delivers comparable daily workflow capability at significantly lower cost.

What does it cost to replace Jira with Redmine?

Redmine is free and open-source. Hosting costs the price of a server or managed cloud service. Redmineflux plugins are licensed per installation, not per user so the cost stays flat as the team grows. The total first-year cost for Redmine with the full Redmineflux plugin suite is typically a fraction of equivalent Jira Premium pricing for a 15–20 person team.

Can Redmine do sprints and Kanban boards like Jira?

Yes, with the Redmineflux Agile Board Plugin. Scrum sprint planning, backlog grooming, Kanban boards, WIP limits, swimlanes, and velocity tracking all work within Redmine. Every board card is a live Redmine issue no separate board tool, no sync required.

How long does it take to migrate from Jira to Redmine?

Most small teams complete the migration in two to three weeks. The process involves exporting from Jira, importing into Redmine with field mapping, installing Redmineflux plugins, and running both systems in parallel for 30 days before cutting over. The migration complexity depends on the number of custom fields and workflow configurations in the existing Jira setup.

Do I need a dedicated administrator to run Redmine?

No. Redmine’s administration model is simpler than Jira’s scheme-based configuration. A project manager or team lead at a small organisation can configure trackers, statuses, workflow transitions, and permissions without specialised tool administration knowledge. Redmineflux plugin configuration follows the same straightforward approach.

Which Redmine versions do Redmineflux plugins support?

Redmineflux tests and supports all plugins on Redmine 5.0.x, 5.1.x, and 6.0.x. Teams running Redmine 4.x should contact support before purchasing to confirm compatibility.

The right Jira alternative for a small team is not just a cheaper tool. It is a tool that covers the same workflow needs sprint management, issue tracking, time reporting, and release planning with simpler administration and a cost model that stays flat as the team grows. Redmine with Redmineflux delivers exactly that.

If your team is ready to make the move, the fastest next step is seeing it in action.

Book a Free Demo — see Redmineflux running live in 30 minutes, no commitment Explore the Plugin Suite — find which plugins cover your Jira use cases Explore Managed Cloud — full Redmineflux stack hosted and maintained for you

Categories
Informational

Best Project Management Software for Development Teams 2026

Most project management tools are built for everyone. That sounds like a strength. In practice, it means they are optimised for no one in particular and development teams feel that gap the most.

A development team’s workflow is not a generic task list. It involves issue tracking, sprint planning, time logging against issues, QA runs tied to the work being tested, and cross-project visibility for engineering leads. Tools that handle marketing campaigns or agency retainers elegantly often handle this combination poorly.

This guide covers what the best project management software for development teams needs to do. It also covers what a purpose-built solution looks like in practice.

What the Best Project Management Software for Development Teams Must Do

The short answer: Development teams need issue tracking with workflow control, sprint and backlog management, time tracking against issues, and ideally QA or test case management in the same system. Generic project management tools often handle one or two of these well. A purpose-built solution handles the full set with a cost model that does not penalise team growth.

Before evaluating any tool, it helps to be specific about what a development team actually needs. Most teams need all of the following:

  • Issue tracking with real workflow control — not just task cards, but tracker-level workflows with role-based status transitions
  • Sprint and backlog management — planning velocity, adjusting scope mid-sprint, and maintaining history across releases
  • Time tracking against work items — hours logged directly against issues and projects, not in a separate disconnected tool
  • Test case and QA workflow — a place to manage test runs and sign-off without switching to a completely separate system
  • Cross-project visibility — for engineering leads and project managers overseeing more than one workstream at once
  • Predictable cost as the team grows — pricing that does not double when headcount doubles

Not every team needs all six from day one. But a tool that cannot grow into all of them is usually a workaround waiting to happen.

Already on Redmine and want to see the full solution? Get a Free Demo – see every capability above running together in a live environment in 30 minutes.

Why Most Generic Tools Fall Short

Most project management software starts from a task card. You have a list of tasks, you assign them, you mark them done. That model works for operational work, campaign management, and internal coordination.

Development work is different. A bug is not the same kind of work as a feature. A support ticket should not follow the same workflow as a QA task. As a result, generic tools flatten all of that into one task type. Teams end up building workarounds to compensate. QA tracking moves to a spreadsheet because the tool has no test case model. Sprint velocity gets managed in a separate document because the board does not connect to a backlog with history. For billing, time data gets exported to another system because the tool cannot report hours against projects.

Each workaround feels small at first. Together, however, they create a system where no single view shows the complete picture. Delivery suffers. Reporting becomes unreliable. Eventually, the team gradually stops trusting the tool.

Instead, the right solution for a development team is a platform built around how development work actually moves. Backlog to sprint. Issue to resolution. Estimate to logged time.

What Purpose-Built Project Management Looks Like

Redmine as the Foundation

Redmine is an open-source project management and issue tracking platform. Developers have maintained it actively since 2006. Redmine handles the kind of structured, multi-role workflow that development teams run not as an afterthought, but as the core design.

The base platform gives you issue tracking with trackers, statuses, and role-based workflow transitions. Time tracking is native hours log directly against issues and projects. Role and permission management is granular. Project wikis, forums, and document management are all included. A basic Gantt view ships with the platform.

Most importantly, Redmine separates work by type. A Bug follows different rules from a Feature. A Support ticket has different required fields and different status transitions. That structure is what makes reporting reliable and what prevents the “everything is just a task” problem that generic tools create.

Redmine is free and open-source. You host it on your own server, which means your data stays in your database available for backup, export, or migration at any time.

Redmineflux — The Layer That Completes the Workflow

As a foundation, the base Redmine platform covers the essentials well. The gaps appear when teams need agile execution, advanced timeline planning, and detailed time reporting all connected to the same issues they are already tracking.

That is exactly what Redmineflux is built to add.

The Agile Board Plugin — sprint planning and Kanban boards built for Redmine brings Scrum and Kanban boards, sprint planning, WIP limits, swimlanes, and backlog management. Every board card is a Redmine issue — no duplication, no sync problems.

For release planning, the Gantt Chart Plugin — dependencies, baselines, and drag-and-drop scheduling adds milestone tracking, Finish-to-Start dependencies, baseline comparison, and resource loading. When a task slips, the downstream impact shows immediately on the chart.

Time reporting gets equally strong coverage — the Timesheet Plugin — billing-quality time reports against your Redmine issues adds detailed reporting, approval workflows, and export formats suitable for client billing, without a separate time-tracking application.

QA workflow stays inside the same system through the Test Case Management Plugin — test runs and sign-off inside your issue tracker. Test cases link directly to the issues they cover. Sign-off happens in Redmine, not in a disconnected spreadsheet.

Finally, the Workload Plugin — team capacity visible before you make commitments shows who has capacity on which dates. You see resource conflicts before they affect delivery, not after.

Teams that delay setting up proper tooling pay a compounding price. Manual workarounds become habits. Sprint data ends up in spreadsheets. Consequently, QA gaps surface at release time instead of during planning. The sooner the workflow is structured correctly, the less cleanup is needed later.

Explore how Redmineflux Plugins brings all development tools together

The Cost Model That Makes Sense for Growing Teams

Most project management tools charge per user per month. At small team sizes, that feels manageable. As the team grows from 10 to 30 to 50 people the cost grows at the same rate. Add advanced features and the bill grows faster still. For development teams at growing organisations, that pricing model becomes a significant constraint over a three to five year horizon.

In contrast, Redmineflux licenses plugins per installation, not per user. A 10-person team and a 100-person team pay the same plugin licence fee. As headcount grows, the cost stays flat. The full plugin suite Agile Board, Gantt Chart, Timesheet, Workload, Dashboard, Test Case Management, and more is available as an All Plugins Pack at a fraction of what comparable per-seat tooling costs at scale.

Additionally, Redmine itself is free and open-source. Hosting costs the price of a server. For teams that want managed hosting without the administration overhead, Redmineflux Managed Cloud provides a fully configured Redmine environment maintained, updated, and supported without the SaaS vendor dependency that comes with most cloud tools.

What This Looks Like for a Real Development Team

Consider a 25-person development team running three concurrent projects. They need sprint boards for day-to-day delivery, a Gantt chart for release planning, time tracking for client billing, and a QA workflow that does not live in a separate spreadsheet.

For example, with per-seat project management software at the feature tier required for all of those capabilities, that team spends a significant sum annually and the bill grows every time a new developer joins.

Instead, with Redmine and the Redmineflux plugin suite, the same team pays one plugin licence regardless of whether they grow to 40 or 50 people. Every capability boards, Gantt, time tracking, QA, workload management sits in one system, drawing from the same issue data. When a developer logs time or closes a test case, the project manager sees it immediately on the same dashboard.

As a result, that is what purpose-built project management looks like in practice. Not more features better integration of the features the team already needs.

Choosing the Right Setup for Your Team

If your team is self-hosted and technical

First, install Redmine on your own server. Then add the Redmineflux plugins that cover your team’s current gaps. Start with the Agile Board Plugin for sprint execution and the Gantt Chart Plugin for release planning those two changes cover most of what development teams find missing from the base Redmine installation. Additionally, the guide to setting up Redmine issue tracking covers the workflow foundations that make every plugin more effective.

If your team wants managed hosting

Redmineflux Managed Cloud provides a fully configured Redmine environment with the plugin suite pre-installed. Your team gets the full capability without anyone on the team managing infrastructure, handling upgrades, or troubleshooting server issues. You own the data. Redmineflux handles everything else.

If your team is evaluating from scratch

Start with the free demo. It shows the complete Redmineflux workflow issue tracking, sprint boards, Gantt chart, time tracking, and QA running together in a live environment. Thirty minutes in the demo answers most of the questions that would otherwise take weeks of evaluation to resolve.

Start with a demo.

Book a free demo and explore the full workflow in action

Common Questions

1. What is the best project management software for small development teams?

For small development teams under 20 people, Redmine with a focused Redmineflux plugin set delivers the best capability-to-cost ratio. The administration model is straightforward, the pricing does not grow with headcount, and the feature set covers the full development workflow issue tracking, sprint boards, time tracking, and test case management without requiring separate tools for each function.

2. Does development team project management software need built-in time tracking?

Yes, for most development teams. When time tracking sits in a separate tool, hours do not connect to the issues they were spent on. Reporting becomes manual and unreliable. Redmine’s native time tracking logs hours directly against issues and projects. The Redmineflux Timesheet Plugin adds the reporting depth and approval workflows that billing and project review require.

3. What project management software supports self-hosted deployment for development teams?

Redmine is the most established self-hosted project management platform for development teams. It is open-source, free to install, and runs on standard server infrastructure. Redmineflux plugins extend it with agile boards, Gantt planning, time reporting, and QA workflow all self-hosted, with no SaaS dependency.

4. Do development teams need separate tools for project management and bug tracking?

Not if the project management tool has a real issue tracking model. Redmine handles both in one system bugs are a tracker type within the same issue model as features, tasks, and support tickets. Each tracker type can have its own workflow, required fields, and status transitions. No separate bug tracking tool is needed.

5. What is the most cost-effective project management tool for a growing development team?

Redmine with Redmineflux is the most cost-effective option for growing teams. Plugin licences do not increase with headcount, and Redmine itself is free and open-source. Hosting costs scale predictably with infrastructure rather than with user count. For teams projecting growth beyond 20–30 people, the cost difference versus per-seat tools compounds significantly over three to five years.

The best project management software for a development team is not the one with the most features or the highest review score. It is the one built around how development work actually moves from backlog to sprint, from issue to resolution, from estimate to logged time with a cost model that does not penalise the team for growing.

If your team is ready to move beyond basic issue tracking into a fully structured development workflow, the next step is simple.

Explore Managed Cloud — full Redmineflux stack, hosted and maintained for you

Categories
Informational

Redmineflux Managed Cloud: What Managed Redmine Hosting Looks Like in Practice

Redmine is self-hosted by design. That gives your team full data ownership and complete control over the environment. Many teams choose Redmine precisely because of that characteristic.

But self-hosting also means your IT team owns everything that keeps Redmine running. Upgrades, backups, plugin compatibility, and every unplanned outage all of that lands on your plate. The software is free; the operational overhead is not.

For some teams, that trade-off works perfectly. For others, it quietly becomes the reason Redmine never gets the attention it deserves. Upgrades get delayed because nobody has bandwidth. Plugins fall behind compatibility. The server runs fine until it does not. And every time something breaks, someone who should be building products spends a day diagnosing infrastructure instead.

Redmineflux Managed Cloud exists for teams that want Redmine the data ownership, the plugin depth, the structured workflow without the infrastructure work that gets in the way.

What Self-Hosting Redmine Actually Involves

Self-hosting Redmine is not complicated for experienced engineers. But it requires genuine, ongoing effort that most teams underestimate before they commit.

First, someone needs to provision and maintain the server itself. That means selecting the right environment, installing the correct Ruby and Rails versions, setting up the database, and keeping system dependencies current. Then comes the Redmine installation migrations, configuration files, file storage, and initial setup. None of this is a one-time task. Every time Redmine releases a new version, the upgrade path runs through schema migrations and plugin compatibility checks. If you run a plugin that has not released a compatible version yet, you wait or you upgrade without it and deal with the consequences.

Plugin management deserves its own mention. Installing a Redmine plugin involves placing files, running bundle install, executing migrations, and restarting the server. Doing this across ten or fifteen plugins and keeping them all compatible with each other and with the Redmine version you run is a maintenance project on its own. Backups require a strategy, a schedule, and someone who tests restoration regularly. SSL certificates expire. Email configuration for notifications needs setup and monitoring. And when the server goes down, your team’s project management goes down with it and your IT team owns the incident.

None of this is unreasonable. It is simply honest about what self-hosting Redmine requires from the people responsible for it.

What Redmineflux Managed Cloud Covers

Answer capsule: Redmineflux Managed Cloud provides a fully hosted Redmine environment with all Redmineflux plugins pre-installed. The Redmineflux team handles infrastructure provisioning, Redmine version upgrades, plugin compatibility management, daily backups, SSL, and email configuration. Teams get a production-ready Redmine instance without managing a server.

When your team joins Redmineflux Managed Cloud, the team provisions the environment before you log in for the first time. Your instance arrives with the full Redmineflux plugin suite already installed and ready. Agile Board, Gantt Chart, Timesheet, Workload, Custom Dashboard, Knowledge Base, Helpdesk, CRM all of them sit in your Redmine instance from day one. No installation steps. Skip bundle installs. Forget migration scripts.. Your admin opens the browser and starts configuring projects.

Managed upgrades work differently from what most self-hosted teams experience. When Redmine releases a new version, the Redmineflux team handles the upgrade cycle. They test plugin compatibility across the full suite, run the schema migrations, and move your instance to the new version. Your team notices the version number changed. They do not notice a maintenance window, a compatibility failure, or a broken plugin that someone needs to diagnose. The Redmineflux team treats that process as their responsibility because in Managed Cloud, it is.

Data ownership in Managed Cloud works differently from most SaaS tools. Many SaaS project management platforms store your data in a shared multitenant system where export options are limited and migration is difficult by design. Redmineflux Managed Cloud gives each customer a dedicated environment. You can export your data at any time. If your team ever decides to move to self-hosted Redmine, that migration path exists and the Redmineflux team supports it. Your data belongs to your team the hosting arrangement does not change that.

Self-Hosted vs Managed Cloud — Which Fits Your Team

This is not a question with one right answer. Both options serve real teams with real reasons for choosing them.

Self-hosted Redmine makes sense when your team has in-house DevOps capability and wants complete control over the environment. Teams in regulated industries government contractors, healthcare, finance sometimes require on-premise infrastructure for compliance reasons, and self-hosting is the only path that satisfies those requirements. Teams that want to control the upgrade schedule, hold a version stable for extended periods, or make deep customisations to the Redmine codebase also have good reasons to own the infrastructure themselves.

Managed Cloud makes sense when infrastructure overhead sits in the way of Redmine adoption. Teams without a dedicated server admin, teams that have deferred upgrades for months because no one has bandwidth, teams where the IT director wants to reduce operational load on internal tooling these teams spend less time on maintenance and more time on the work Redmine was installed to manage. It also makes sense for teams that want to start quickly. A self-hosted deployment takes time to provision correctly. Managed Cloud removes that setup project entirely.

The honest framing is this: self-hosting gives you full control, and Managed Cloud transfers the maintenance responsibility without transferring data ownership. Choose based on your team’s actual capacity and compliance situation.

Getting Started with Redmineflux Managed Cloud

The setup process for Managed Cloud does not involve your IT team standing up a server. The Redmineflux team provisions the instance on their infrastructure after you sign up.

Your admin receives access credentials for a configured Redmine environment. All plugins are already enabled. From there, your admin configures the things that should belong to your team projects, trackers, workflows, custom fields, user roles, and permissions. That configuration work is the same whether you run self-hosted or Managed Cloud. The difference is that everything underneath it the server, the database, the SSL certificate, the email configuration, the backup schedule already works.

Ongoing, your team uses Redmine. The Redmineflux team handles upgrades, backups, and infrastructure. Support is available for configuration questions when your team needs guidance on Redmine settings or plugin behaviour. The goal is a Redmine environment your team maintains for your work, not one that requires ongoing technical management just to stay operational.

How Managed Cloud Connects with the Plugin Suite

The practical advantage of Managed Cloud is not just that plugins are included. It is that every plugin works without the installation friction that delays adoption on self-hosted environments.

Teams that run self-hosted Redmine often delay plugin adoption because installation requires a maintenance window, compatibility checks, and someone technical enough to handle the process safely. On Managed Cloud, that barrier does not exist. The Agile Board Plugin is enabled from day one your team starts sprint planning immediately. The Gantt Chart Plugin is pre-configured your project managers start building timelines without waiting for a deployment. The Timesheet Plugin is ready for time tracking and approval workflows before your first project kicks off.

The same applies to Knowledge Base for documentation, Helpdesk for support tickets, CRM for client and contact management, and every other plugin in the suite. Managed Cloud makes the full plugin suite available on day one not after a sequence of installation projects that stretch across weeks.

For teams looking to go deeper on specific workflows, the guides on how to track time in Redmine and how to create a Gantt chart in Redmine cover the practical setup steps for the tools your team will use most.

Common Questions

What is Redmine Managed Cloud?

Redmine Managed Cloud is a hosted Redmine deployment where the provider handles infrastructure, upgrades, backups, and plugin management on your behalf. Redmineflux Managed Cloud includes the full Redmineflux plugin suite pre-installed. Your team uses a complete Redmine environment without managing any servers.

Does Redmineflux Managed Cloud include all plugins?

Yes. Every plugin in the Redmineflux suite comes pre-installed on Managed Cloud. That includes Agile Board, Gantt Chart, Timesheet, Workload, Custom Dashboard, Knowledge Base, Helpdesk, CRM, Issue Templates, Checklist, and more. No separate plugin licences or installation steps.

Can I migrate from self-hosted Redmine to Managed Cloud?

Yes. The Redmineflux team supports migrations from self-hosted Redmine to Managed Cloud. Your existing projects, issues, users, time entries, and attachments move to the new environment. Contact the Redmineflux team to discuss the migration process for your specific setup.

Who owns the data in Redmineflux Managed Cloud?

Your team owns your data. Redmineflux Managed Cloud gives each customer a dedicated environment not a shared multitenant system. You can export your data at any time. If you choose to move to self-hosted in the future, your data goes with you.

What happens when Redmine releases a new version?

The Redmineflux team handles the upgrade. They test plugin compatibility across the full suite, run the required schema migrations, and move your instance to the new Redmine version. Your team sees no planned downtime to manage and no compatibility failures to diagnose.

Is Managed Cloud more expensive than self-hosting?

The licence cost for Managed Cloud is higher than running Redmine on your own hardware. The full cost comparison depends on what you count. Self-hosted Redmine requires a server, IT time for setup, time for each upgrade cycle, and ongoing maintenance overhead. Managed Cloud replaces those costs with a predictable per-user monthly fee. For teams without a dedicated server admin, Managed Cloud is often the more cost-effective option when staff time enters the calculation.

Self-hosting Redmine gives your team full control. Managed Cloud gives your team full Redmine without the infrastructure work that delays upgrades, holds back plugin adoption, and quietly consumes IT bandwidth.

Explore Managed Cloud See what the Redmineflux Managed Cloud includes Get Free Demo See Redmine running with all plugins pre-installed View All Plugins Browse the full Redmineflux plugin suite

Categories
Informational

How to Create a Gantt Chart in Redmine — A Practical Guide

Redmine has a Gantt view built in. Most teams find it early, use it briefly, and then quietly stop.

The reason is always the same. The default view shows your issues as bars on a timeline. Start date on the left, due date on the right. You can filter by project, tracker, or assignee. You can print it. But you cannot drag bars to reschedule work, you cannot draw lines between issues to show dependencies, and you cannot compare today’s schedule against what you originally planned. When a project slips, the default Gantt has no way to show you how far it has moved.

For small projects with short timelines and a single team, that is often enough. For software releases with cross-team dependencies, client deliveries with fixed milestones, or IT portfolios where one overloaded developer can hold up three projects — the default Gantt runs out of road quickly.

This guide covers how to create a Gantt chart in Redmine using both the built-in view and the Redmineflux Gantt Chart Plugin, and when each approach is the right one.

What Redmine’s Built-In Gantt View Does

The short answer: Redmine’s built-in Gantt view displays issues on a timeline based on start and due dates. It is read-only, does not support dependencies or baselines, and does not let you reschedule work directly. For basic timeline visibility, it works. For active project planning, it requires the Redmineflux Gantt Chart Plugin to be useful.

To access the built-in view, open any Redmine project and click the Gantt tab in the project menu. Any issue with a start date and a due date appears as a bar on the timeline. You can filter by tracker, assignee, version, or priority to narrow the view.

That is genuinely useful when all you need is a quick visual of what is scheduled and when. A project manager checking whether the team’s work is spread across the month, or whether a set of issues is clustered too close to a release date, gets value from this view with no additional setup required.

The limitations become visible quickly when teams try to use it for active planning. There is no way to see which issues depend on other issues finishing first. There is no baseline to compare current progress against the original plan. There is no resource view to check whether the team is overloaded on specific dates. And there is no interactivity — you cannot move a bar and have Redmine reschedule the issue. Every date change has to be made manually inside each issue.

How to Create a More Complete Gantt Chart in Redmine

The Redmineflux Gantt Chart Plugin adds the planning layer that the built-in view is missing. Dependencies, baselines, milestones, resource loading, drag-and-drop rescheduling, and cross-project timelines — all working directly on top of your existing Redmine issues.

Here is how to set it up from scratch.

Step 1 — Install the plugin

Upload the plugin folder to Redmine/plugins/gantt_chart. Run bundle install to install required gems. Run the database migration for your environment:

RAILS_ENV=production bundle exec rails redmine:plugins:migrate

Restart Redmine. The plugin is now installed.

Step 2 — Enable Gantt Chart for your project

Go to Project → Settings → Modules tab. Check the Gantt Chart module and save. The project menu now shows a Gantt Chart tab alongside Issues, Agile Board, and other enabled modules.

Step 3 — Make sure your issues have dates

For any issue to appear on the Gantt chart, it needs a start date and a due date. You can set these on individual issues via the issue edit form. You can also assign dates directly by dragging on the Gantt canvas — click and drag on an empty row for an issue that has no dates yet, and the plugin creates the date range immediately.

If your team has been skipping start dates because the built-in view was not useful, this is the step where the habit needs to change. A Gantt chart without dates is an empty chart.

Step 4 — Add dependencies between issues

Open any issue and scroll to the Relations section. Add a “follows” relation — meaning this issue follows another issue and cannot start until the predecessor is complete. Save the issue.

Back on the Gantt chart, you will now see a connector line between the two issues. If the predecessor’s due date is later than the dependent issue’s start date, the schedule conflict is immediately visible on the chart. This is the moment where most teams realise how many implicit dependencies existed in their project that were never formally tracked.

Step 5 — Set a baseline

Open the Gantt Chart view and click Set Baseline. The plugin saves the current schedule — every issue’s start and end dates — as your reference plan.

From this point forward, the Gantt chart shows two bars for every issue: the baseline bar showing the original planned dates, and the current bar showing today’s dates. When an issue moves, the gap between the two bars makes the slippage immediately visible without any manual comparison.

Set a baseline at the start of each sprint, release, or project phase. It takes one click and gives you an honest record of how delivery tracked against the original commitment.

Step 6 — Add milestones

The Gantt Chart Plugin links milestones to Redmine versions. Go to Project → Settings → Versions → New Version. Give it a name and a target date. Save it.

Back on the Gantt chart, that version appears as a diamond marker on the timeline — visible alongside all the issues working toward it. This is the view you share with stakeholders or clients when they ask for a delivery timeline. It shows the target date, the issues scheduled before it, and how current progress sits relative to the milestone.

Step 7 — Review resource loading

The Gantt Chart Plugin shows team member workload on the timeline. Scroll to the resource section of the view to see which team members are assigned to work on which dates.

Before scheduling a new piece of work or pulling an issue forward on the timeline, check whether the assigned person has capacity on those dates. Most scheduling conflicts that surface mid-sprint were visible at planning time — they just had no tool to surface them.

What This Looks Like in a Real Project

Consider a software team planning a release. The release has four phases: design, development, QA, and deployment. Development cannot start until design is complete. QA cannot start until development is done. Deployment is blocked until QA sign-off.

Without dependencies on the Gantt, that sequence is implicit — everyone knows it, but nothing in the schedule reflects it. When design runs two days late, no one immediately updates the development start date. QA does not know their window has shifted. The release date stays fixed on the calendar while the schedule underneath it silently compresses.

With the Gantt Chart Plugin, you link those four phases as Finish-to-Start dependencies. When design slips two days, the dependent phases update on the chart automatically. The project manager sees the impact on the release date before anyone misses it. A conversation happens at replanning, not at the release date.

That is the practical difference between a timeline view and a planning tool.

Where the Gantt Chart Plugin Fits in the Wider Workflow

The Gantt chart works best when it connects to the rest of your Redmine workflow, not when teams use it in isolation.

Agile Board — daily work meets delivery timeline

If your team runs sprints on the Agile Board Plugin, those sprint issues appear automatically on the Gantt. Daily board work and delivery timeline planning stay in sync without any manual transfer. Use the board for day-to-day standups and the Gantt for release-level planning — both views draw from the same issues.

Timesheet Plugin — effort alongside schedule

Time entries logged through the Timesheet Plugin sit against the same issues the Gantt displays. Effort visibility and schedule visibility come from one place. If an issue takes longer than estimated, the logged hours show you exactly why the bar moved.

Workload Plugin — capacity before commitment

If resource loading is a recurring concern, the Workload Plugin gives the team a dedicated capacity view. Used alongside the Gantt, it means you plan delivery dates knowing who is actually available — rather than discovering overloads after you have already made commitments.

Common Questions

Does Redmine have a built-in Gantt chart?

Yes. Redmine includes a read-only Gantt view that displays issues on a timeline based on start and due dates. It supports basic filtering but does not allow dependencies, baselines, milestones, or drag-and-drop rescheduling. The Redmineflux Gantt Chart Plugin adds those capabilities on top of Redmine’s existing issue data.

How do I add dependencies between issues in Redmine?

Open an issue, scroll to the Relations section, and add a “follows” relation pointing to the predecessor issue. Once saved, the dependency appears as a connector line on the Gantt chart. Dependent issues update visually when predecessor dates change, making schedule impacts immediately visible.

What is a Gantt baseline in Redmine and how do I set one?

A baseline is a saved snapshot of your planned schedule at a specific point in time. To set one, open the Gantt Chart view and click Set Baseline. The current issue dates are saved as the reference plan. Future views show both baseline and current dates, making schedule slippage visible at a glance.

Can I view multiple Redmine projects on one Gantt chart?

Yes. The Redmineflux Gantt Chart Plugin includes a cross-project Gantt view. You select the projects to include and view all their issues on a single timeline. This is particularly useful for programme managers and IT directors overseeing several concurrent workstreams from one view.

Can I drag and drop issues to reschedule them on the Gantt?

Yes. The plugin supports drag-and-drop rescheduling directly on the Gantt canvas. Dragging an issue bar to a new position updates the issue’s start and due dates in Redmine on save. Dependent issues shift in line with the rescheduled predecessor.

Which Redmine versions does the Gantt Chart Plugin support?

Redmineflux tests and supports the plugin on Redmine 5.0.x, 5.1.x, and 6.0.x. Teams running Redmine 4.x should contact support before purchasing to confirm compatibility.

Redmine’s built-in Gantt view is a starting point — useful for visibility, limited for planning. The Redmineflux Gantt Chart Plugin turns it into an active planning tool where dependencies are tracked, you can measure slippage against a baseline, and resource conflicts surface before they affect delivery.

For a broader picture of how time tracking and issue setup connect to Gantt planning, the guides on how to track time in Redmine and how to set up issue tracking in Redmine cover the foundations that make the Gantt chart most useful.

Categories
Informational

How to Set Up Issue Tracking in Redmine — A Practical Guide from Redmineflux

At Redmineflux, we build plugins and managed Redmine environments for development teams. Issue tracking sits at the center of that work, it is where ownership, status, priority, and progress live.

Redmine is flexible by design. That flexibility is useful, but it also means a new instance can feel under-defined until the issue tracking model is properly configured.

This guide explains how to set up issue tracking in Redmine, which settings matter most, and where Redmineflux plugins add structure when core Redmine is no longer enough.

What Redmine Issue Tracking Actually Controls

Before changing settings, it helps to understand what Redmine treats as an issue. In Redmine, an issue can represent a bug, feature, support request, internal task, test item, or almost any other work object tied to a project.

That flexibility comes from a few core building blocks:

  • trackers define the type of work, such as bug, feature, support, or task
  • statuses define where the work currently sits in its lifecycle
  • workflow rules define which status transitions are allowed for each role
  • custom fields capture the extra data your team needs on creation or handoff
  • roles and permissions determine who can create, edit, assign, and close issues

Answer capsule: A good Redmine issue tracking setup combines trackers, statuses, workflows, permissions, and custom fields into one consistent model. The goal is not to create more settings. The goal is to make issue creation clearer, handoffs cleaner, and reporting more reliable across the whole project lifecycle.

If these pieces are not aligned, teams usually experience the same problems: vague tickets, inconsistent states, unclear ownership, and reporting that cannot be trusted.

Start with Trackers, Not with Statuses

One of the most common setup mistakes is trying to build the whole process around statuses first. In practice, trackers should come first because they define what kind of work the issue represents.

For example:

  • bug may need severity, reproduction steps, and QA verification
  • feature may need acceptance criteria, story points, and release planning
  • support ticket may need requester details, SLA rules, and response ownership
  • an internal task may need a lighter workflow with fewer required fields

If all of those are forced into one generic issue type, the result is either too much friction or too little structure.

A Practical Tracker Model for Most Teams

For many software and IT teams, a clean starting model looks like this:

  • Bug
  • Feature
  • Task
  • Support
  • Change Request

This is usually enough to separate work meaningfully without creating a tracker list so large that no one uses it consistently.

If your team handles repetitive intake, the Issue Template Plugin is often the next useful layer because it standardizes issue creation for each tracker and reduces missing information at the source.

Define Statuses Around Real Handoffs

Statuses should reflect actual workflow states, not aspirational labels. The cleanest Redmine setups usually use a small set of states that map directly to real team behavior.

A practical example:

  • New
  • In Progress
  • In Review
  • QA
  • Resolved
  • Closed

This works because each state signals a meaningful handoff or decision point. It also keeps reporting readable. If the system contains fifteen statuses with overlapping meanings, users stop trusting the board and managers stop trusting the reports.

How to Think About Status Design

Use statuses for workflow milestones, not for every nuance of work.

Good status questions:

  • has someone started this work
  • is it waiting on review
  • is it in testing
  • is it done but not yet formally closed

Poor status questions:

  • is this blocked because of one temporary dependency
  • is the user having a slightly different kind of review
  • does one team prefer a special naming convention

Those cases are usually better handled through notes, tags, or custom fields rather than new statuses.

For agile teams, the Agile Board Plugin becomes useful here because it turns those statuses into a clearer visual flow for Kanban and Scrum execution.

Configure Workflow Rules by Role

This is where Redmine becomes much more powerful than a simple ticket list. Workflow rules let you decide which roles can move which trackers between which statuses.

That matters because a good workflow protects process quality without forcing everyone into the same permissions model.

Examples:

  • Developers can move Bugs from New to In Progress
  • QA can move Bugs from Resolved to QA or back to In Progress
  • Project Managers can close Features after review
  • Support agents can create and update Support issues without changing development-only fields

This is what makes Redmine suitable for mixed teams. You are not just tracking issues. You are controlling how work moves between people and functions.

Keep Workflows Different Only Where It Matters

Not every tracker needs a completely separate workflow. Use separate workflows when the work type genuinely changes the handoff logic. If the process is basically the same, reuse the same structure and keep administration lighter.

A good rule is this: separate workflows should reduce confusion, not create configuration overhead.

Use Custom Fields to Improve Ticket Quality

Once trackers and statuses are clear, custom fields become the next quality lever. This is where you capture the information your team repeatedly asks for during clarification.

Useful examples:

  • Severity
  • Environment
  • Reproduction Steps
  • Acceptance Criteria
  • Client Name
  • Billable / Non-Billable
  • QA Owner
  • Release Version

The best custom fields answer questions that otherwise appear in comments after the issue has already been created.

This improves three things at once:

  • issue quality at creation
  • handoff quality between teams
  • filter and reporting quality later

If your team still closes work with missing steps, the Checklist Plugin is a strong companion because it helps enforce definition-of-done discipline at the issue level.

Make Issue Creation Easier, Not Heavier

Teams often over-correct once they discover Redmine’s flexibility. They add too many required fields, too many statuses, and too many workflow branches. The result is a ticket form nobody wants to use.

The goal of Redmine issue tracking setup is not maximum configuration. It is minimum ambiguity.

A strong setup usually has these traits:

  • each tracker has a clear purpose
  • each status means something distinct
  • required fields are limited to what improves routing or execution
  • permissions match real team responsibilities
  • issue creation is fast enough that users do not avoid it

If your issue intake is repetitive and prone to omissions, templates usually work better than more admin rules. That is why the Issue Template Plugin can improve quality without making the issue form feel heavier.

Set Up Reporting Around the Workflow You Actually Use

Redmine reporting is only useful when the workflow underneath it is consistent. Once your tracker and status design is stable, you can filter and report by:

  • tracker
  • assignee
  • priority
  • version
  • status
  • project
  • custom field

That gives project managers a usable operational view instead of a flat ticket dump.

If your team also needs time visibility, connect this setup to the existing How to Track Time in Redmine guide and the Timesheet Plugin so execution effort and issue flow stay in one system.

If capacity planning is becoming the next bottleneck, this setup pairs naturally with How to Manage Workload in Redmine and the Workload Plugin.

For leadership reporting, the Custom Dashboard Plugin adds a stronger visual analytics layer on top of issue and project data.

Where Standard Redmine Stops — and Where Redmineflux Fits

Core Redmine is very good at flexible issue tracking. It gives you:

  • trackers
  • statuses
  • workflows
  • custom fields
  • roles and permissions
  • issue lists
  • basic time tracking
  • Gantt and roadmap views

For many teams, that is enough to start.

The gaps appear when teams want:

  • visual agile execution
  • standardized issue creation
  • definition-of-done enforcement
  • stronger documentation linked to work
  • support workflow inside the same system
  • better executive dashboards

That is where Redmineflux plugins move Redmine from a capable tracker into a more complete operating system for delivery.

Useful next layers include:

  • Agile Board Plugin for Scrum and Kanban execution
  • Issue Template Plugin for standardized intake
  • Checklist Plugin for process enforcement
  • Knowledge Base Plugin for linked documentation and SOPs
  • Helpdesk Plugin for customer support issue flow inside Redmine

A Practical Redmine Issue Tracking Setup for a Growing Team

If you want a simple starting point, this is a strong baseline:

Trackers

  • Bug
  • Feature
  • Task
  • Support

Statuses

  • New
  • In Progress
  • In Review
  • QA
  • Resolved
  • Closed

Required Fields

  • Priority
  • Assignee
  • Start Date
  • Due Date where relevant
  • One or two tracker-specific custom fields

Workflow Principles

  • developers move active engineering work
  • QA controls test and verification statuses
  • project managers close work where business confirmation matters
  • support roles stay inside support-specific transitions

This keeps the system light enough to adopt but structured enough to scale.

Common Questions About Redmine Issue Tracking

1. How do I set up issue tracking in Redmine?

Start by defining your trackers, then create a small set of meaningful statuses, configure workflow transitions by role, and add only the custom fields your team actually needs. A good setup makes issue creation easier and issue movement more consistent across the project lifecycle.

2. What is the difference between trackers and statuses in Redmine?

Trackers define what kind of work an issue represents, such as Bug or Feature. Statuses define where that issue is in its lifecycle, such as New, In Progress, or Closed. Trackers classify work. Statuses show workflow progress.

3. How many statuses should I use in Redmine?

Most teams should start with a small set of workflow states that map to real handoffs. Too many statuses make boards harder to read and reports less reliable. If a status does not represent a meaningful change in ownership or progress, it usually does not need to exist.

4. Can Redmine support different workflows for different issue types?

Yes. Redmine lets you configure workflows by tracker and by role. That means Bugs, Features, Support issues, and Tasks can each follow different transition rules while still living inside the same Redmine environment.

5. Which Redmine plugins improve issue tracking the most?

The most useful additions depend on the gap you are solving. The Agile Board Plugin improves visual workflow execution, the Issue Template Plugin improves intake quality, the Checklist Plugin improves completion discipline, and the Helpdesk Plugin extends Redmine for support-driven issue flow.

Redmine becomes much easier to manage once issue tracking is treated as a system instead of a list of tickets. Clear trackers, meaningful statuses, practical workflows, and a small number of useful custom fields create the foundation. That is the perspective behind the Redmineflux website as well: help teams get more out of Redmine first, then add the right plugin layer when they need stronger structure without forcing a tool migration.

Redmine becomes much easier to manage once issue tracking is treated as a system instead of a list of tickets.

Clear trackers, meaningful statuses, practical workflows, and a small number of useful custom fields create the foundation.

Build a Redmine setup your team can actually rely on

That is the perspective behind Redmineflux: help teams get more out of Redmine first, then add the right structure when they need it.