Introduction #
The Agile Board Plugin is a powerful tool designed to enhance project management and collaboration for teams following the Agile methodology. This plugin provides a visual representation of tasks, their statuses, and progress on a board, enabling teams to plan, track, and prioritize work effectively. This documentation will guide you through the installation, configuration, and usage of the Agile Board Plugin.
Version Compatibility #
Redmine Versions
- 4.0.x, 4.1.x, 4.2.x
- 5.0.x, 5.1.x
- 6.0.x
Installation #
To install Redmineflux Agile Board Plugin follow these steps
- Make sure you have a working installation of Redmine
- Unzip the archive and upload the agile_board folder to Redmine/plugins and do not change the plugin folder name.
- Run the following command to install the required dependencies
bundle install
- Run migrate command for database migration
1. In Production
RAILS_ENV=Production bundle exec rails redmine:plugins:migrate
2. In Development
RAILS_ENV=Development bundle exec rails redmine:plugins:migrate
- Restart Redmine server to load the plugin
Rails s
License Key Configuration #
After successfully installing the plugin:
1. Login to your Redmine instance as an Admin user.
2. Navigate to Administration → Plugins
3. Find the installed plugin in the list and click on “Configure”.
4. You will see two input fields:
a. License Key
b. Security Key
5. Enter the Key values you received via email or order details.
6. Click Apply to validate and activate the plugin license.
Once validated, the plugin will be ready for use.
Note: By default, a Redmineflux license key supports 100 active users of Redmine. If your organization requires more than 100 active users, you’ll need to purchase additional user licenses.
You have two options to update your user license:
1. Purchase additional user licenses during your initial plugin purchase.
2. After the purchase, go to the “My Account” section in your profile to upgrade the number of users.
How to Deactivate and Activate Plugin on New Domain / IP #
- Go to Order Section
- Navigate to the Order section in your account.
- Click on View Order for the plugin you want to transfer.
- Change Domain URL
- In the domain URL, remove the current domain URL.
- Enter or paste your desired new domain URL.
- Click on the Save button to update the domain.
- Activate Plugin on New Domain
- Go to the plugin configuration section on your desired domain.
- Enter your License Key and Secret Key in the appropriate fields.
- Save the settings to activate the plugin on the new domain.
Configuration #
- Login into Redmine as an administrator.
- Navigate to application menu to see global Agile board of all the projects.
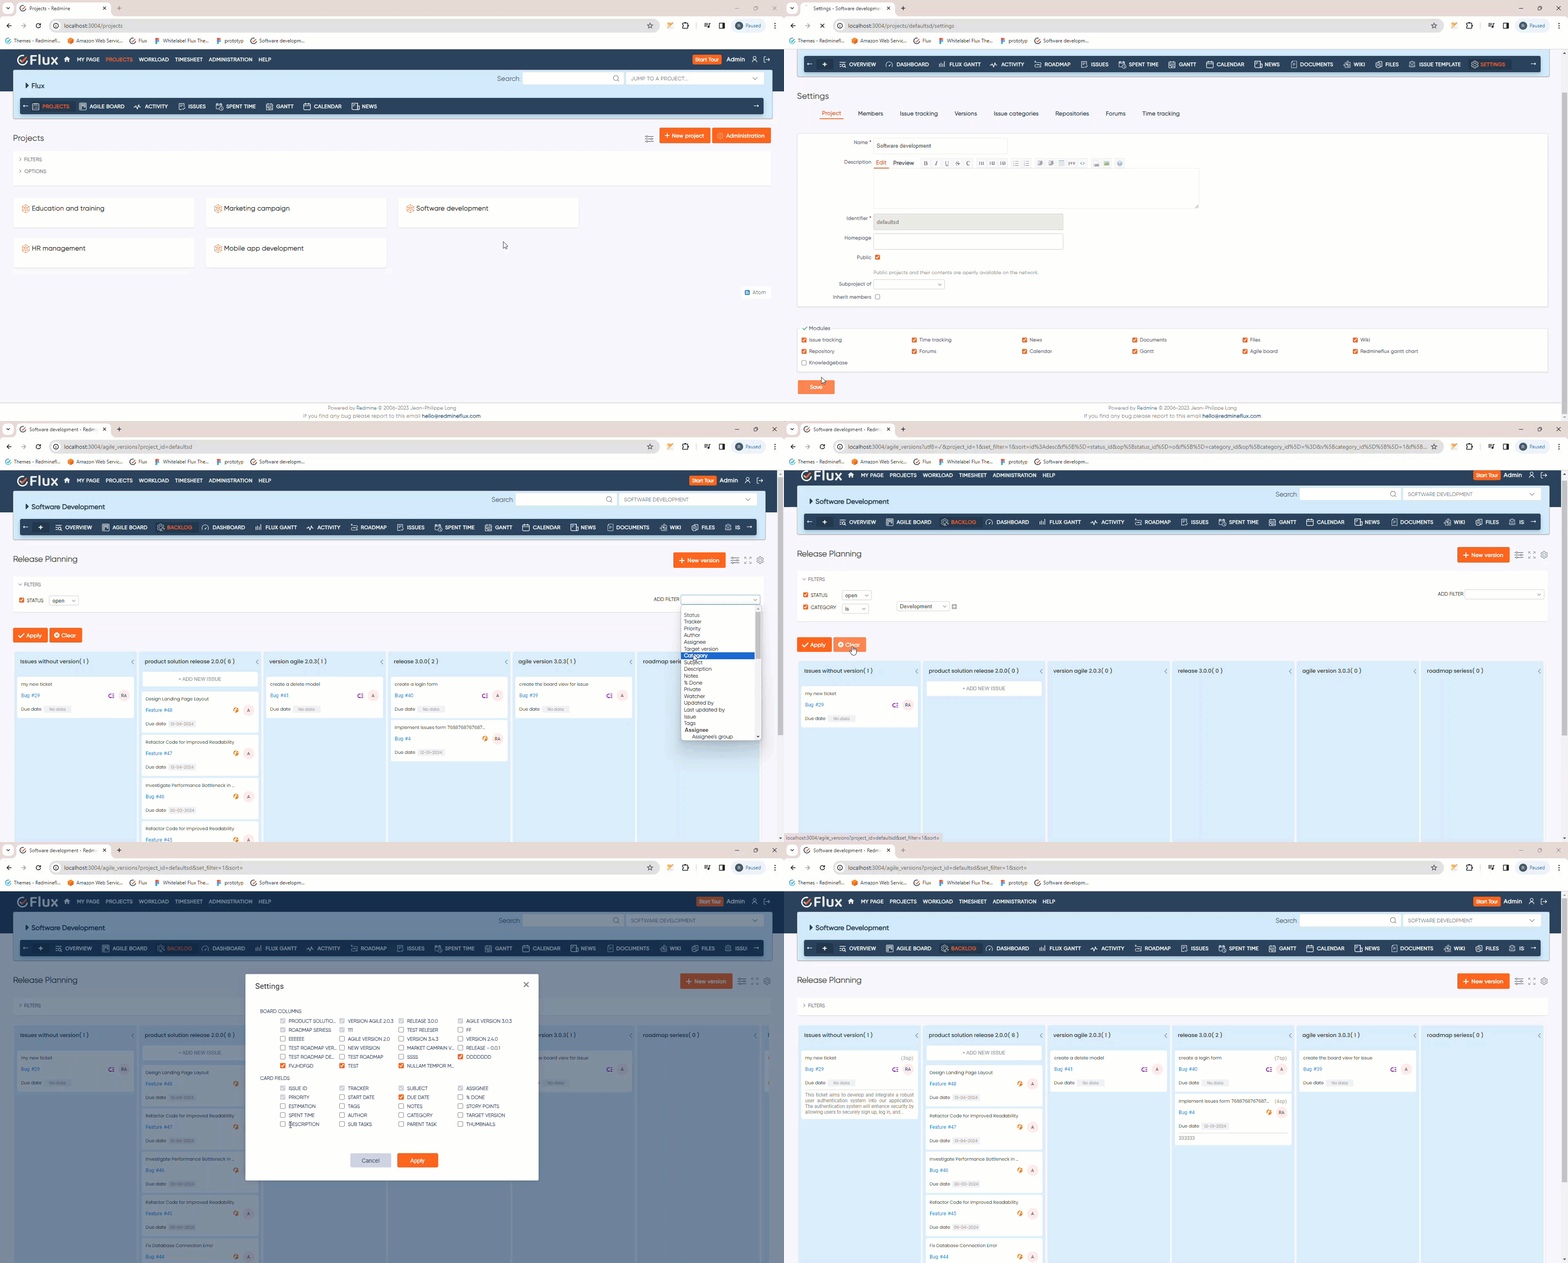
- Navigate to project where you want to see the Agile board.
- Click on the Settings tab in the project menu.
- From the modules section do check on Agile Board option to enable Agile board in the project.
- Click on the save button to see the changes
How to #
How to View an Agile Board #
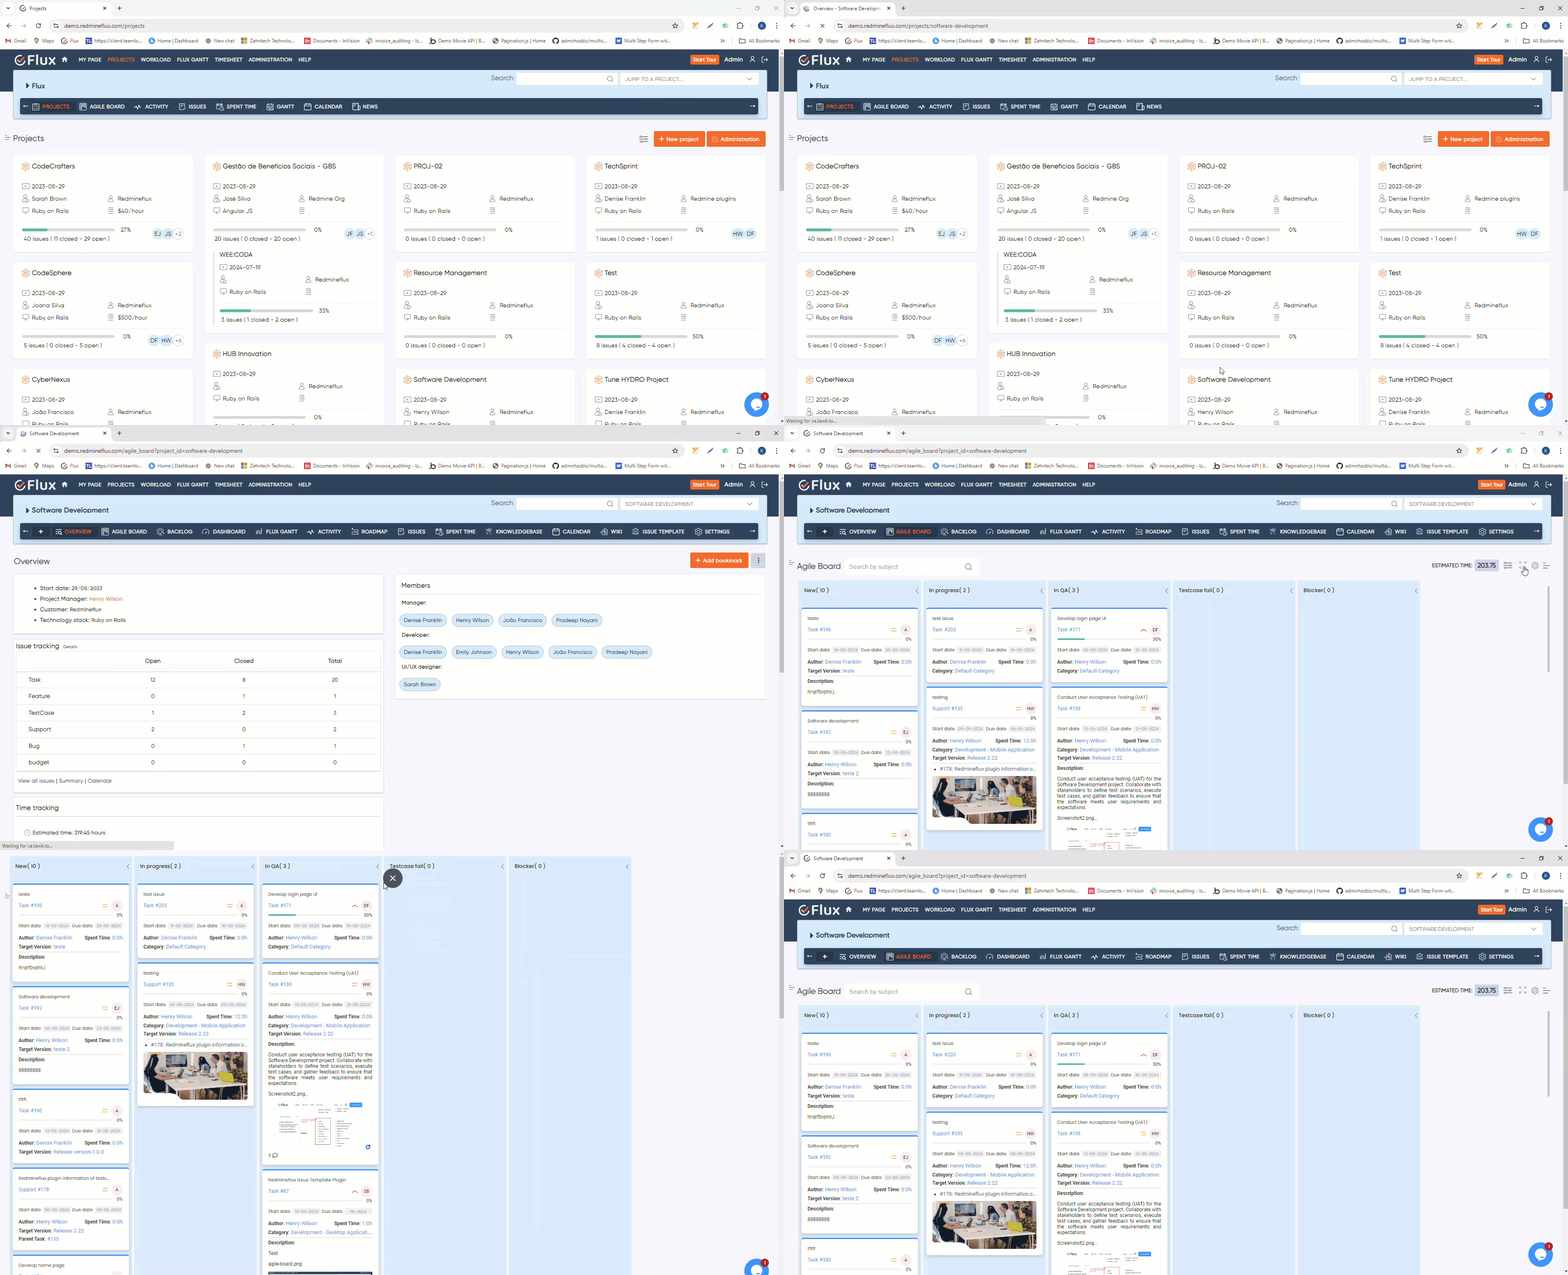
- To access the Agile Board of a specific project, navigate to the project where you want to view it.
- Within the project, click on the “Agile Board” tab to access the Agile Board specific to that project.
- If you want to view the Agile Boards of all projects, you can go to the application menu and click on the “Agile Board” tab, which will display an overview of Agile Boards across all projects.
How to Add Task in Agile Board #
To Add a task in Agile Board Plugin, follow these steps
- Access the Agile Board of the desired project.
- Identify the appropriate column that represents the current status for the new task.
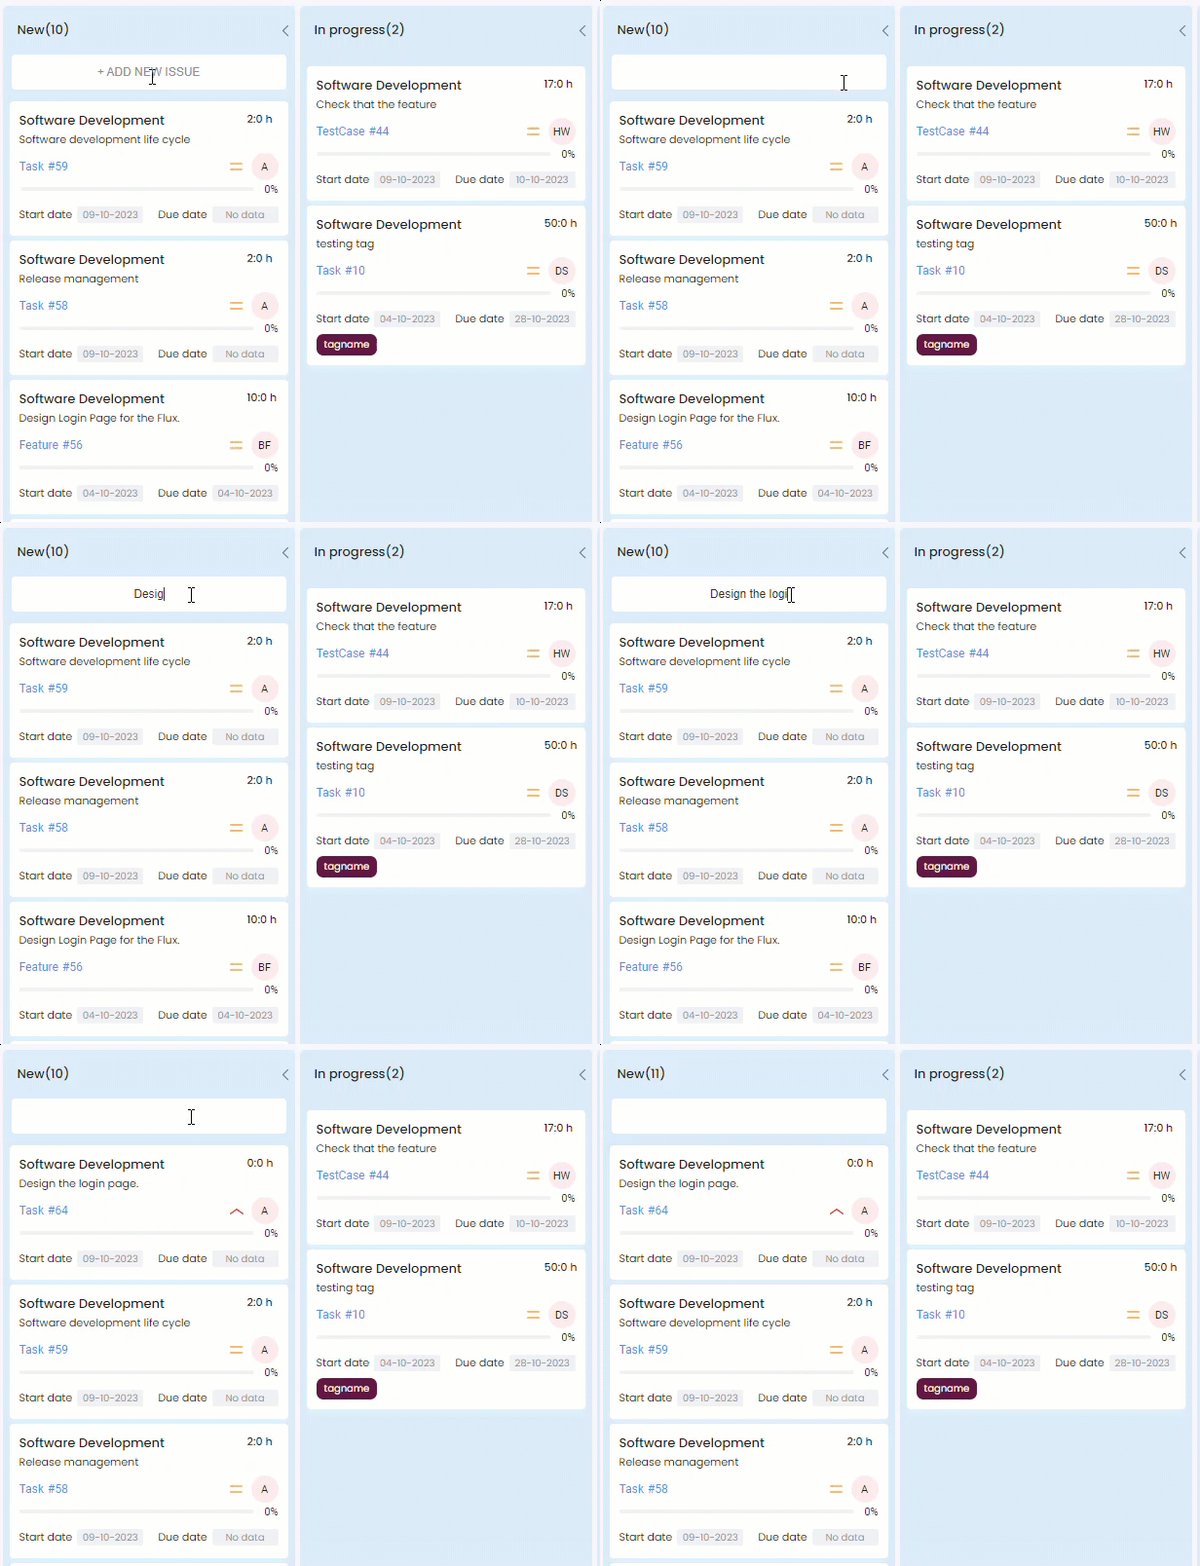
- Locate the column’s “Add New Issue” input field (usually denoted by a “+” symbol) and type task subject and press “Enter” key to add new task in the Agile Board.
- The task will now appear as a card within the corresponding column on the Agile Board.

How to Update Task in Agile Board #
To update tasks within the Agile Board, follow these steps
- Locate the card representing the task you want to update within the Agile Board.
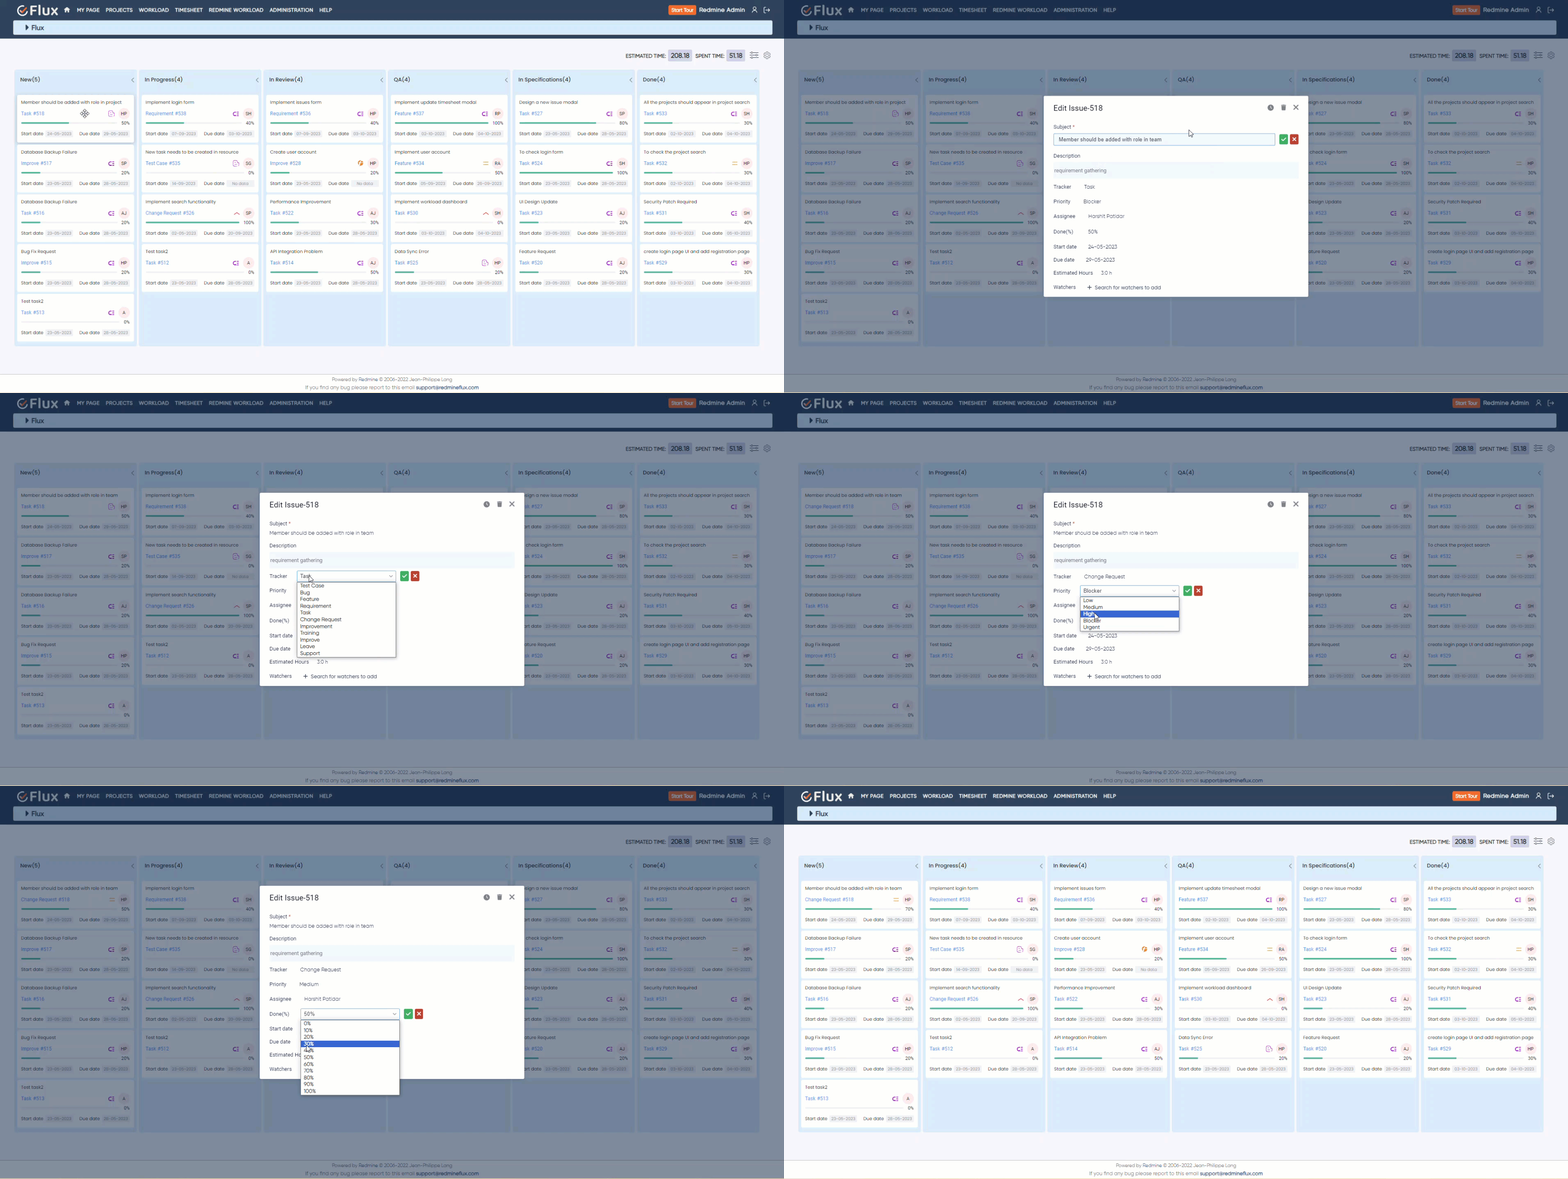
- The card that represents the task has a subject, due date, tracker,and priority field. Click on the desired field you want to update, modify the attributes and click on the “Right”icon and the task attribute will be updated.
- Click on“Cross” to discard the changes.
- To update more attributes such as task description, assignee, start date, task estimation, task progress Click on the edit icon in the card to open its detail view.
- In the detail view, you can modify various attributes of the task, such as the description, assignee, due date, and other relevant fields.
- Make the necessary changes to the task’s details.
- The task card on the Agile Board will reflect the updated information.
By following these steps, you can seamlessly update tasks within the Agile Board to keep your project management organized and up to date.

How to update Task Status through drag and drop in Agile Board #
To update task status through drag and drop in Agile Board, please follow these steps
- Access the Agile Board of a specific project or access the Agile Board for all projects.
- Locate the card representing the task you want to update.
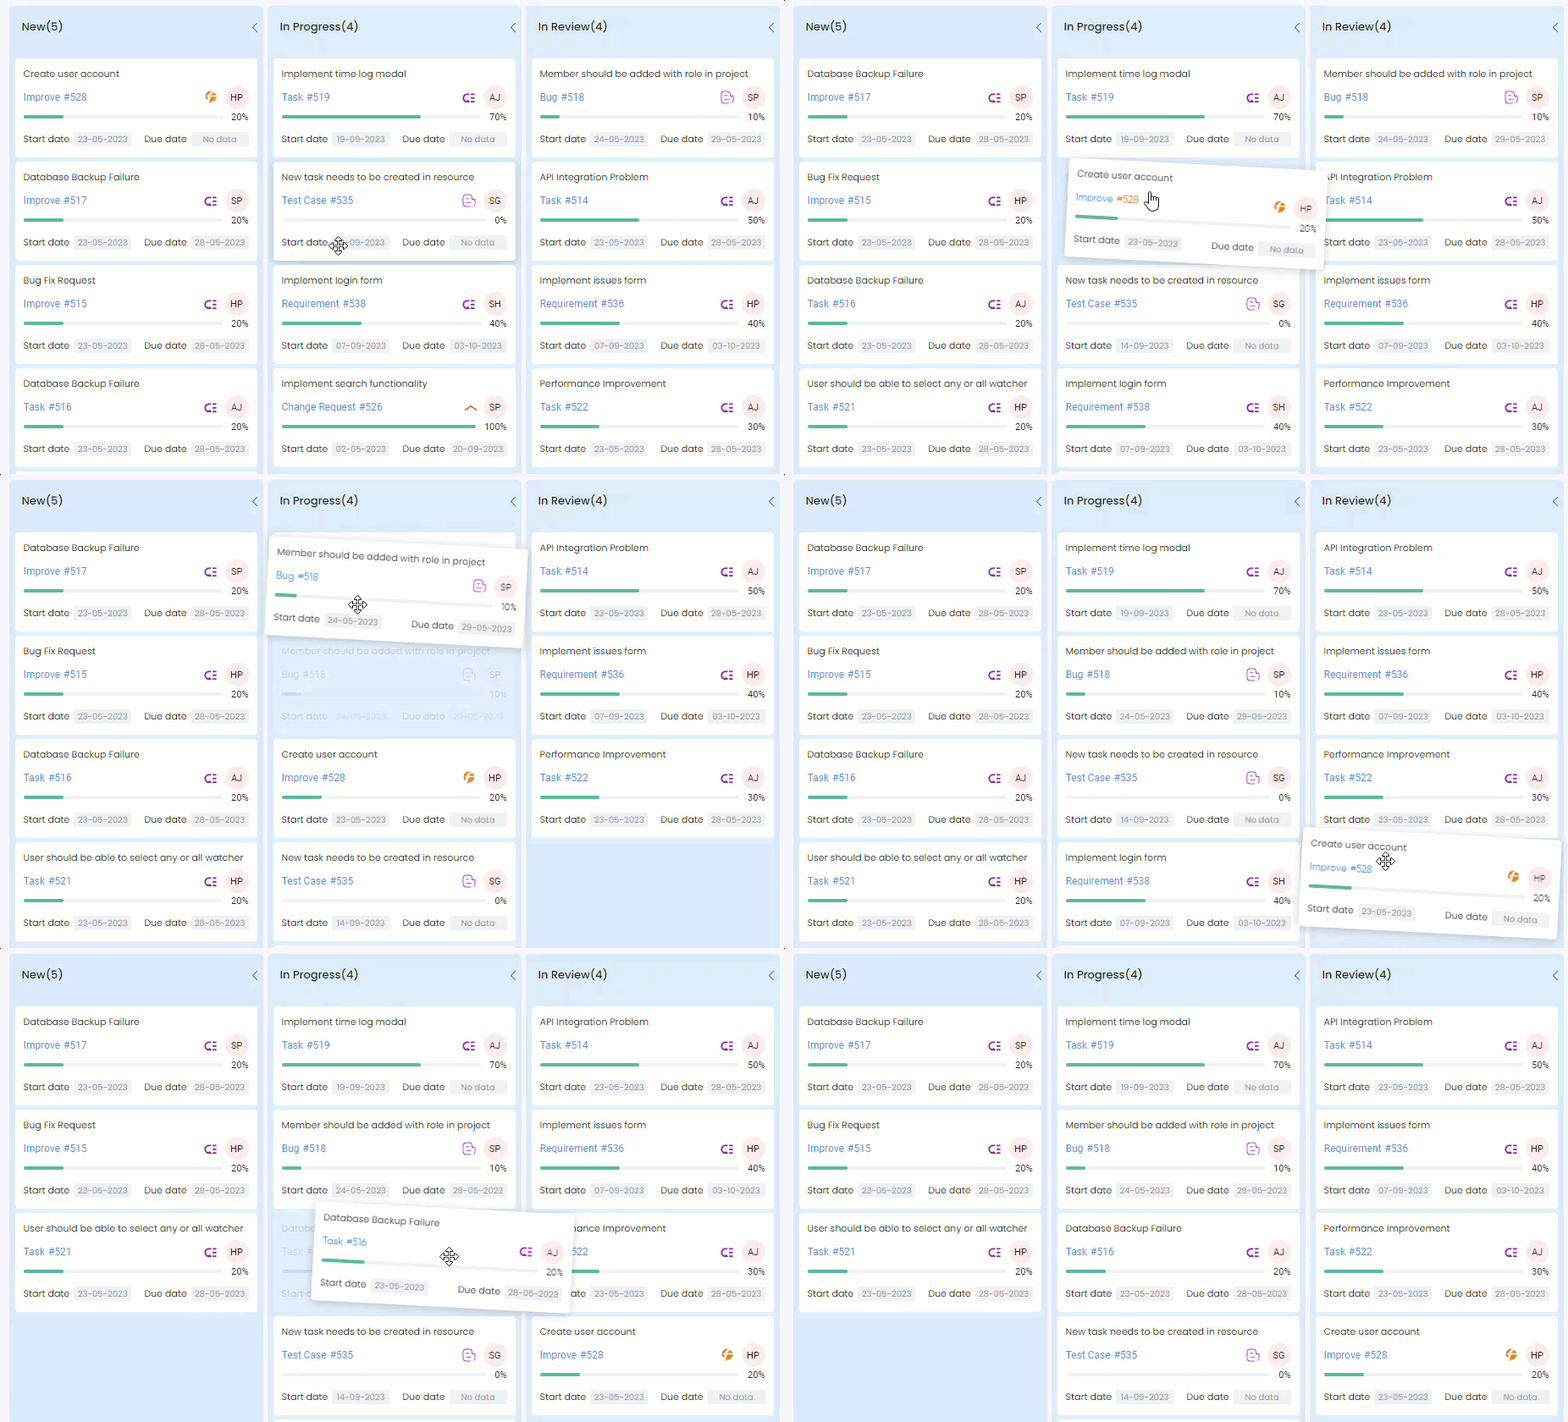
- Click and hold the card with your mouse cursor.
- Drag the card to the desired column representing the new status.
- Once you have positioned the card over the target column, release the mouse button to drop the card.
- The task’s status will be automatically updated to reflect the new column it was moved to.
By following these steps, you can easily update the task status by simply dragging and dropping the corresponding card within the Agile Board. This provides a visual and intuitive way to track the progress and movement of tasks throughout different stages of your project.

How to Log Time in Agile Board #
To log time for tasks in the Agile Board, follow these steps
- Access the Agile Board of a specific project or access the Agile Board for all projects.
- Locate the card representing the task for which you want to log time.
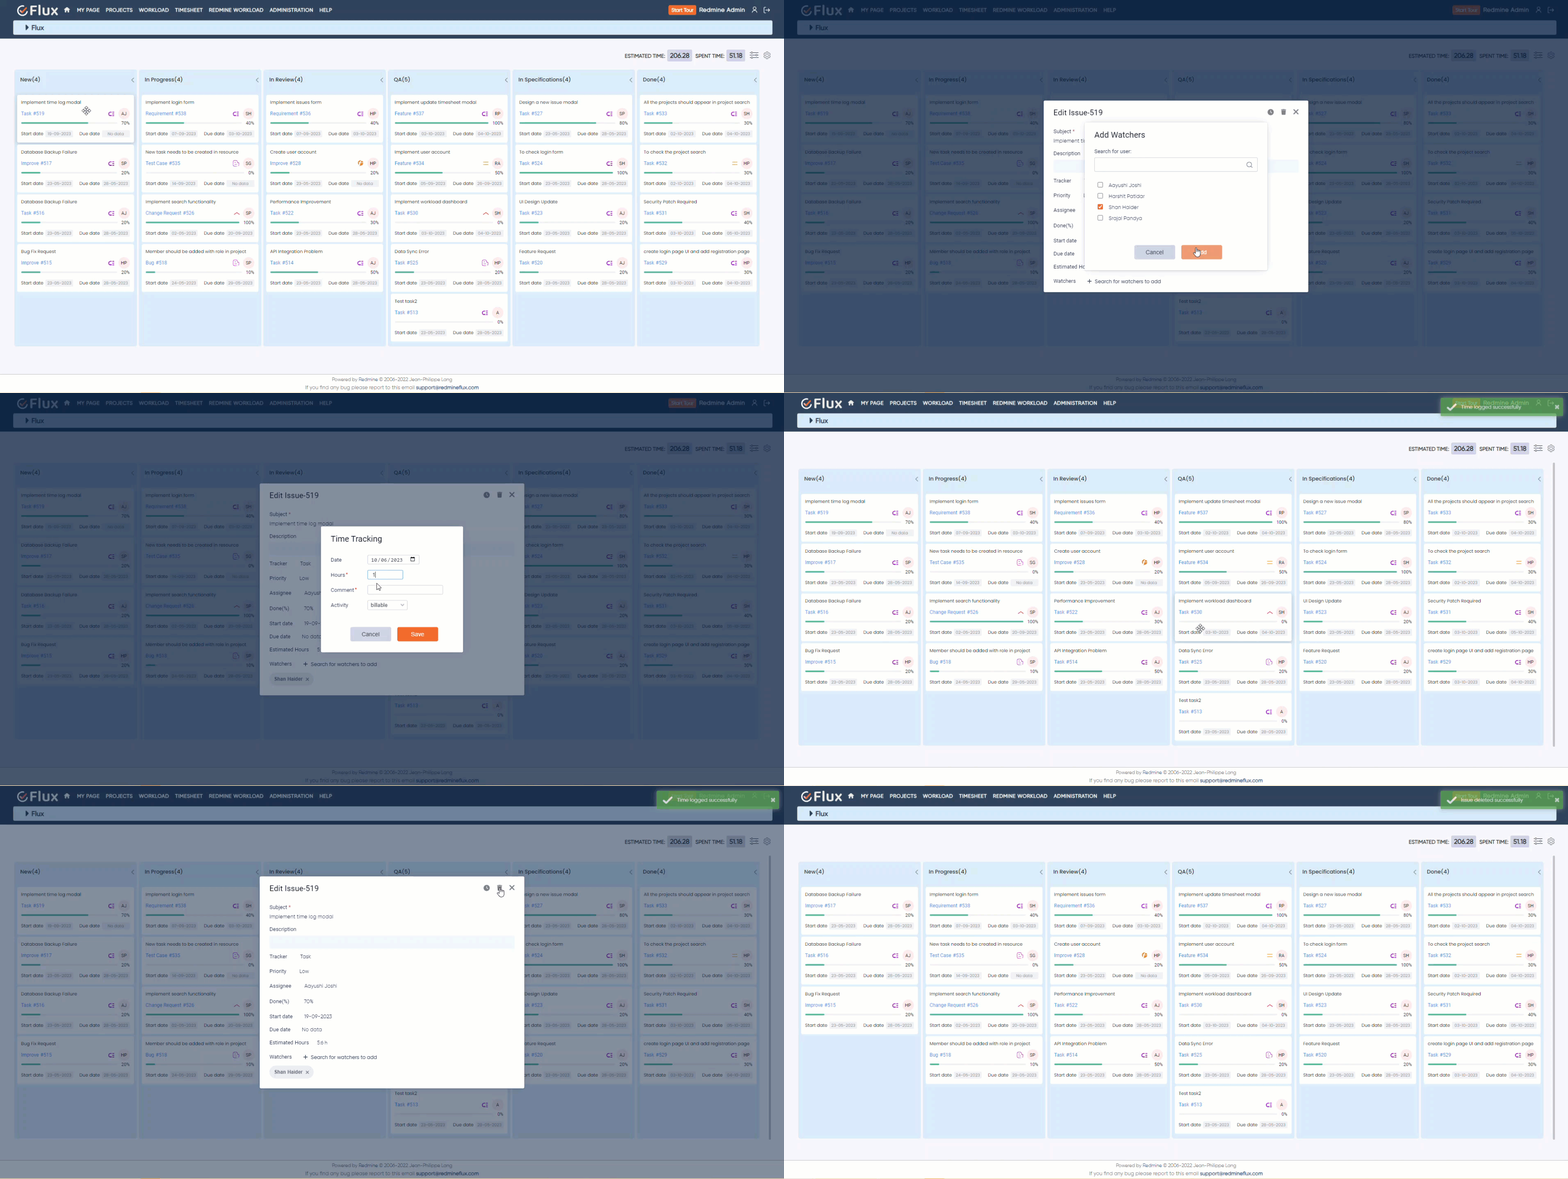
- Click on the edit icon in the card to open its detail view.
- Look for the “Log Time” icon within the task detail view and click on it.
- A pop-up window will appear, prompting you to enter the amount of time you spent on the task in the appropriate field.
- Enter the date on which you want to log the time for the task and select the task activity.
- Optionally, provide a comment related to the logged time to provide additional context or details.
- Once you have filled in all the required fields, click on the “Save” button to log the time, which will be associated with the task and reflected in the Agile Board.
- If you decide not to log time, you can click on the “Cancel” button to discard the time entry.
By following these steps, you can effectively log time for tasks within the Agile Board, helping you track and manage the effort invested in each task.

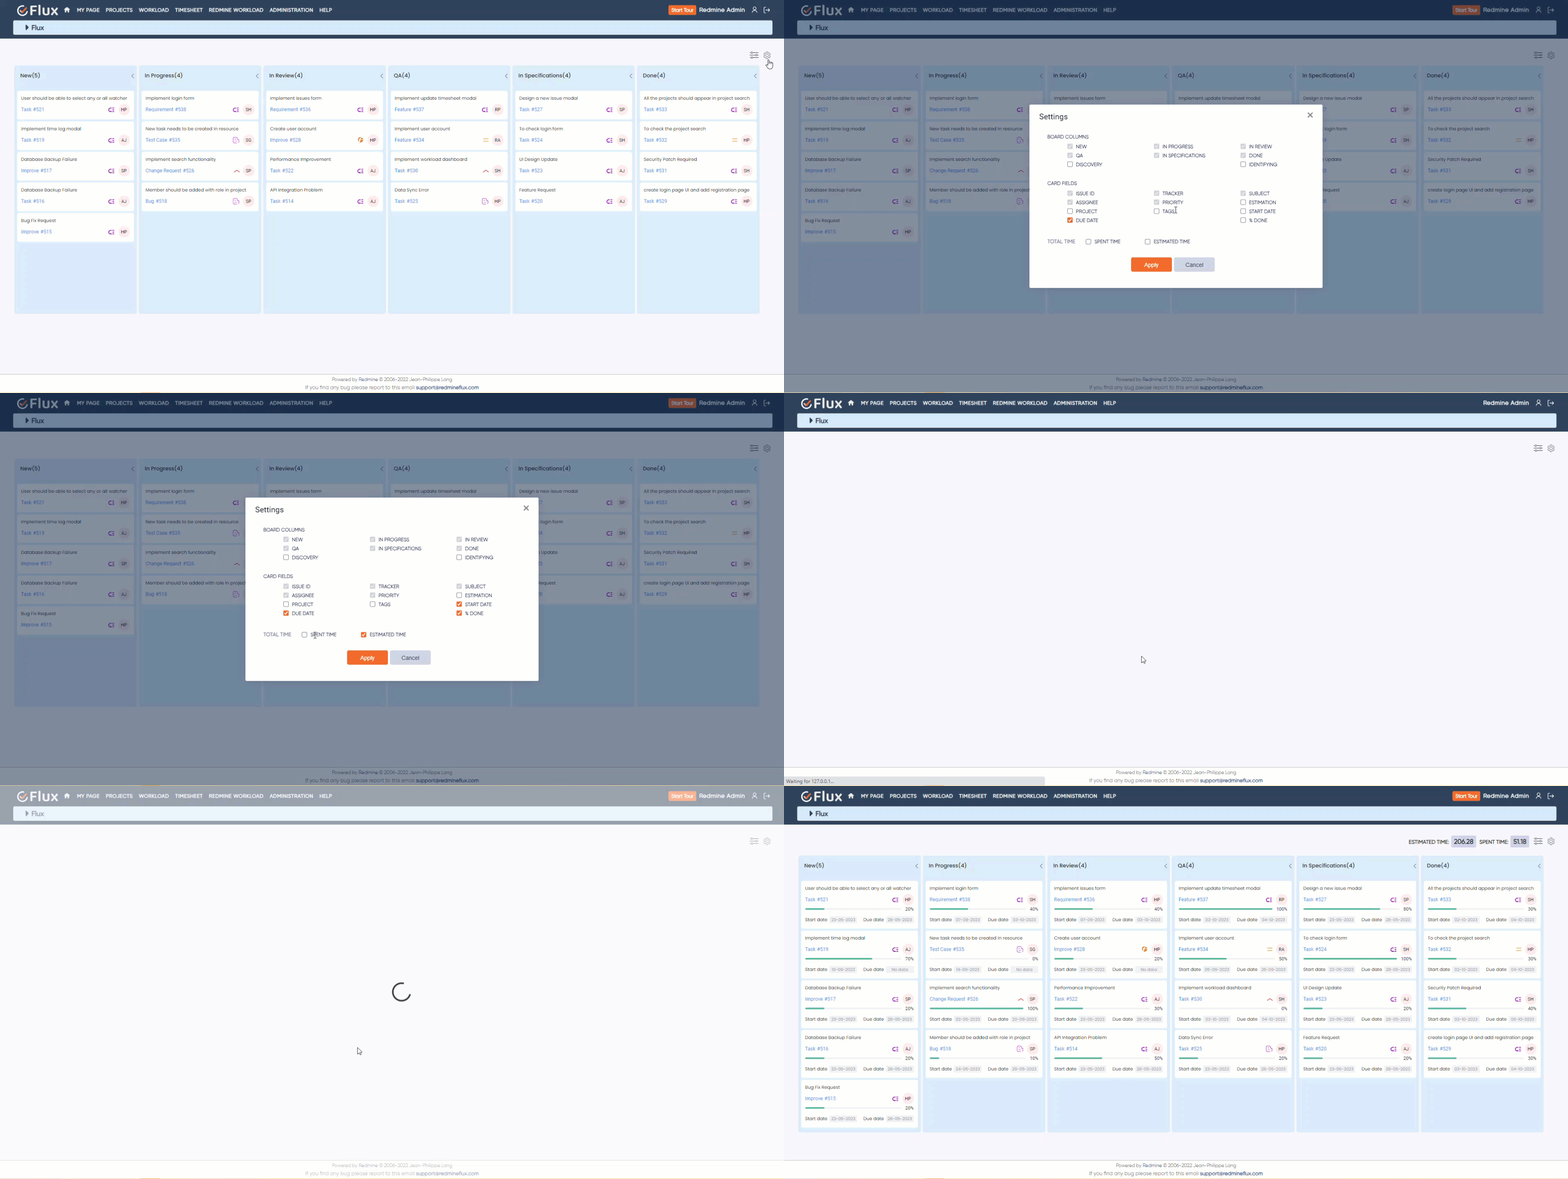
How to Customize Cards (Tasks) in Agile Board #
To customize cards in the Agile Board, follow these steps:
- Access the Agile Board of a specific project or access the Agile Board for all projects.
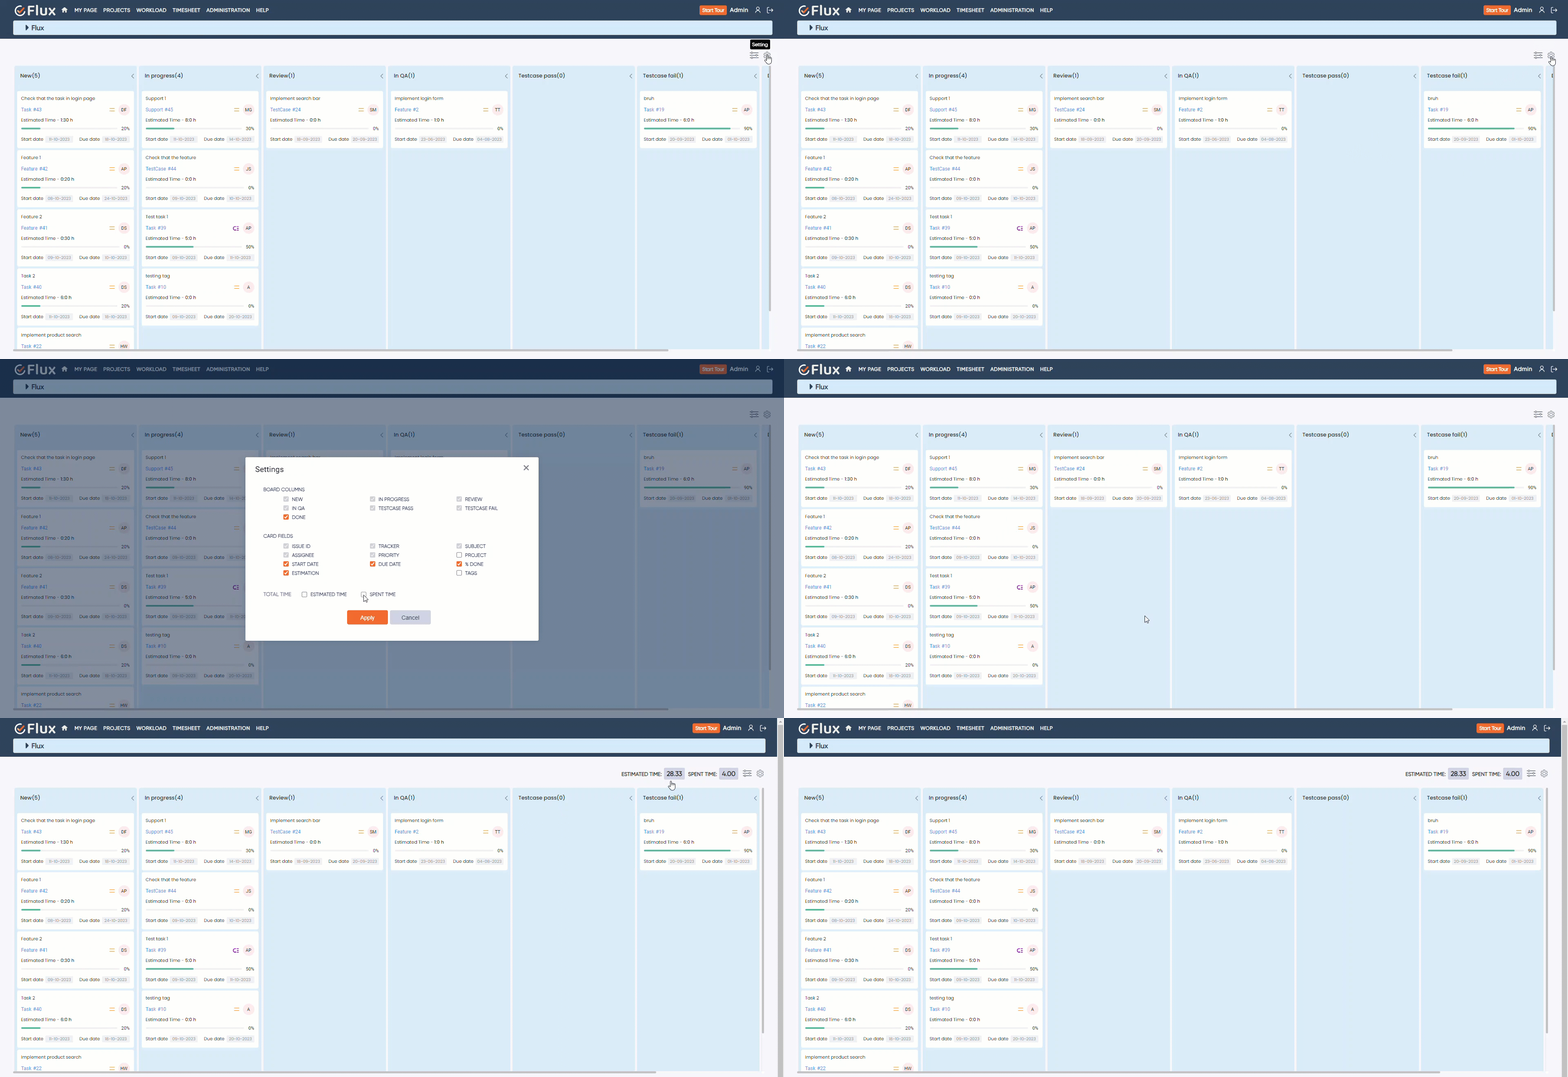
- Click on the “Settings” icon to open a pop-up window.
- Within the pop-up, navigate to the “Card Fields” section and select the desired customization options for Agile Board cards
- After making the selections, click the “Apply” button.
- The Agile Board will now display cards with the chosen customization options, providing more functionality and information.
By following these steps, you can easily customize cards within the Agile Board to suit your preferences and project management needs, allowing you to organize and present information in a way that is most effective for your team.

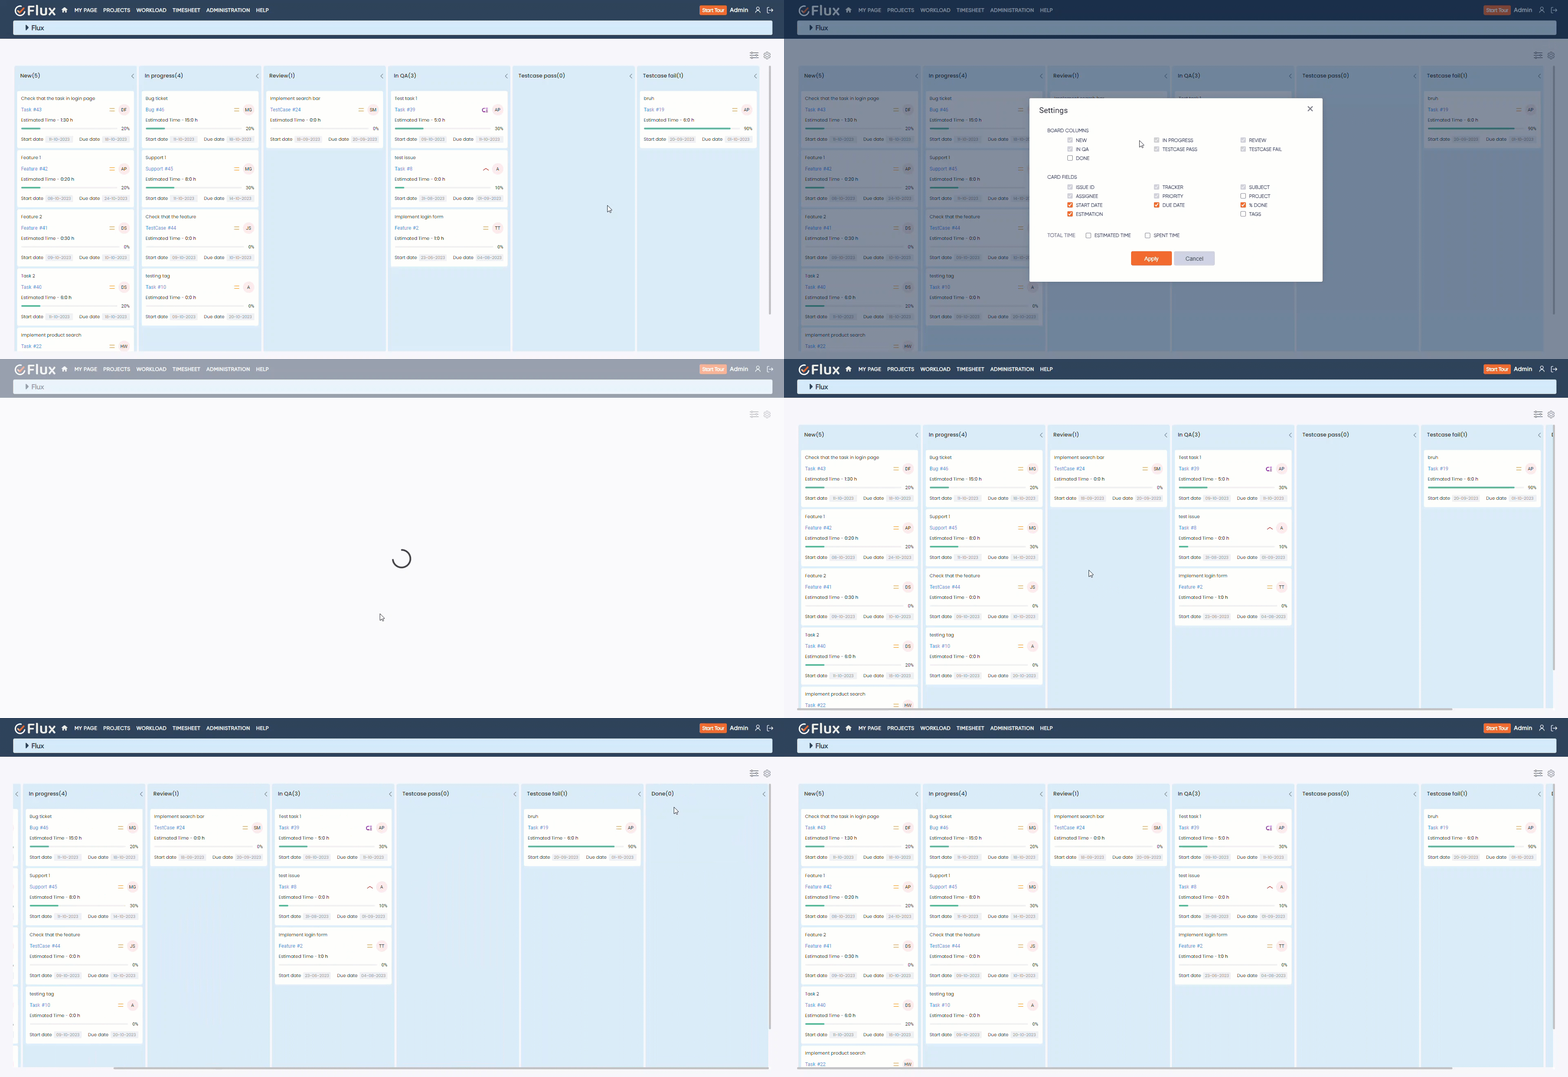
How to Customize Columns (Task Status) in Agile Board #
To customize columns (Task Status) in the Agile Board, follow these steps
- Access the Agile Board of a specific project or access the Agile Board for all projects.
- Click on the “Settings” icon to open a pop-up window.
- Within the pop-up, navigate to the “Column Fields” section and select the desired customization options for Agile Board Columns (task status).
- After making the selections, click the “Apply” button.
- The Agile Board will now display cards with the chosen customization options, providing more functionality and information.
By following these steps, you can easily customize columns within the Agile Board to suit your preferences and project management needs, allowing you to organize and present information in a way that is most effective for your team.

How to perform inline editing in Agile Board #
To perform inline editing in the Agile Board, follow these steps
- Access the Agile Board of a specific project or access the Agile Board for all projects.
- Locate the card or field that you want to edit.
- Click on the text or field you wish to modify.
- The text or field should become editable, allowing you to make changes directly within the card.
- Make the necessary edits to the text or field.
- Press the “Enter” key to save the changes.
- The updated information will be reflected in the Agile Board.
By following these steps, you can easily perform inline editing within the Agile Board, allowing you to quickly update and modify text or fields without the need for additional dialogues or pop-ups.

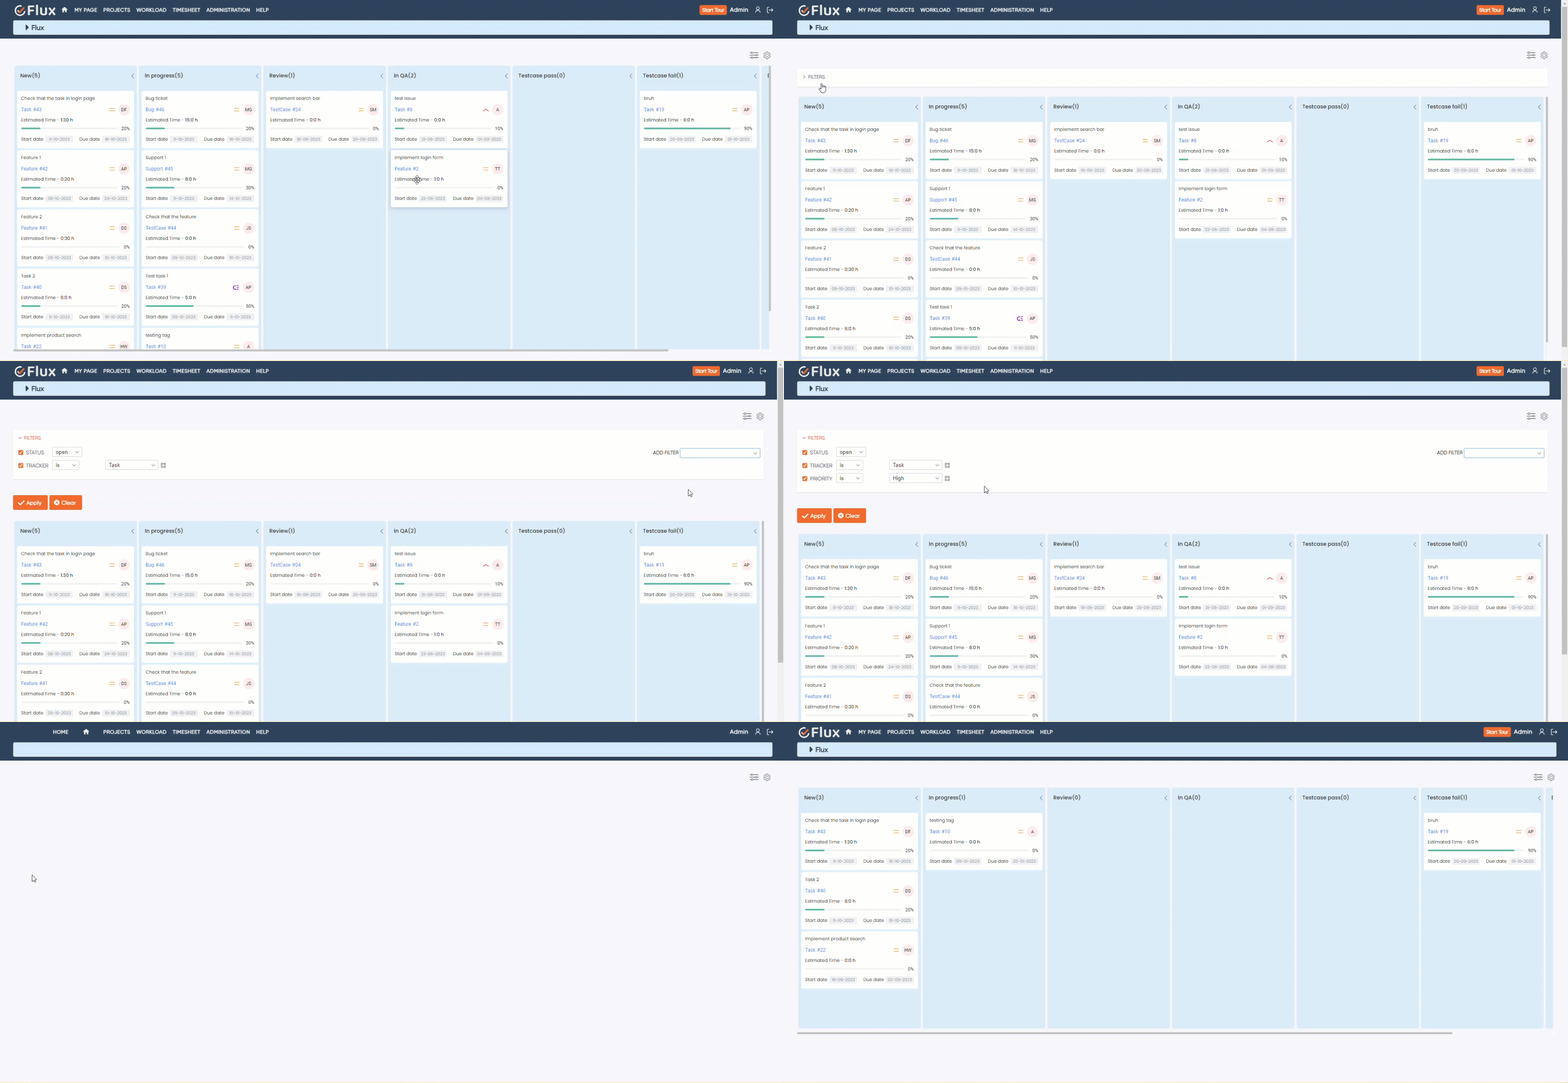
How to Filter of Task in Agile Board #
To filter tasks in the Agile Board, follow these steps
- Access the Agile Board of a specific project or access the Agile Board for all projects.
- Look for the “Filter” option, usually located near the top of the Agile Board interface.
- Click on the “Filter” option to open the filter settings.
- In the filter settings, you may find various criteria and parameters to refine your task filtering. These criteria can include:
- Assignee: Filter tasks based on the assigned team member.
- Status: Filter tasks based on their current status (e.g., To Do, In Progress, Done).
- Priority: Filter tasks based on their priority level.
- Labels or Tags: Filter tasks based on specific labels or tags assigned to them.
- Due Date: Filter tasks based on their due date or deadline.
- Select or enter the desired values or conditions for each filter criteria.
- Once you have configured the desired filters, click on the “Apply” button to apply the filters.
- The Agile Board will now display only the tasks that meet the specified filter criteria.
- To clear the filters and view all tasks again, look for a “Clear” option and click on it.
By following these steps, you can effectively filter tasks within the Agile Board based on specific criteria, helping you focus on relevant tasks and streamline your project management process.

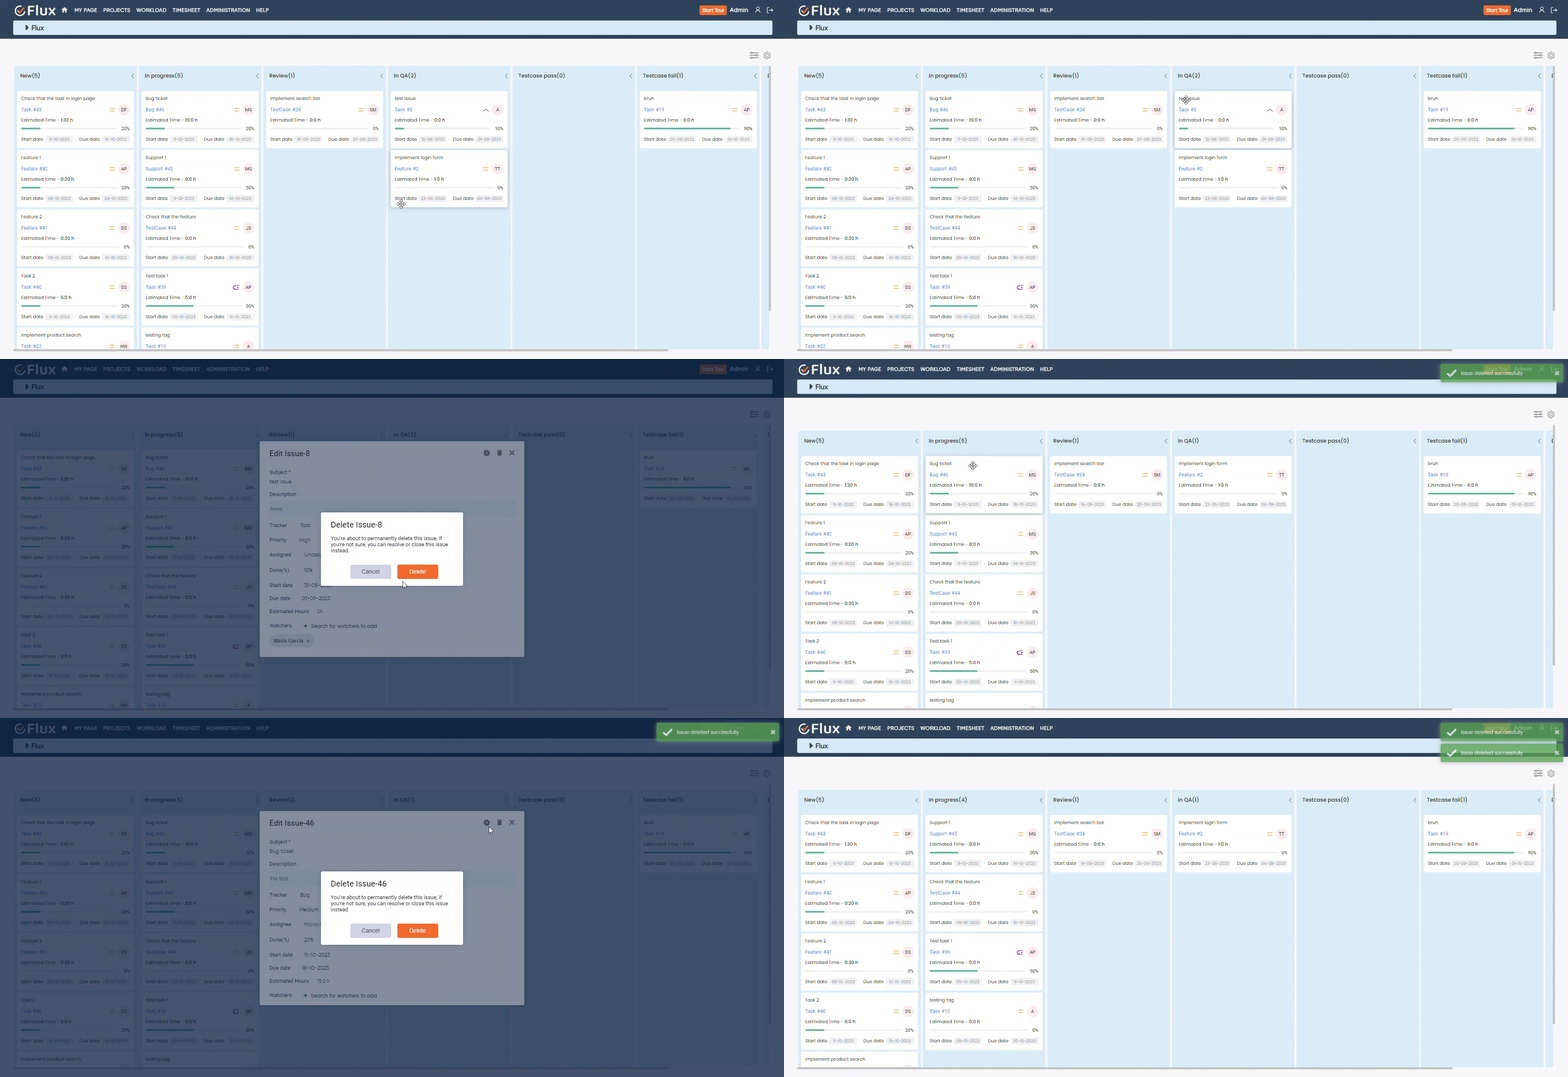
How to Remove Task in Agile Board #
To remove a task from the Agile Board, follow these steps:
- Access the Agile Board of a specific project or access the Agile Board for all projects.
- Locate the card representing the task you want to remove.
- Click on the edit icon in the card to open its detail view.
- Look for the “Trash” icon within the task detail view and click on it.
- A confirmation prompt may appear to ensure that you want to proceed with the deletion.
- Confirm the deletion by clicking the “Delete” button.
- The task card will be removed from the Agile Board, and any associated data or information related to the task may also be deleted.
By following these steps, you can remove a task from the Agile Board, helping you keep the board focused on the relevant and active tasks in your project.

How to Track Spent and Estimation Time in Agile Board #
To track Spent and Estimation Time in the Agile Board, follow these steps
- Access the Agile Board of a specific project or access the Agile Board for all projects.
- Click on the “Settings” icon to open a pop-up window.
- Within the pop-up, navigate to the “Total Time” section.
- Check the desired option, either “Task Estimation” or “Task Spent”, depending on which time metric you want to track.
- After making the selections, click the “Apply” button to save the changes.
- This allows you to monitor and manage the progress and time allocation of tasks directly within the Agile Board.
By following these steps, you can accurately track the spent and estimation time in the Agile Board, helping you monitor and evaluate the time aspects of your project tasks.

How to Add Watchers in the Agile board #
To add watchers in the Agile Board, follow these steps
- Access the Agile Board of a specific project or access the Agile Board for all projects.
- Locate the card representing the task for which you want to add watchers.
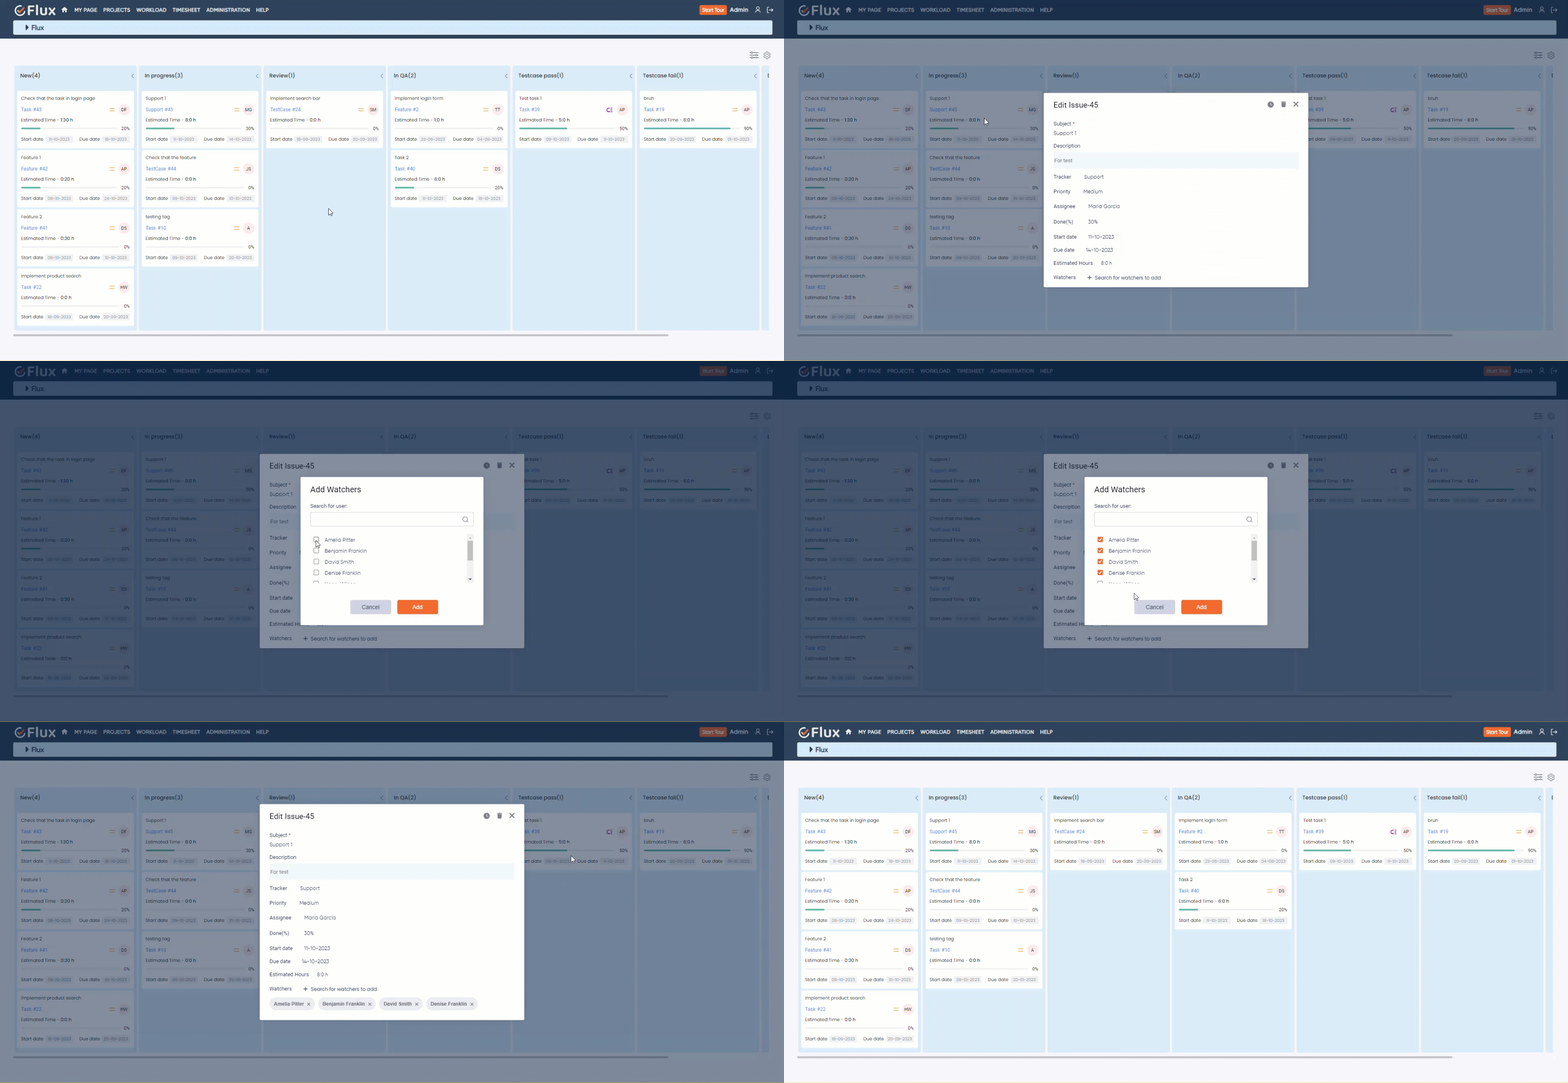
- Click on the edit icon in the card to open its detail view.
- Within the task detail view, find the “Search for watchers to add” text and click on it.
- A pop-up window will appear displaying a list of available watchers.
- Check one or multiple checkboxes to select one or multiple watchers at a time.
- Utilize the search field to find specific watchers if needed.
- Once you have selected the desired watchers, click the “Add” button to save the changes.
- The selected watchers will now be added to the task.
By following these steps, you can easily add watchers to tasks within the Agile Board, ensuring that relevant individuals stay informed and engaged in the task’s lifecycle.

How to Expand and Collapse the Column #
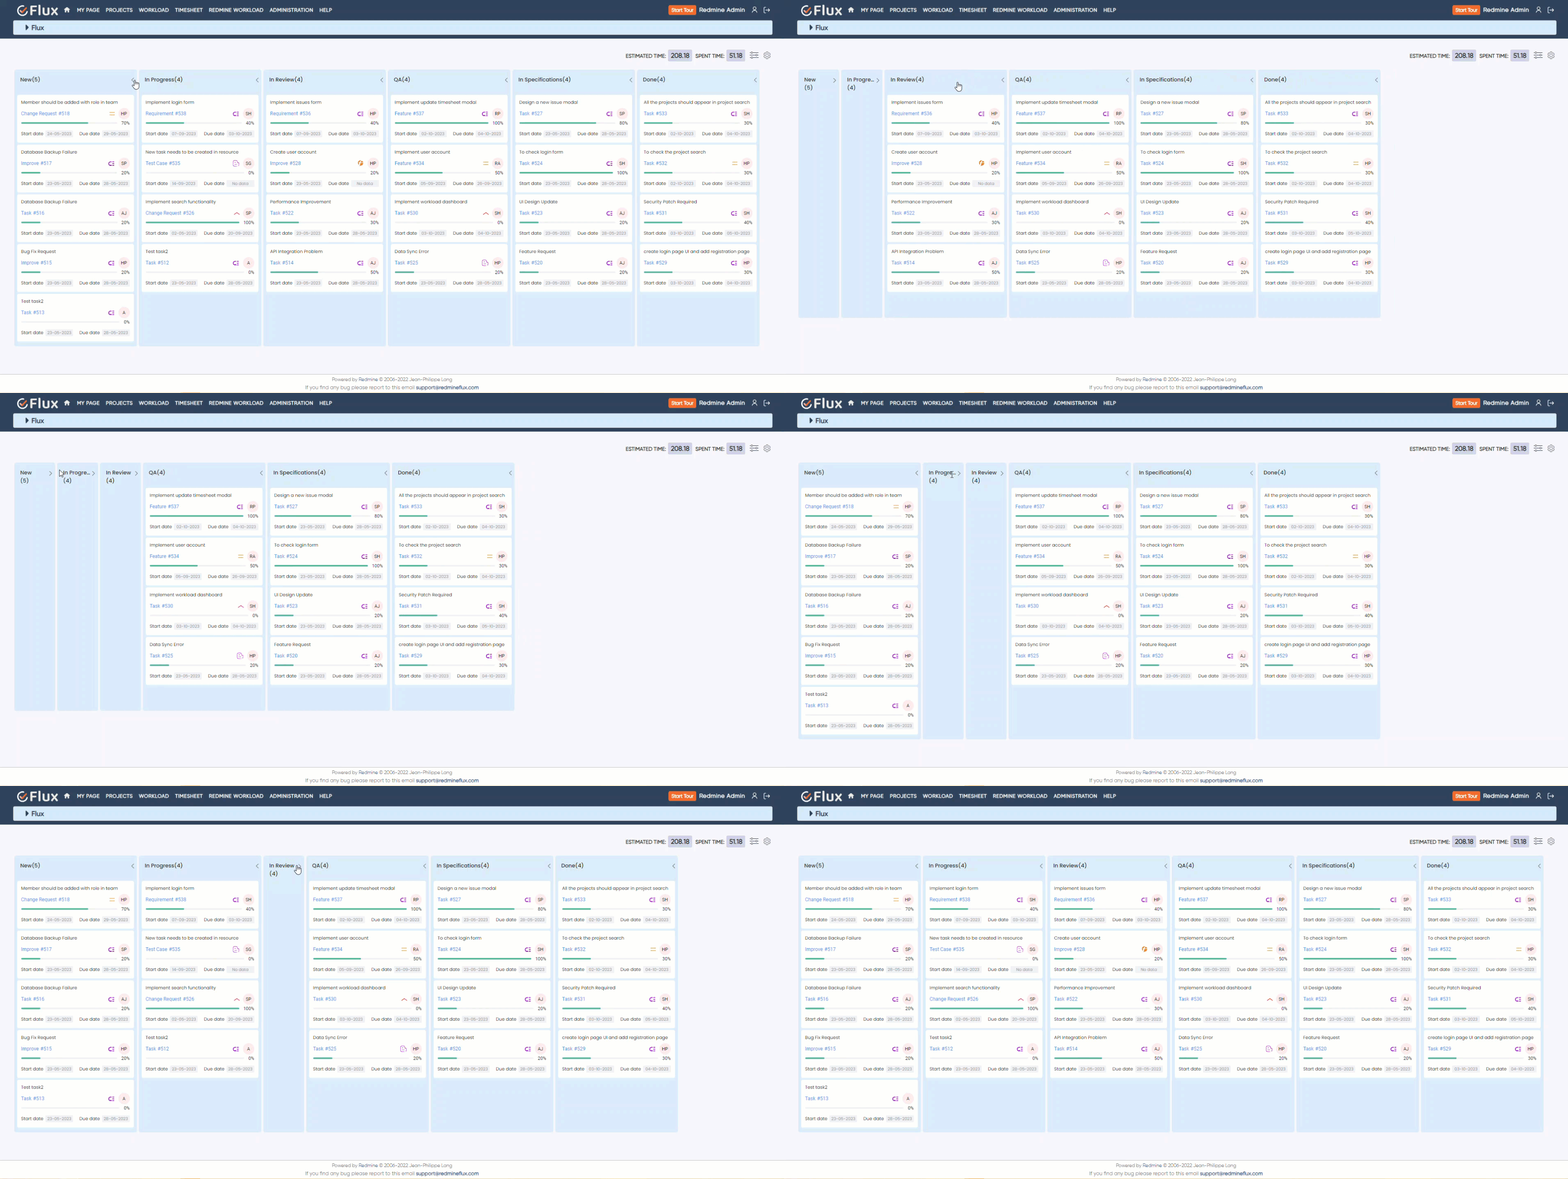
To expand and collapse the column in the Agile Board, follow these steps
- Access the Agile Board of a specific project or access the Agile Board for all projects.
- Locate the column that you want to collapse/expand.
- In the column, click on the arrow icon to expand and collapse the column.

How to Add sprint in Agile Board #
To add sprint in Agile Board, follow these steps
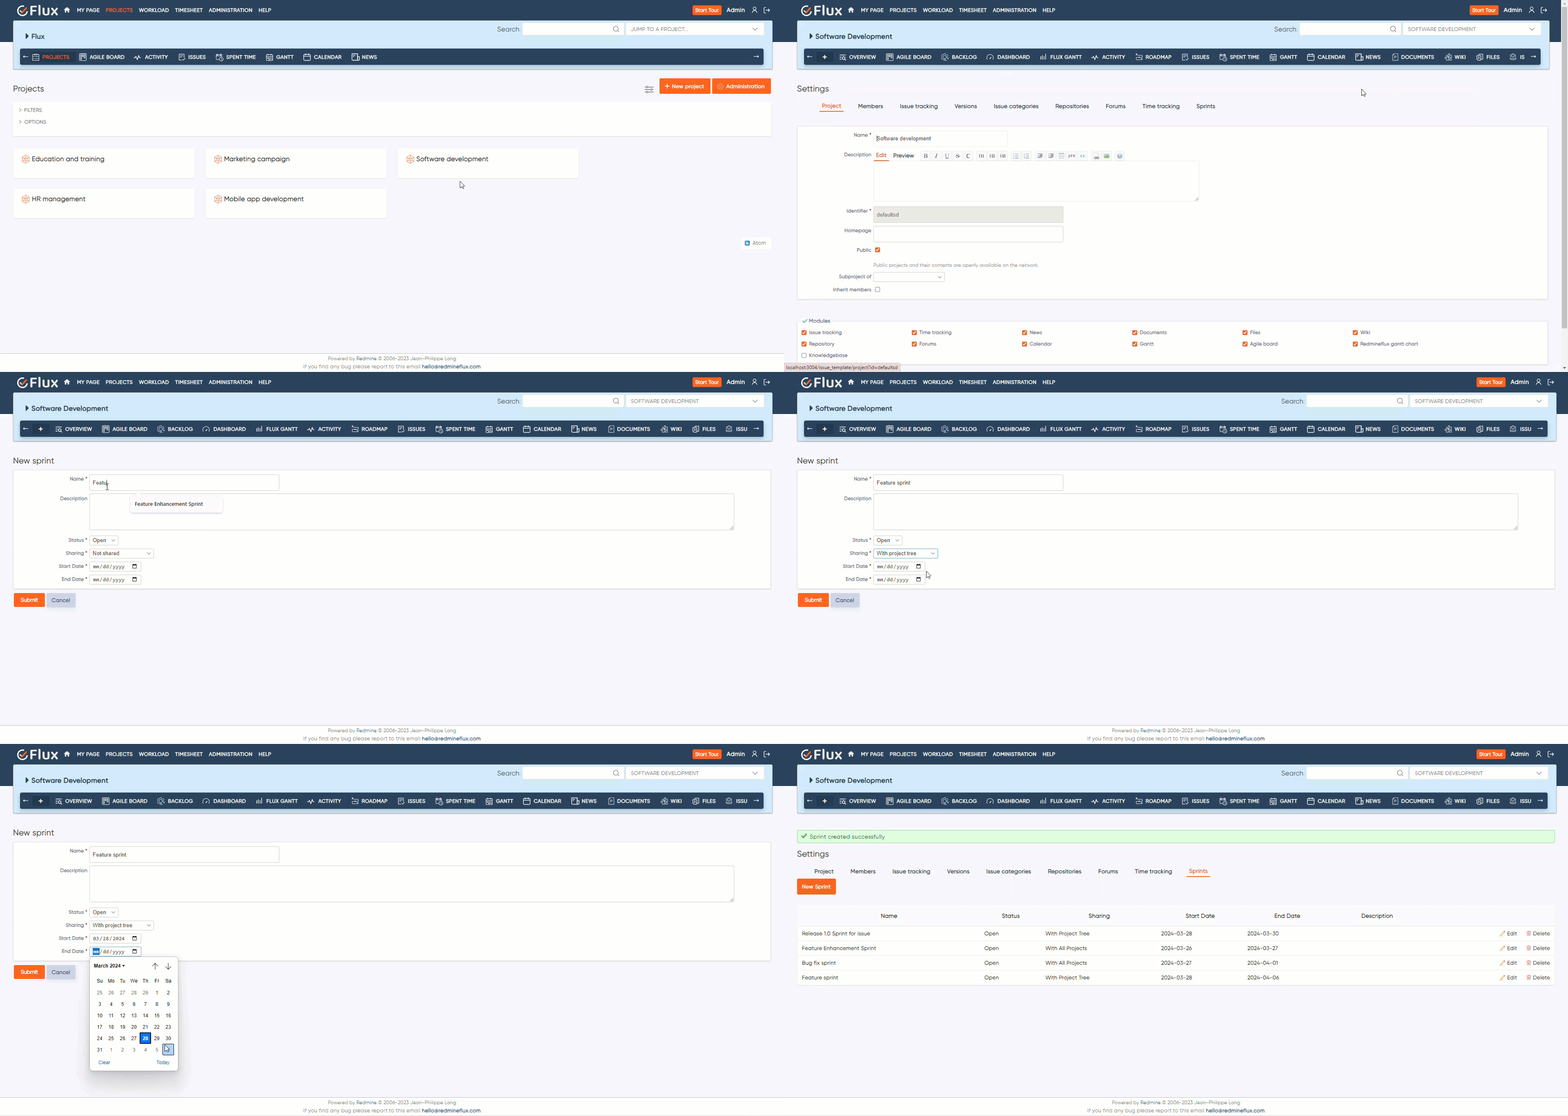
- After Signing in to the Redmine you need to select your desired project.
- Once you’re in the project, click on the “Settings” tab.
- Within the Settings, click on the “Sprint” tab. Click on it to access the sprint features.
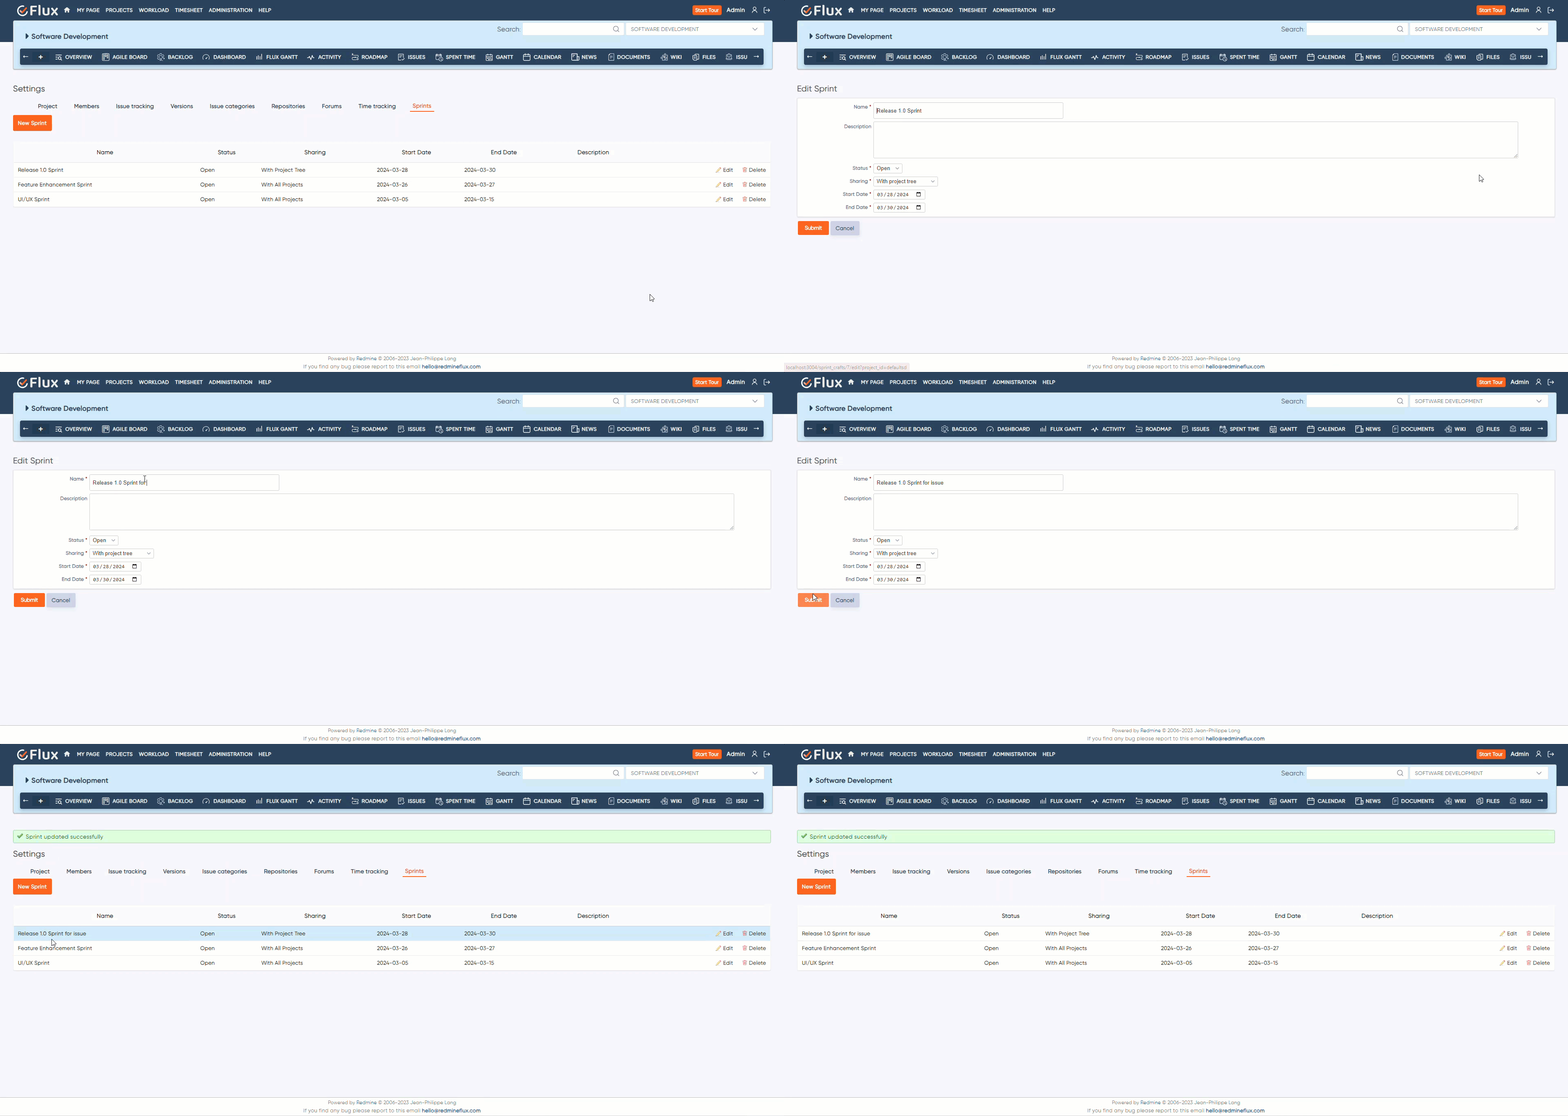
- Now click on “New Sprint”, which allows you to create a new sprint.
- Now Enter Sprint details like name, status, description, start date, end date select an option from sharing dropdown according to your project need.
- After entering all the details, save your changes to create the sprint.
- Verify that the sprint has been successfully created with the specified details.

How to Edit sprint in Agile Board #
To edit sprint in Agile Board, follow these steps:
- Go to the sprint option under the settings.
- Click on the “Edit” icon or text next to the sprint you want to modify.
- Make the necessary changes to the sprint’s status, start date, due date, sharing settings or any other details.
- Save your changes after editing.

How to Delete sprint in Agile Board #
To delete sprint in Agile Board, follow these steps
- Go to the sprint option under the settings.
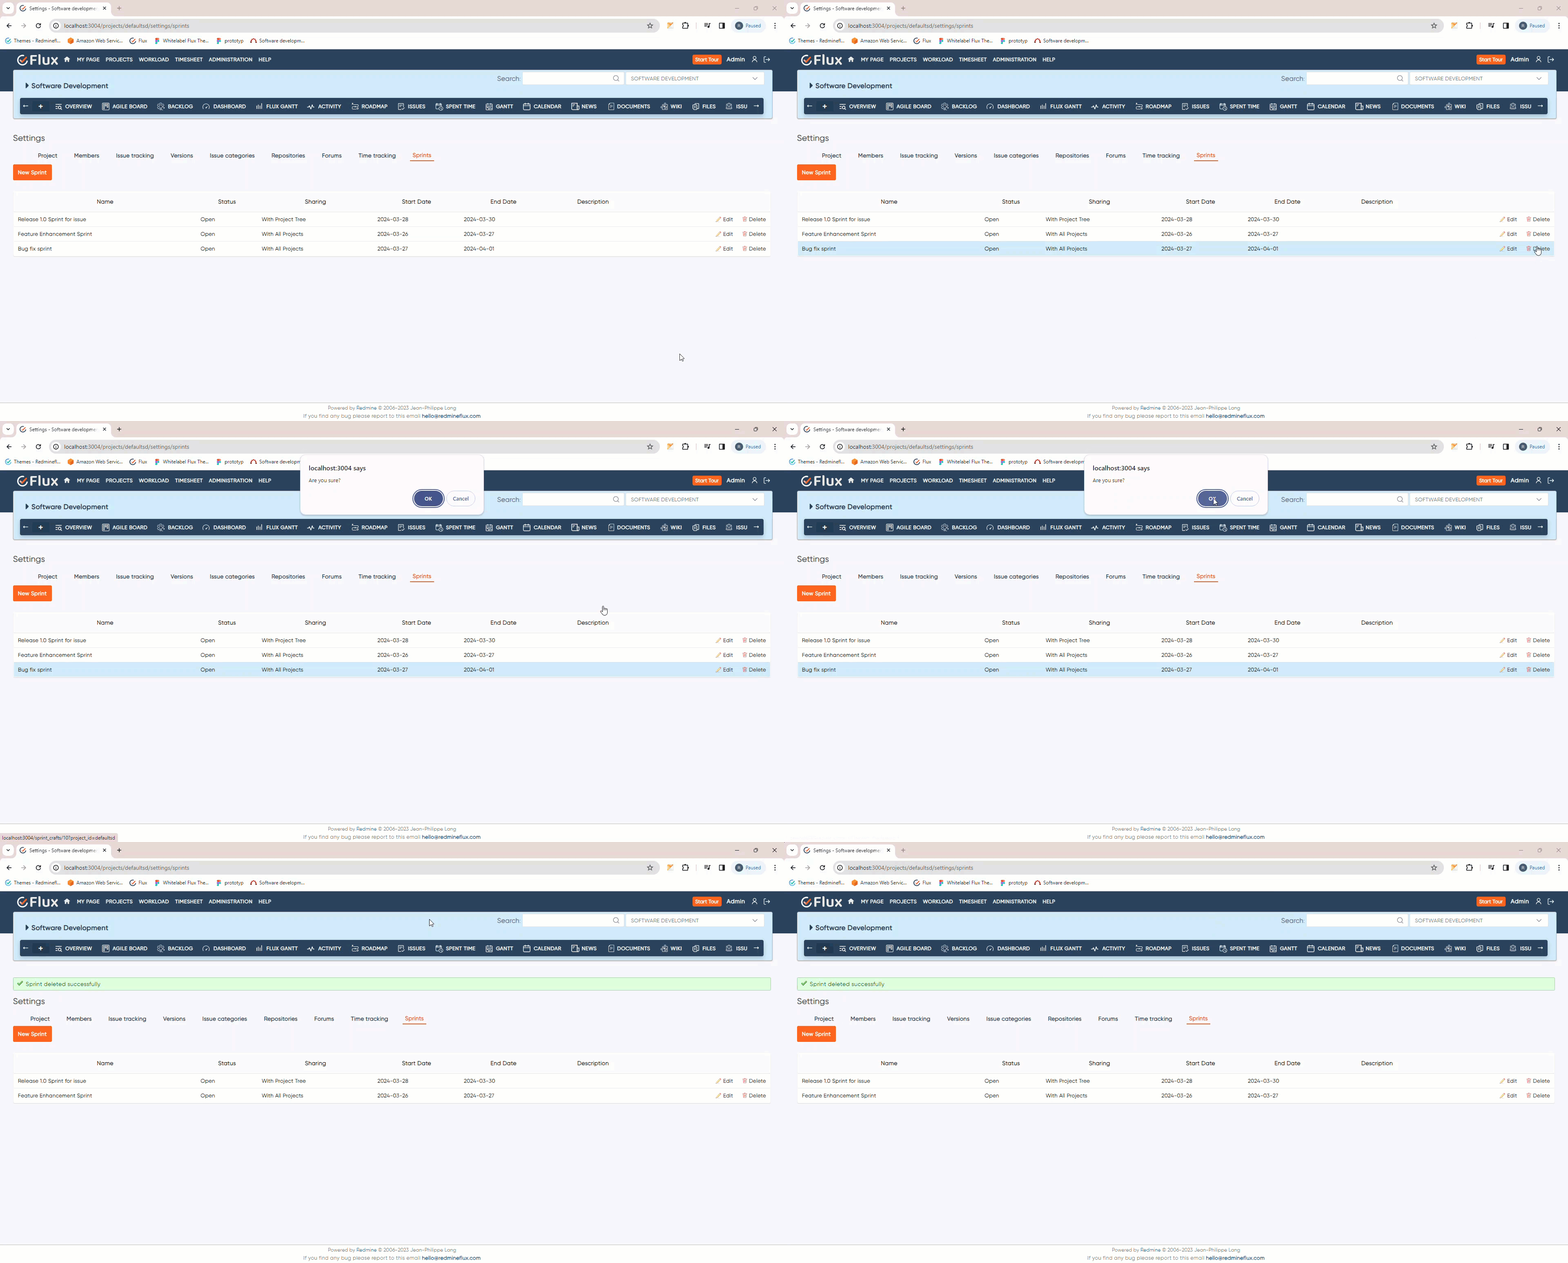
- Click on the “Delete” icon or text next to the sprint you want to delete.
- Confirm the deletion if prompted.

How to assign a sprint by editing the issue #
To assign a sprint by editing the issue, follow these steps:
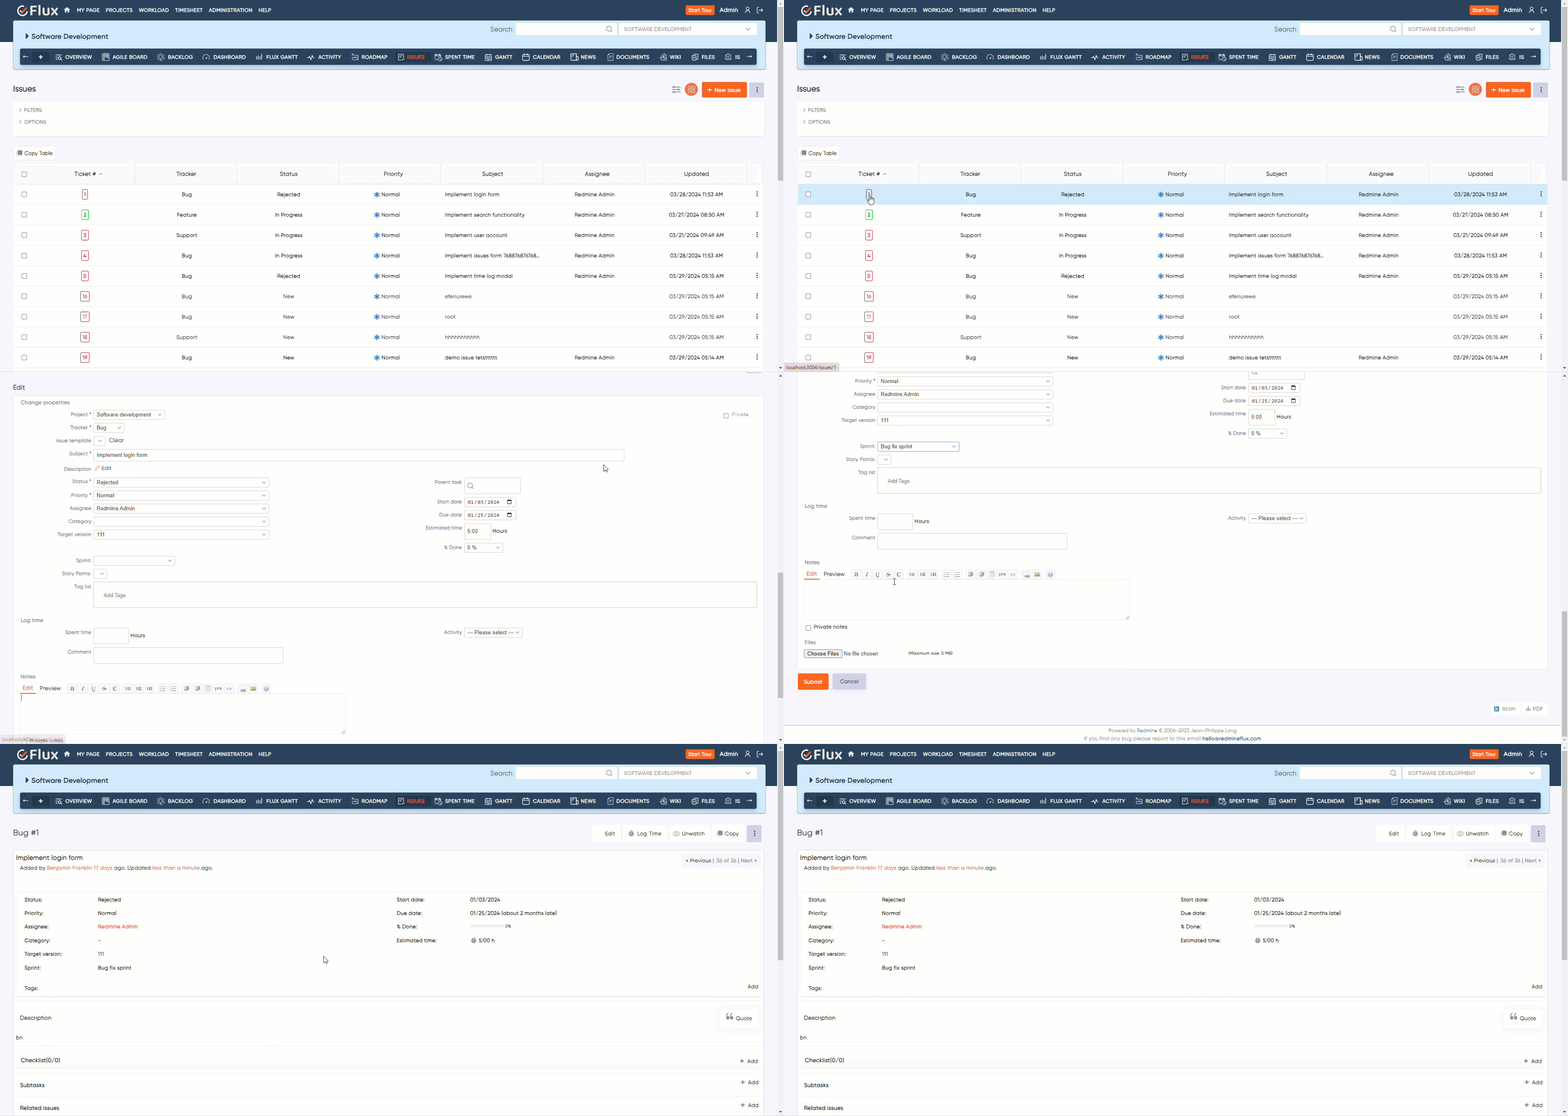
- Click on issues tab under your project.
- You will see all the issues here; now click on any issue that you want to assign a sprint for.
- Click on the edit option on the issue details screen.
- Within the issue editing interface you will see an option called sprints with a dropdown.
- In the Sprint field dropdown, choose the desired sprint from the available options. This will assign the issue to the selected sprint.
- After selecting the sprint, save the changes to the issue.

How view sprint on the Agile board #
To view sprint on the Agile board, follow these steps:
- Click on agile board tab under your project.
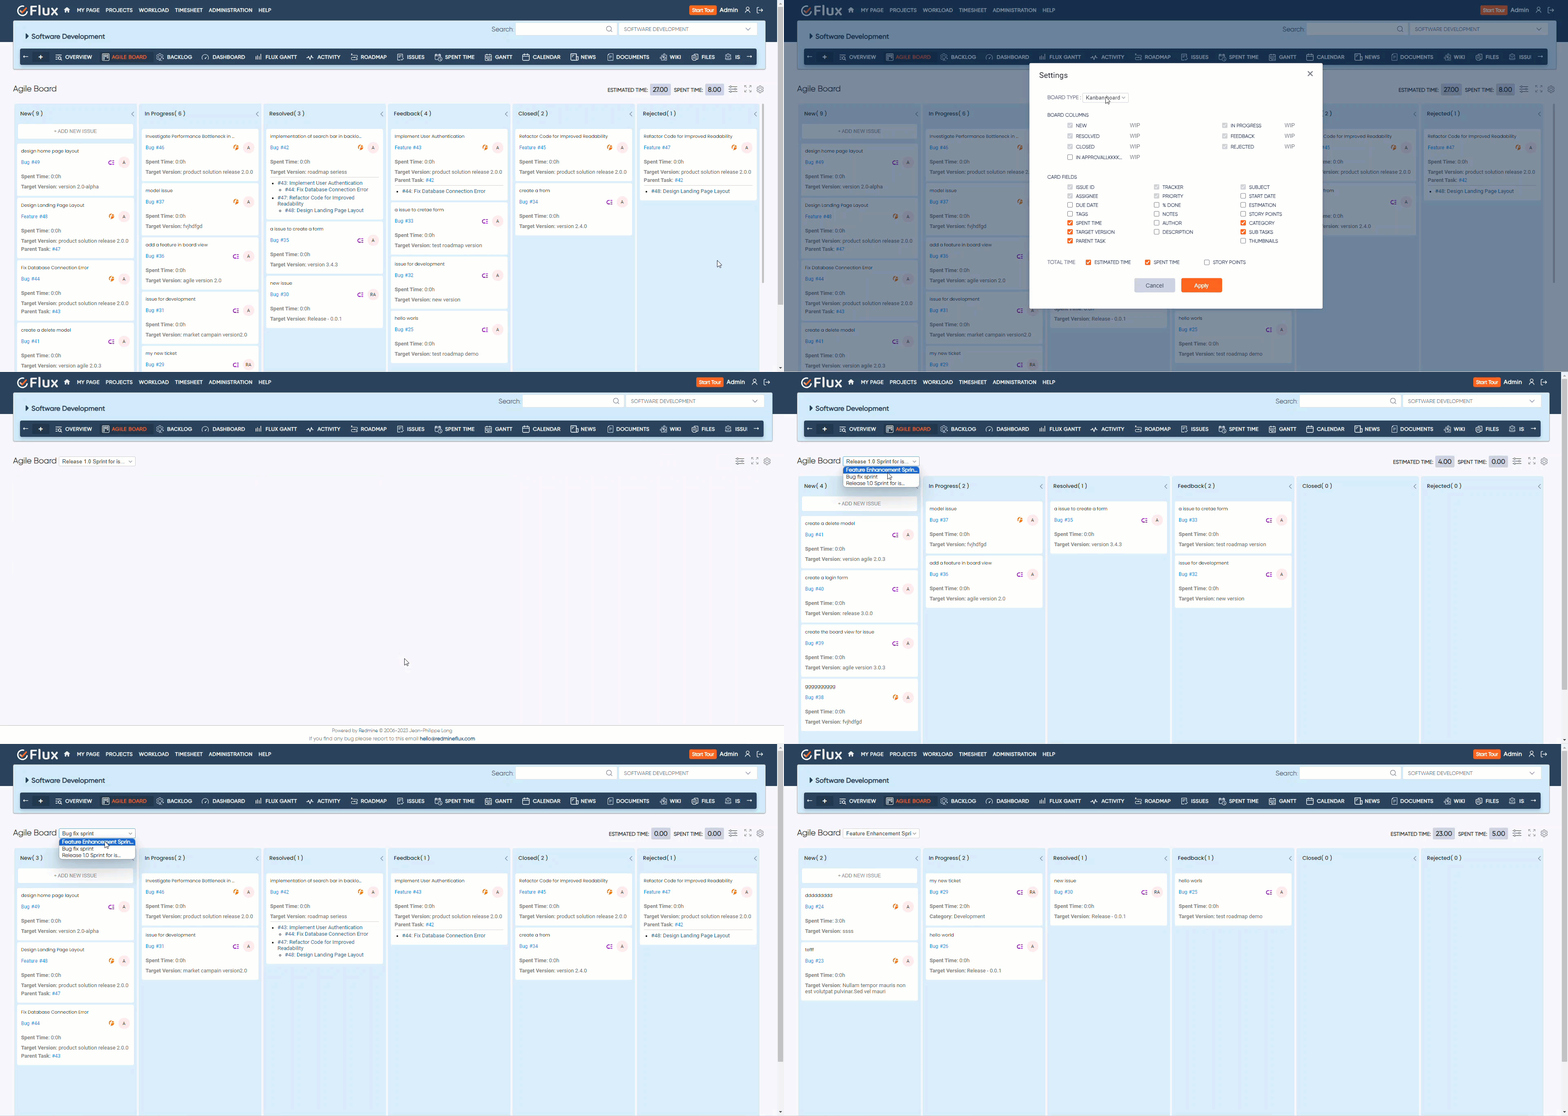
- Here you will see a settings icon on the top right corner click on that icon. This allows you to configure the settings of the Agile board.
- Under settings, find the option to select the board type from the dropdown select “Scrum Board” from the available options.
- After selecting the Scrum board type, click on the “Apply” button to confirm your choice and apply the changes to the board.
- Once the changes are applied, look for a dropdown menu located on the top of the Agile board interface. This dropdown menu allows you to select the sprint you want to view.
- After selecting the sprint, the Agile board will update to show only the issues assigned to that sprint.

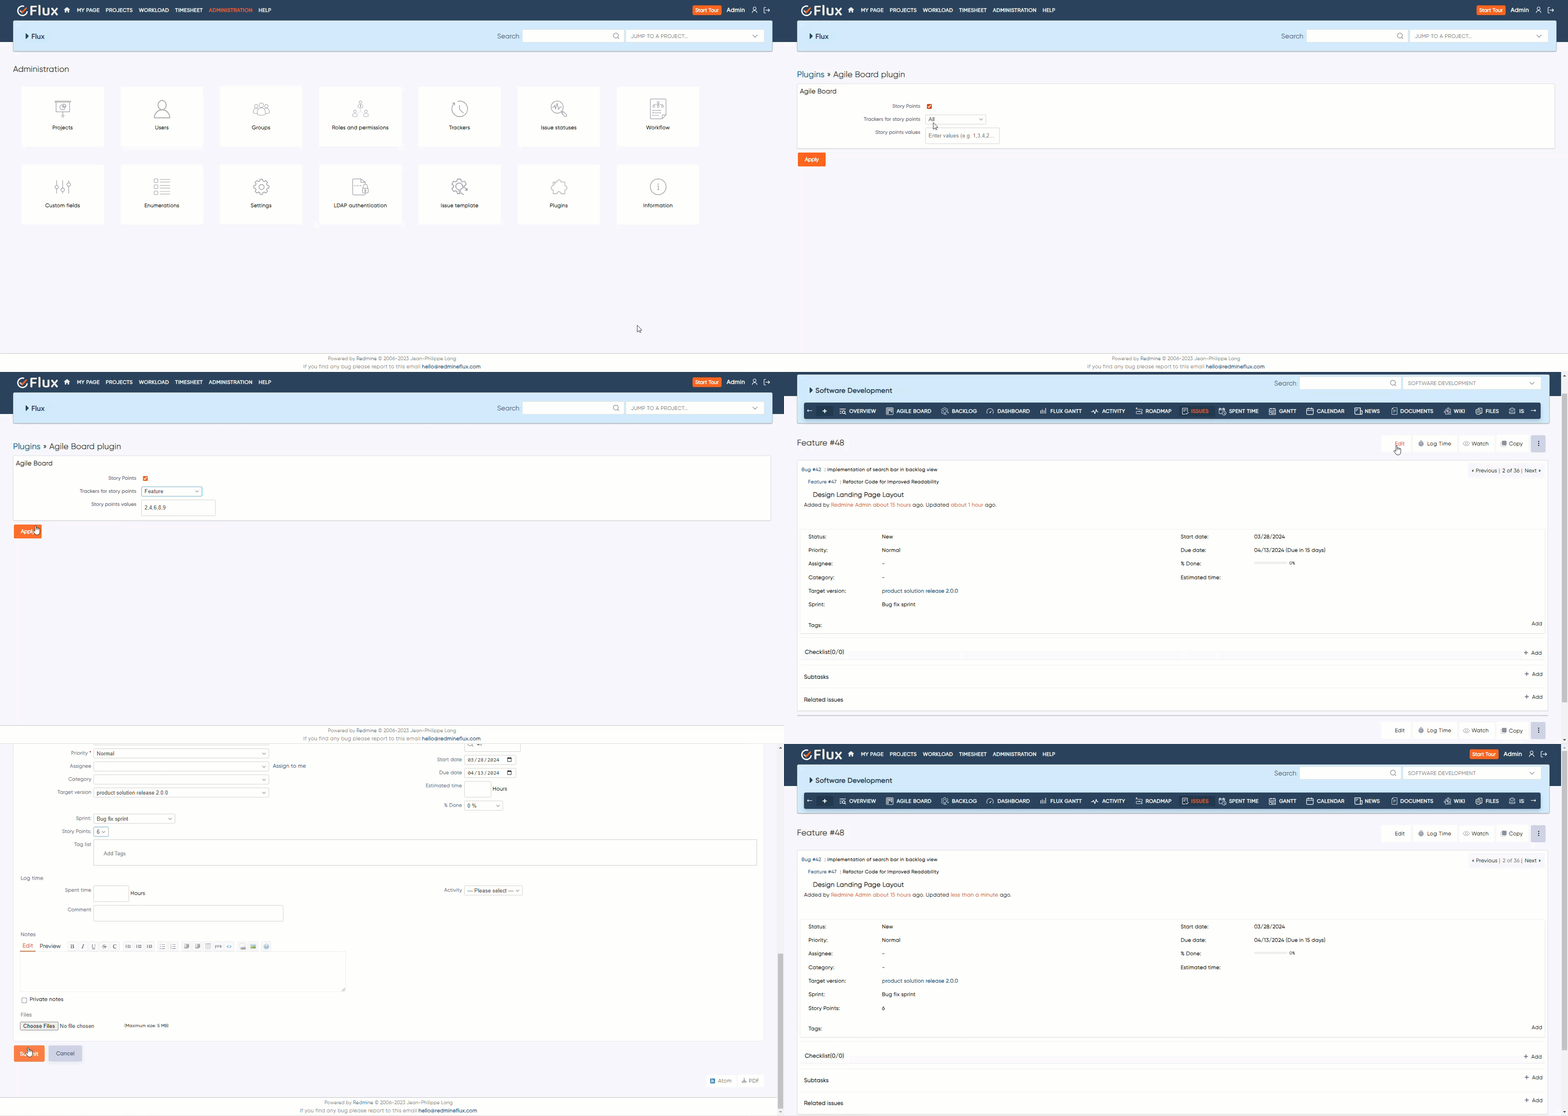
How to Add and Assign Story Points on Agile Board #
To add story points in an Agile board, follow these steps:
- Login into Redmine as an administrator.
- Click on the administration tab from the top menu now click on plugins
- Here you will see the list of installed plugins, go to the Agile board plugin and select the configure option.
- Within the configuration settings of the Agile board plugin, there is an option to enable story points. Click on the checkbox labeled “Story Points” to enable this feature.
- Once story points are enabled, you need to define the values for story points. This would be a numerical scale (e.g., 1, 2, 3, 5, 8, 13)
- Depending on your project setup, you may have different trackers. There is an option within the Agile board plugin configuration to specify the story point values for each tracker type or for all.
- After configuring story points and updating values for trackers, click on the “Apply” button to save your changes.
To assign the story point by editing the issue, follow these steps:
- Click on agile board tab under your project or for all projects.
- You will see all the issues here; now click on any issue that you want to assign a story point for.
- Click on the edit option on the issue details screen.
- Within the issue editing interface you will see an option called Story Points with a dropdown.
- In the story point field dropdown, choose the desired story point value from the available options. This will assign the issue to the selected story point value.
- After selecting the value, save the changes to the issue.

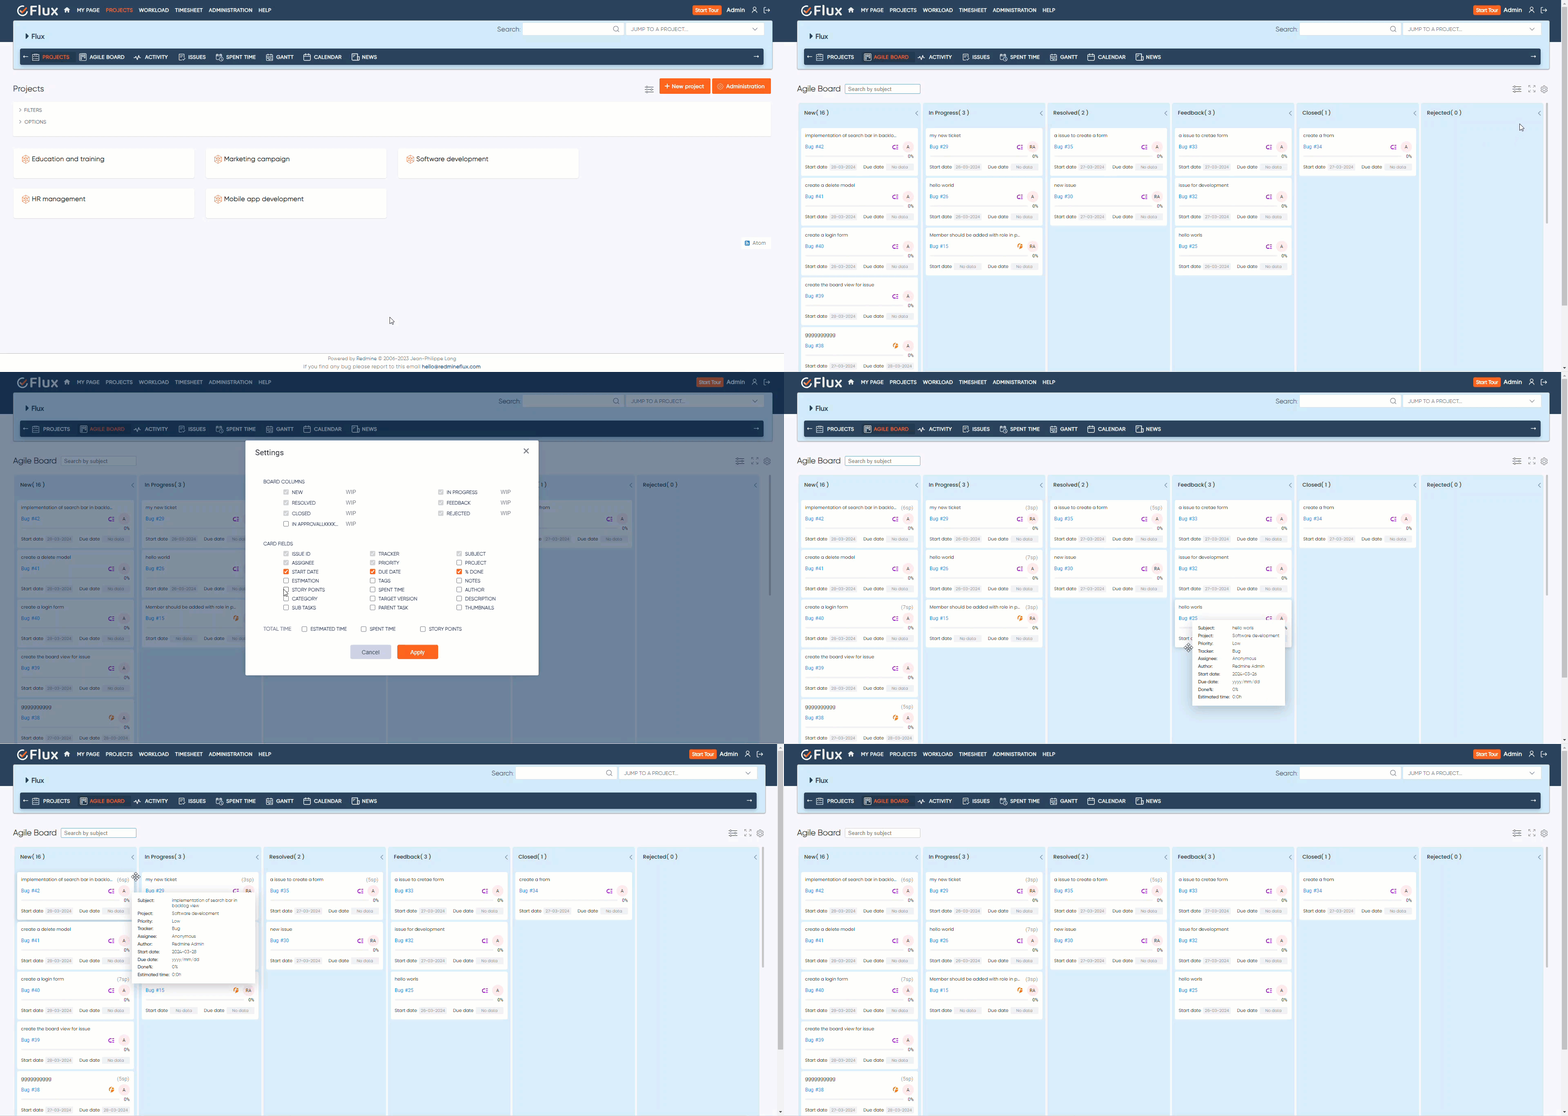
How to view the story point values on Agile board #
To view the story point values on Agile board, follow these steps:
- Click on agile board tab under your project or for all projects.
- Here you will see a settings icon on the top right corner click on that icon. This allows you to configure the settings of the Agile board.
- Within the settings you will see a checkbox labeled “Story Points”. Click on the checkbox to enable the display of story points on the Agile board.
- After selecting, click on the “Apply” button to confirm your choice and apply the changes to the board.
- Once the changes are applied, story point values are visible on the issue cards displayed on the Agile board.
- By following these steps, you can enable and view story points on Global Agile boards and ‘My Page’ Agile Boards also.

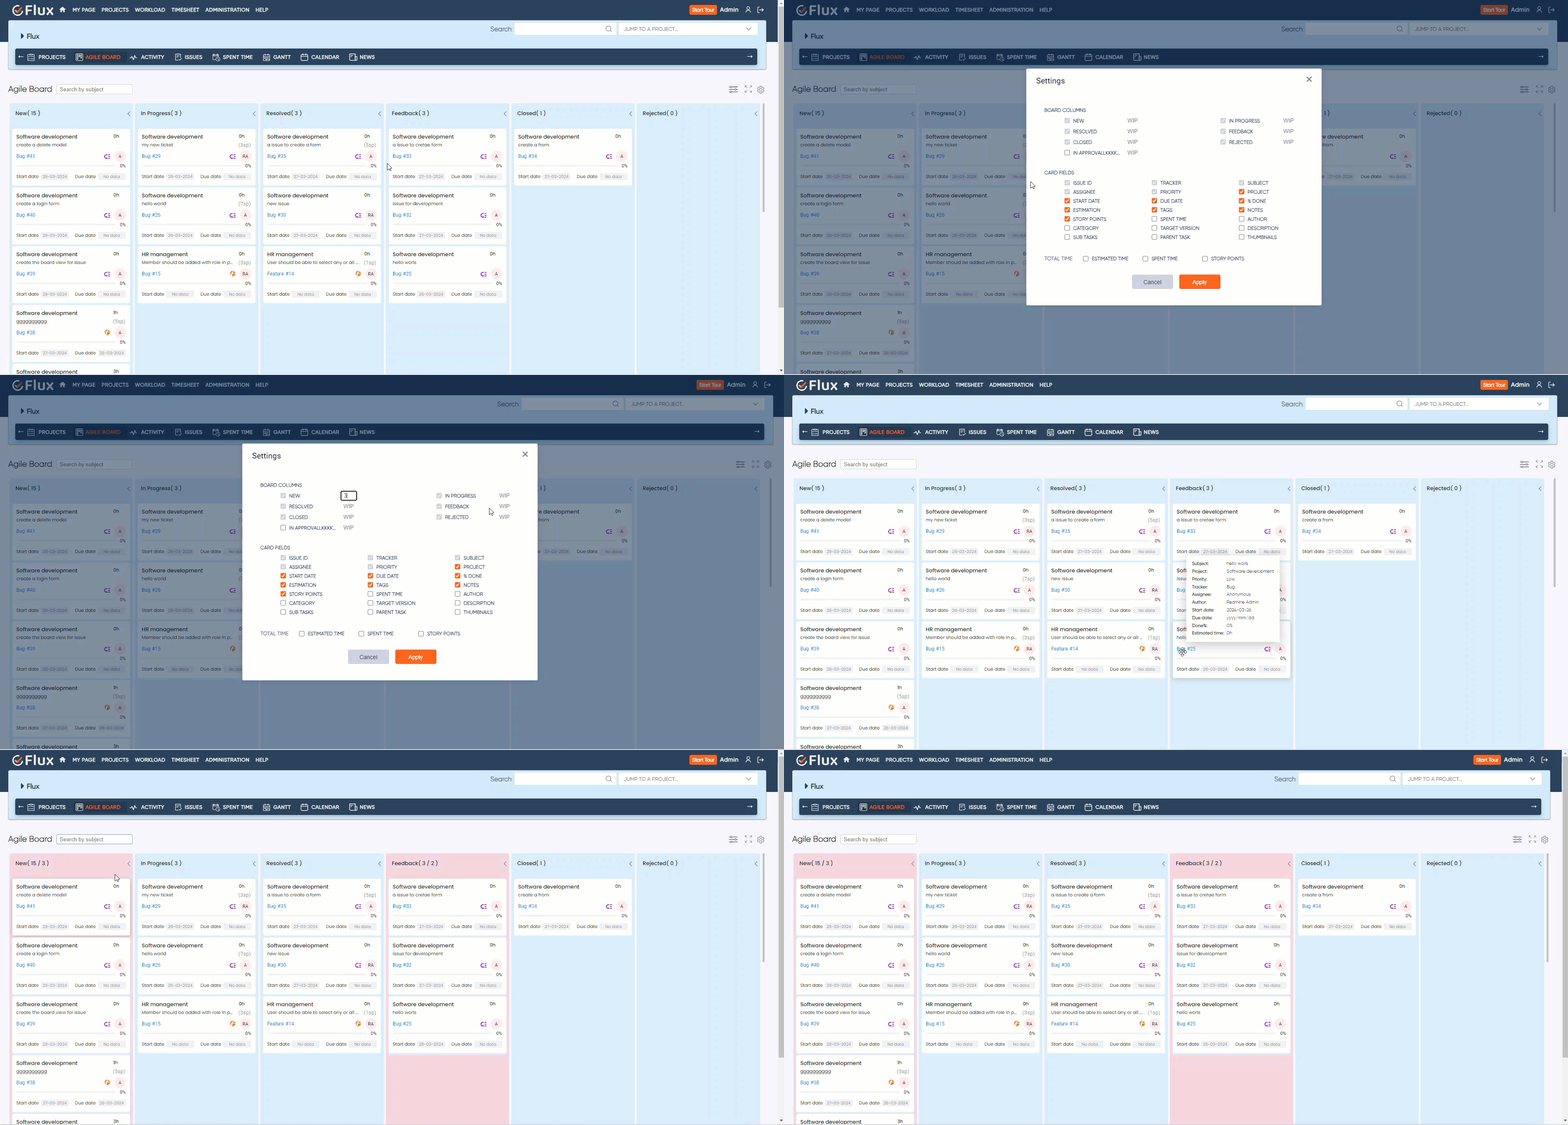
How to Set Work in Progress (WIP) limits on an Agile board #
To Set Work in Progress (WIP) limits on an Agile board, follow these steps:
- Before setting WIP limits, ensure you understand how they work. WIP limits restrict the number of items that can be under a particular status e.g. (New, In Progress, Feedback, Resolved etc.) This helps teams focus on completing work rather than starting new tasks.
- Click on the settings icon located on the top-right corner of Agile board interface. This allows you to configure the settings of the Agile board.
- Here on the popup screen, you will see board column option with WIP fields. These columns are typically labeled with the names of the status in your workflow, such as “New,” “In Progress,” and “Done” etc.
- For each column where you want to set a WIP limit, enter the number in input field, which is labeled as “WIP”. For example, if you want to limit the “In Progress” column to 3 items, enter “3” into the input field.
- After setting the WIP limits for the desired columns, save your changes to apply them to the Agile board configuration.

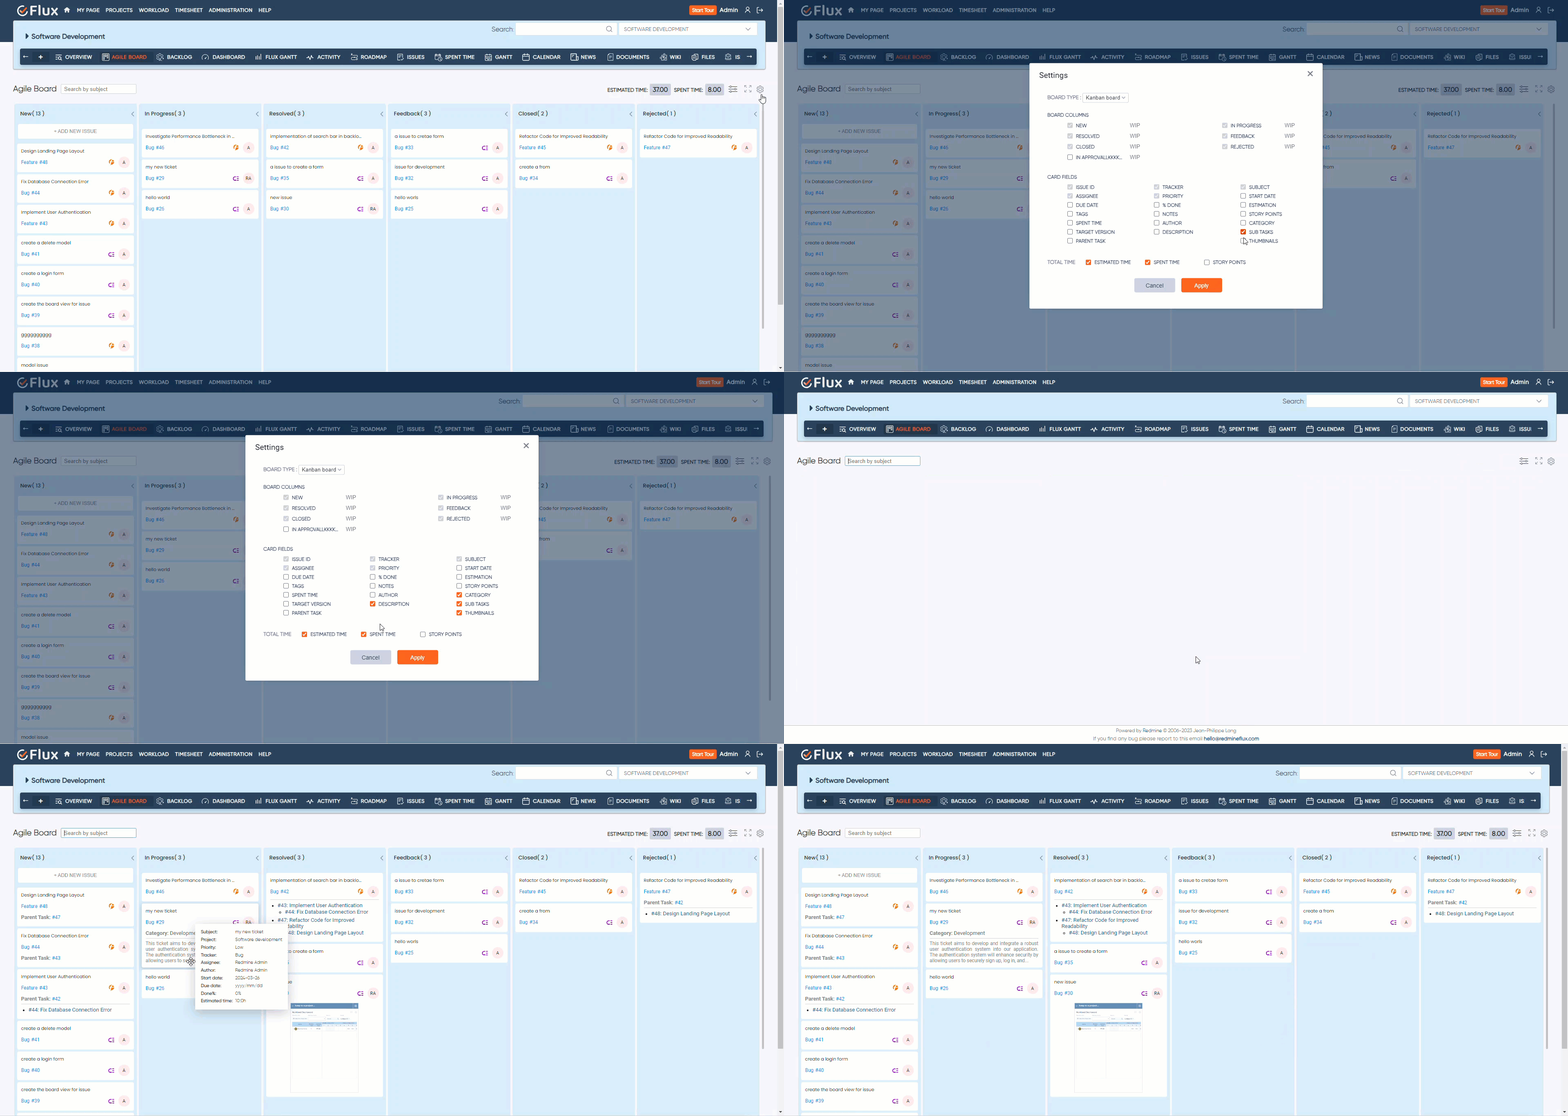
How to customize additional card fields in the issue view of an Agile board #
To customize additional card fields in the issue view of an Agile board, follow these steps:
- Click on agile board tab under your project or for all projects.
- Here you will see a settings icon on the top right corner click on that icon. This allows you to configure the settings of the Agile board.
- Look for an option related to card fields within the setting popup.
- In the card fields, see a list of available fields with checkboxes next to them. Each checkbox represents whether the field is currently displayed on the issue cards.
- Select the field you want to display on the issue cards (e.g., thumbnail images, category, description, target version, sub-task, parent task, story points).
- After selecting the desired fields, find the “Apply” button within the settings window. Click on it to save your change.
- Check the issue cards to confirm that the additional fields you selected are now displayed.

How to view the version planning board in Agile board #
To view the version planning board in Agile board, follow these steps
- Navigate to the project settings tab.
- Within the project settings, ensure that the Agile board modules are enabled.
- Once the Agile board modules are enabled, see a “Backlog” tab next to the “Agile Board” tab. Click on the “Backlog” tab to view the version planning board.
- In the Backlog view, you will see a column of versions along with the associated issues that have been created for each version.
- The version planning board includes a filter that allows you to refine the displayed issues based on user input.
- Select or enter the desired values or conditions for each filter criteria.
- Once you click on the “Apply” button to apply the filters. It will now display only the tasks that meet the specified filter criteria.
- To clear the filters and view all tasks again, click on “Clear ” option.
- You will see a settings icon on the top right corner click on that icon. This allows you to configure the settings related to board columns and card fields for the displayed issues.
- If you prefer a larger view of the version planning board, then click on full screen. This button will expand the board to full screen.

How to create a new version and new issue in Agile board #
To create a new version in Agile board, follow these steps:
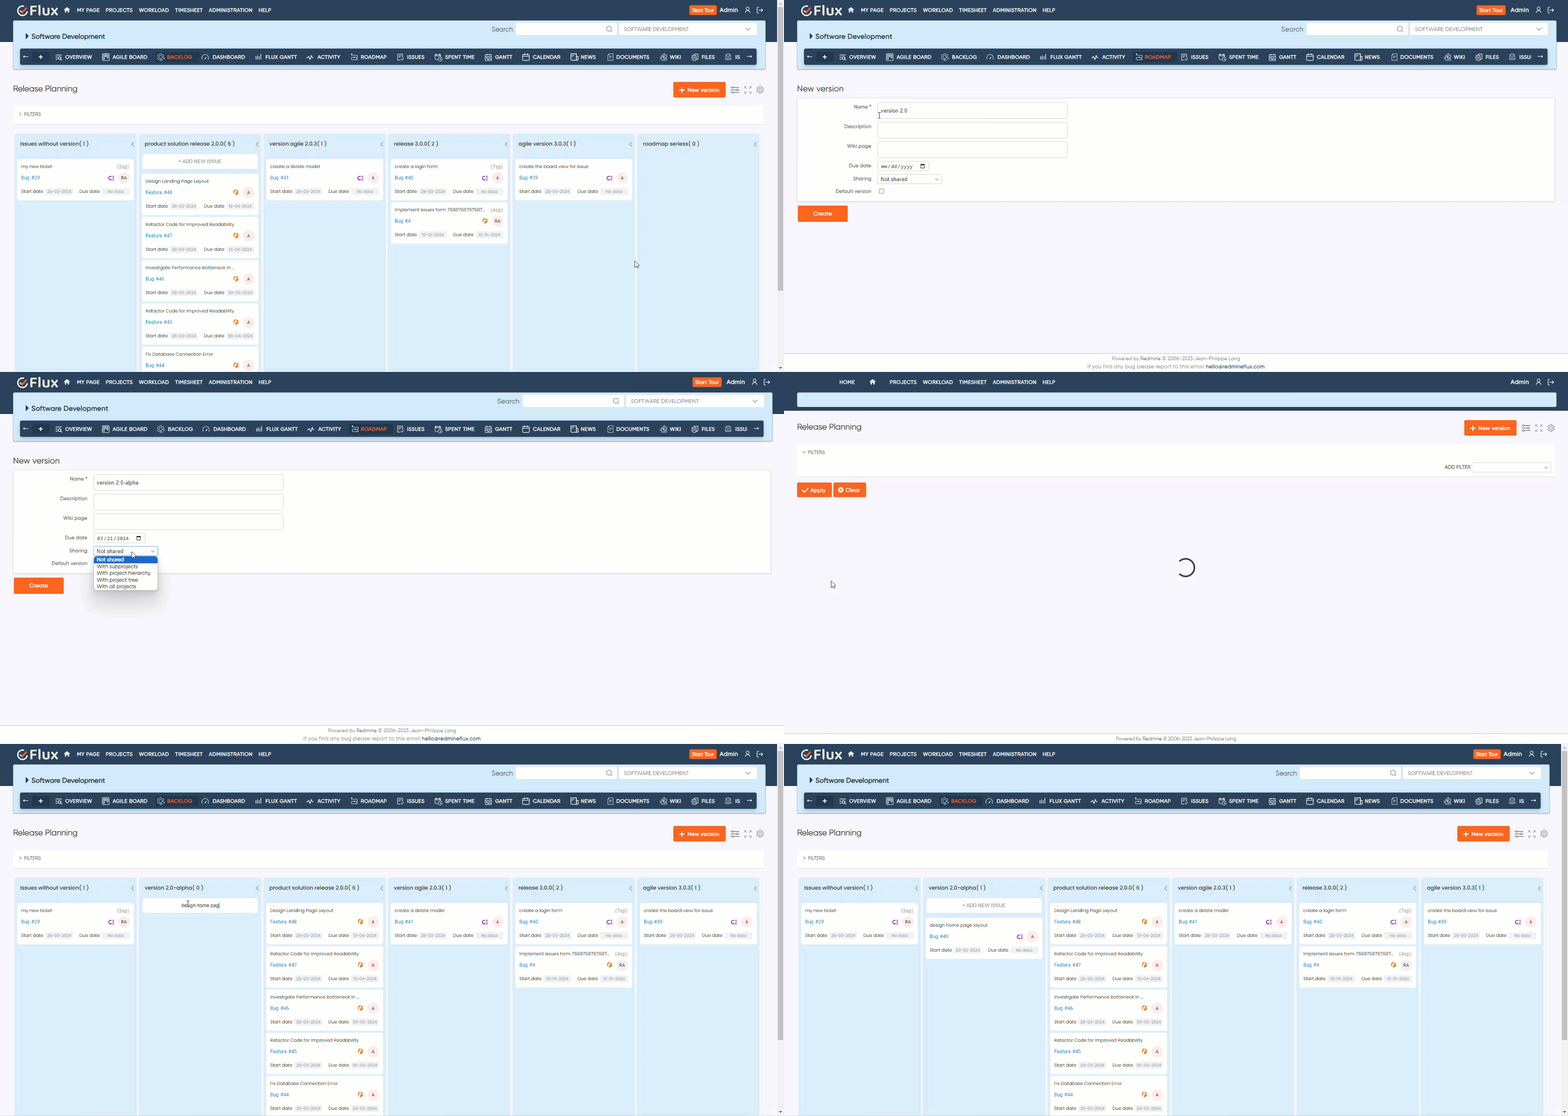
- Navigate to your Agile broad backlog tab.
- Click on the “New Version” button in the top-right corner of the screen.
- Fill in the required details such as name, description, due date, select an option from sharing dropdown according to your project need and any other relevant information.
- Click on the “Create” button to create the new version.
- Once created, the new version will be added to the backlog page as a new column.
To add a new issue to a specific version column and manage issues within the column view, follow these steps:
- Go to the column view where versions are represented as columns. This view displays each version as a separate column, allowing you to manage issues within each version.
- You will find the option to add a new issue within the column view. It is labeled “Add Issue” that creates a new issue.
- Click on the ‘Add Issue’ button, fill in the issue subject, and then create the new issue.
- After creating the issue, it will typically appear as a card in a backlog. After that you can drag the newly created issue into the column for the desired version which you want to assign the issue.

How to search an issue in agile board #
To search for an issue on an Agile board, follow these steps:
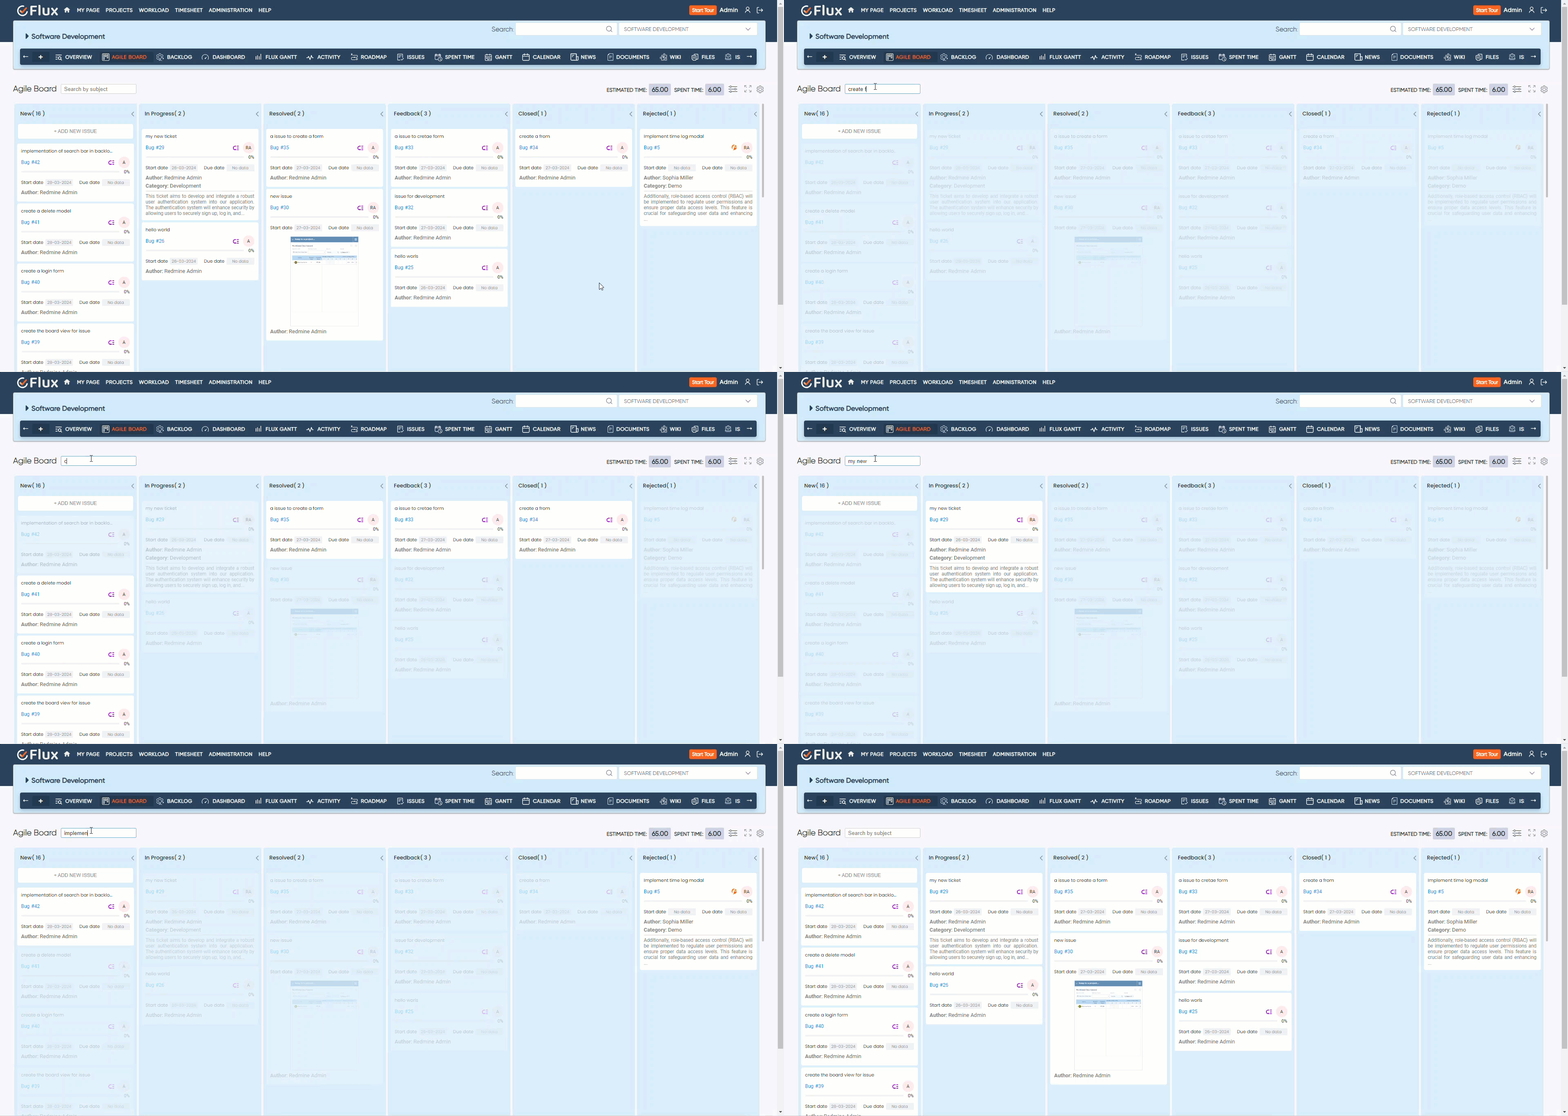
- Access the Agile Board for a specific project or for all projects.
- You will find the search input field labeled “Search by Subject.”
- Click on the input field, and then type in the subject of the issue you’re searching for.
- The issues matching the entered subject or keyword will be displayed accordingly.

How to View the Agile Board in Full-Screen Mode #
To view the Agile board in full-screen mode, follow these steps:
1. To access the Agile Board of a specific project. Click on agile board tab under your project.
2. In the Agile board view, this icon is in the top right corner of the Agile board interface.
3. Click on the full-screen icon. This action will expand the Agile board to cover your entire screen, providing a more immersive view of your tasks and workflow.
4.To exit full-screen mode, press the “Esc” key on your keyboard, or click on the full-screen icon again. This will return the Agile board to its original size within the interface.

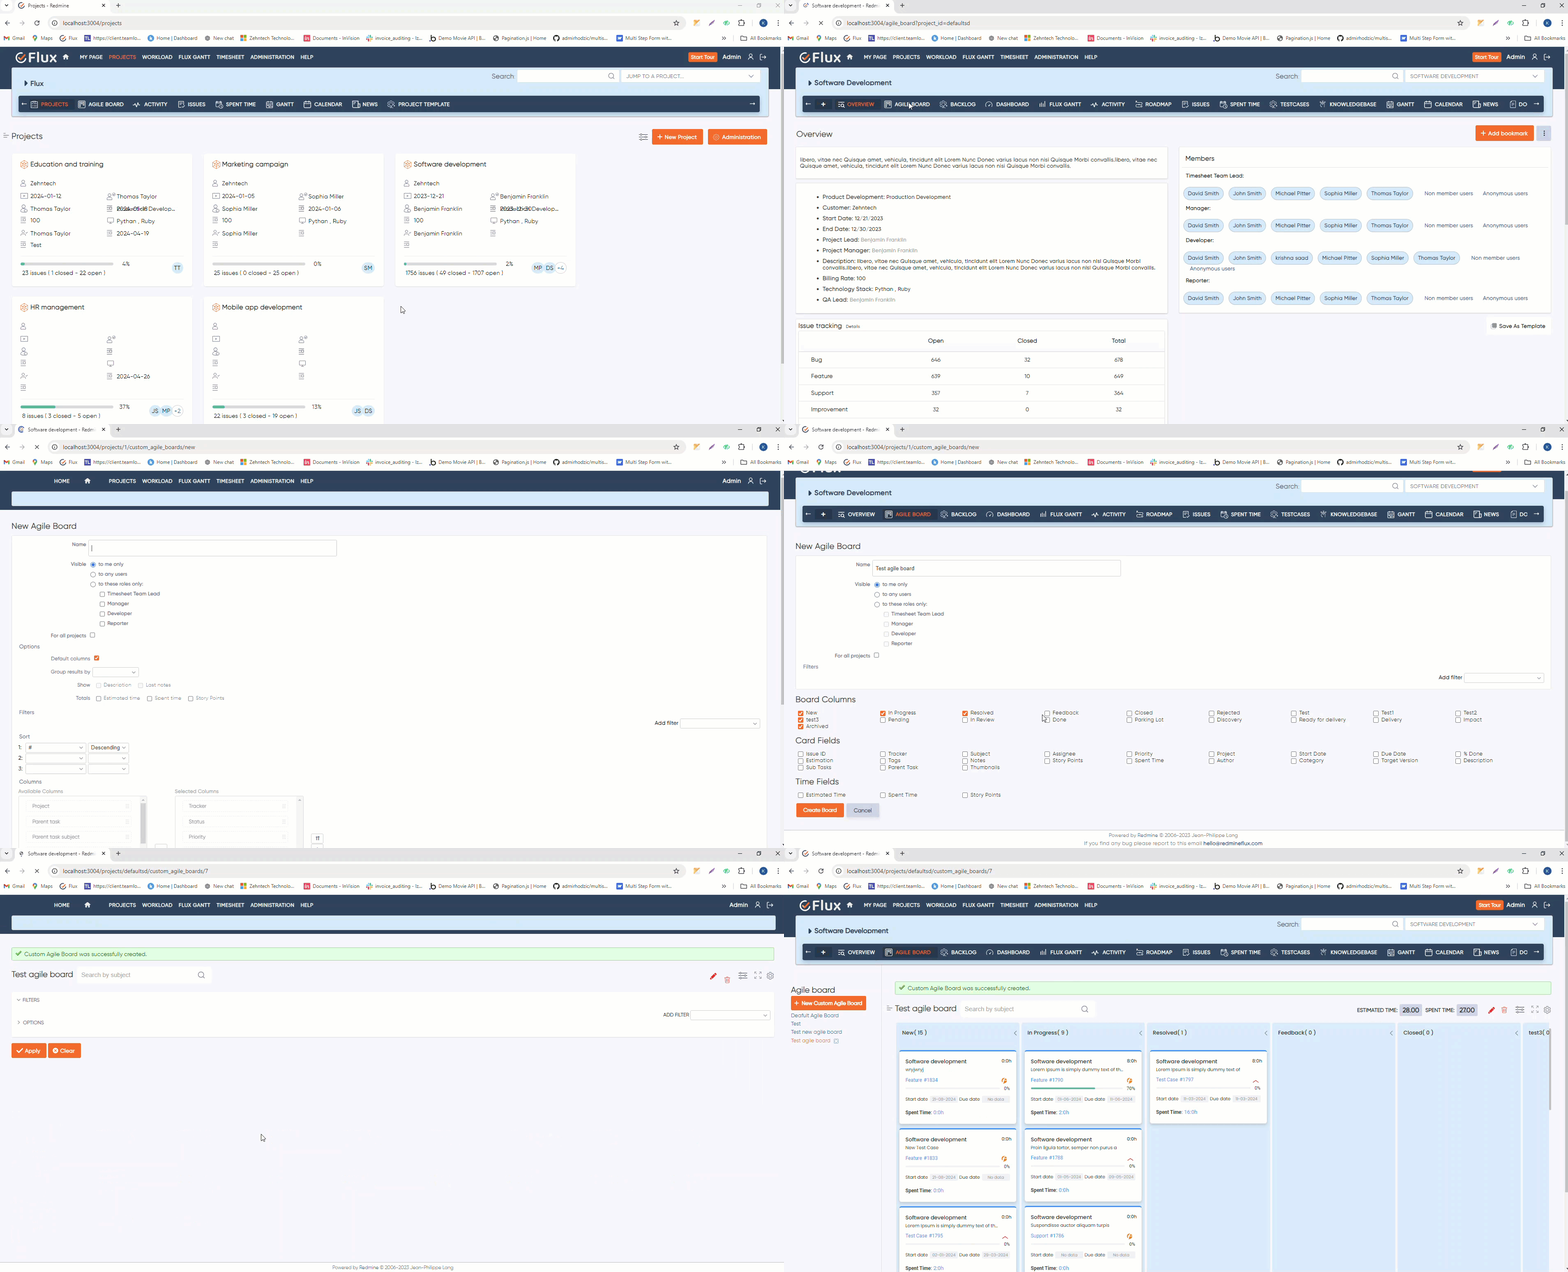
How to Create Custom Agile Board or Multiple Agile Board for a particular project. #
1. To access the Agile Board of a specific project. Click on agile board tab from the top menu under your project.
2. Click on the icon in the top left corner before heading to open the side bar.
3. In the side bar, click on the “New Custom Agile Board” button. This will take you to the form for creating a custom Agile board.
4. In the form, select the fields you want to display on your Agile board, such as board columns, card fields, and time fields.
5. After selecting your preferred options, click the “Create Board” button. Your custom Agile board will be created and displayed with the selected fields.

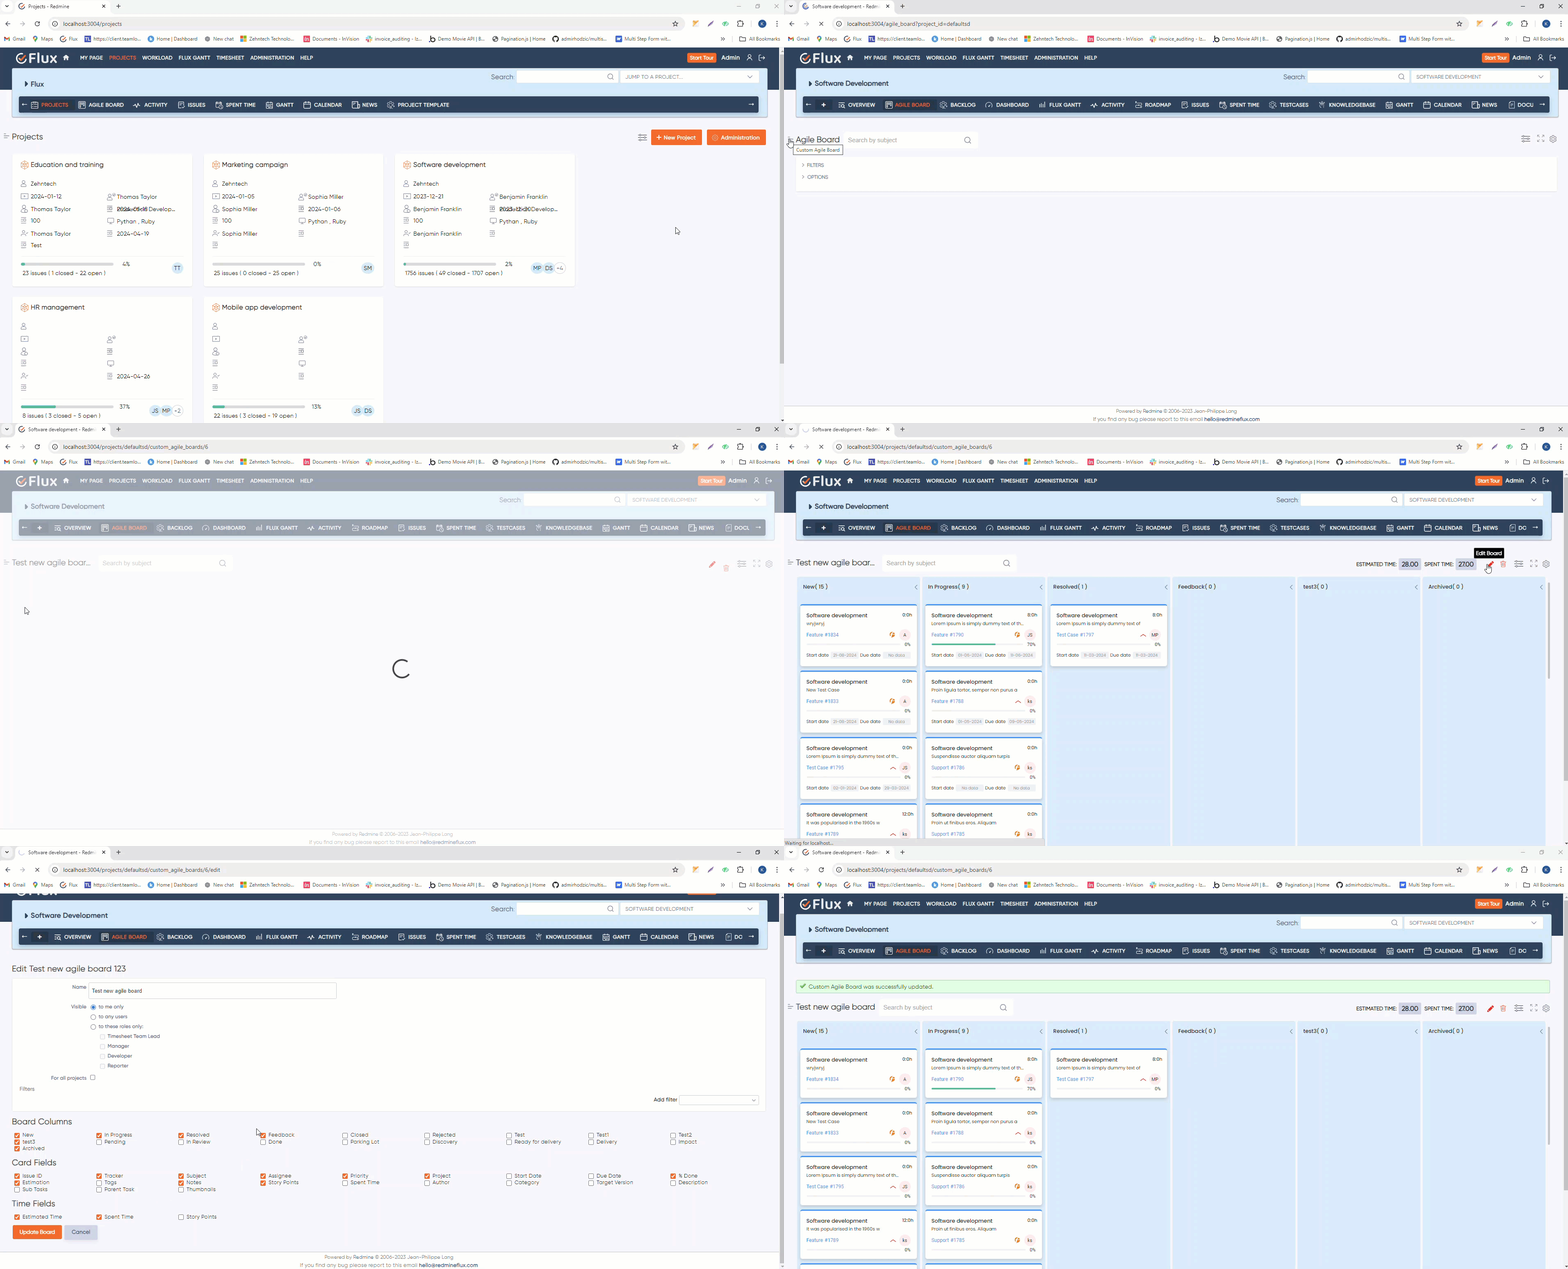
How to Update a Custom Agile Board #
1. Navigate to the project where you want to update the custom Agile board.
2. Click on the “Agile Board” tab from the top menu under project.
3. In the top left corner before heading, you’ll see an icon for custom Agile boards. Click on it to open the side bar.
4. In the side bar, find and click on the custom Agile board you want to update.
5. In the top right corner, there is a pencil icon. Click on the icon to be redirected to the update page with the form pre-filled with your data. Make your updates as needed.
6. Click on the update button to save the changes. You will be redirected to the index page, where the updated data will be displayed.

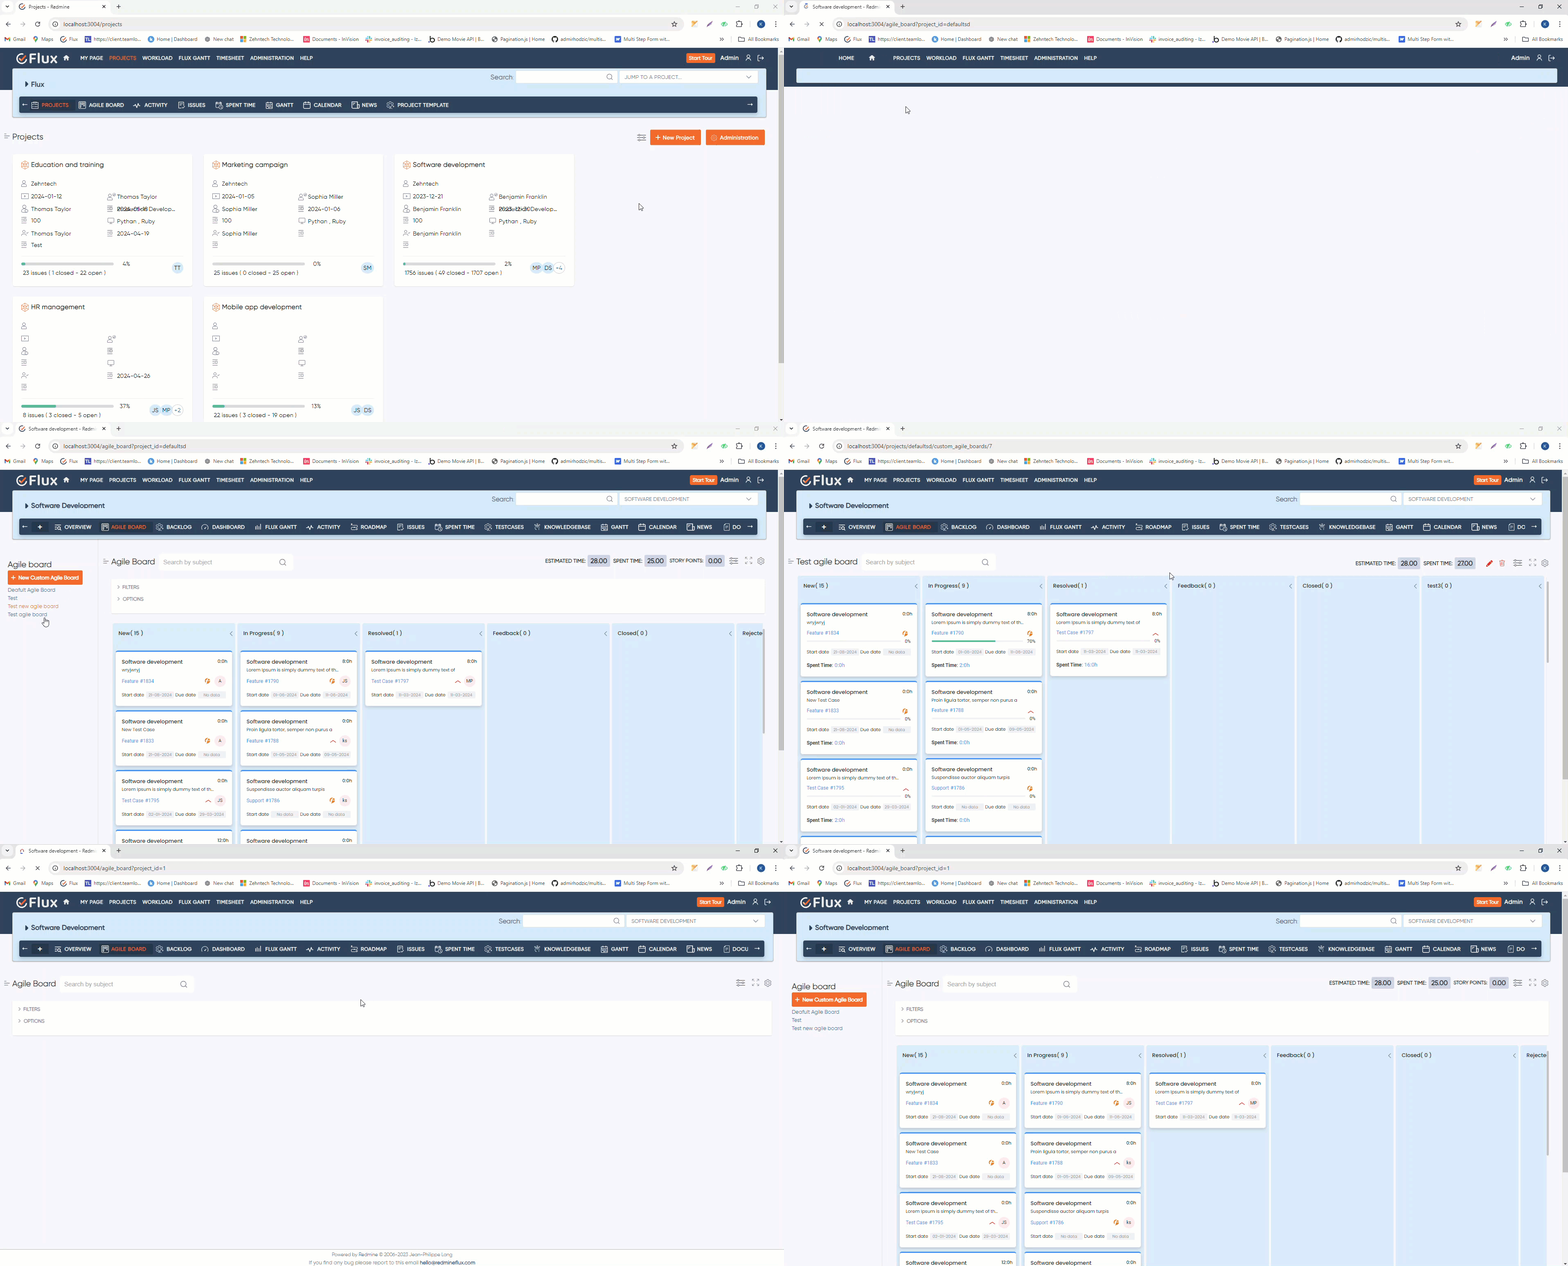
How to Remove a Custom Agile Board #
1. Navigate to the project where you want to remove the custom Agile board.
2. Click on the “Agile Board” tab from the top menu under project.
3. In the top left corner before heading, you’ll see an icon for custom Agile boards. Click on it to open the side bar.
4. In the side bar, find and click on the custom Agile board you want to remove.
5. After selecting the Agile board, you’ll see a cross (✕) icon next to the board’s name in the sidebar. Click this icon to close the currently open custom Agile board.
6. To delete a custom Agile board, click the delete icon located before the filter icon in the top right corner. This will delete the current Agile board and redirect you to the default Agile board.

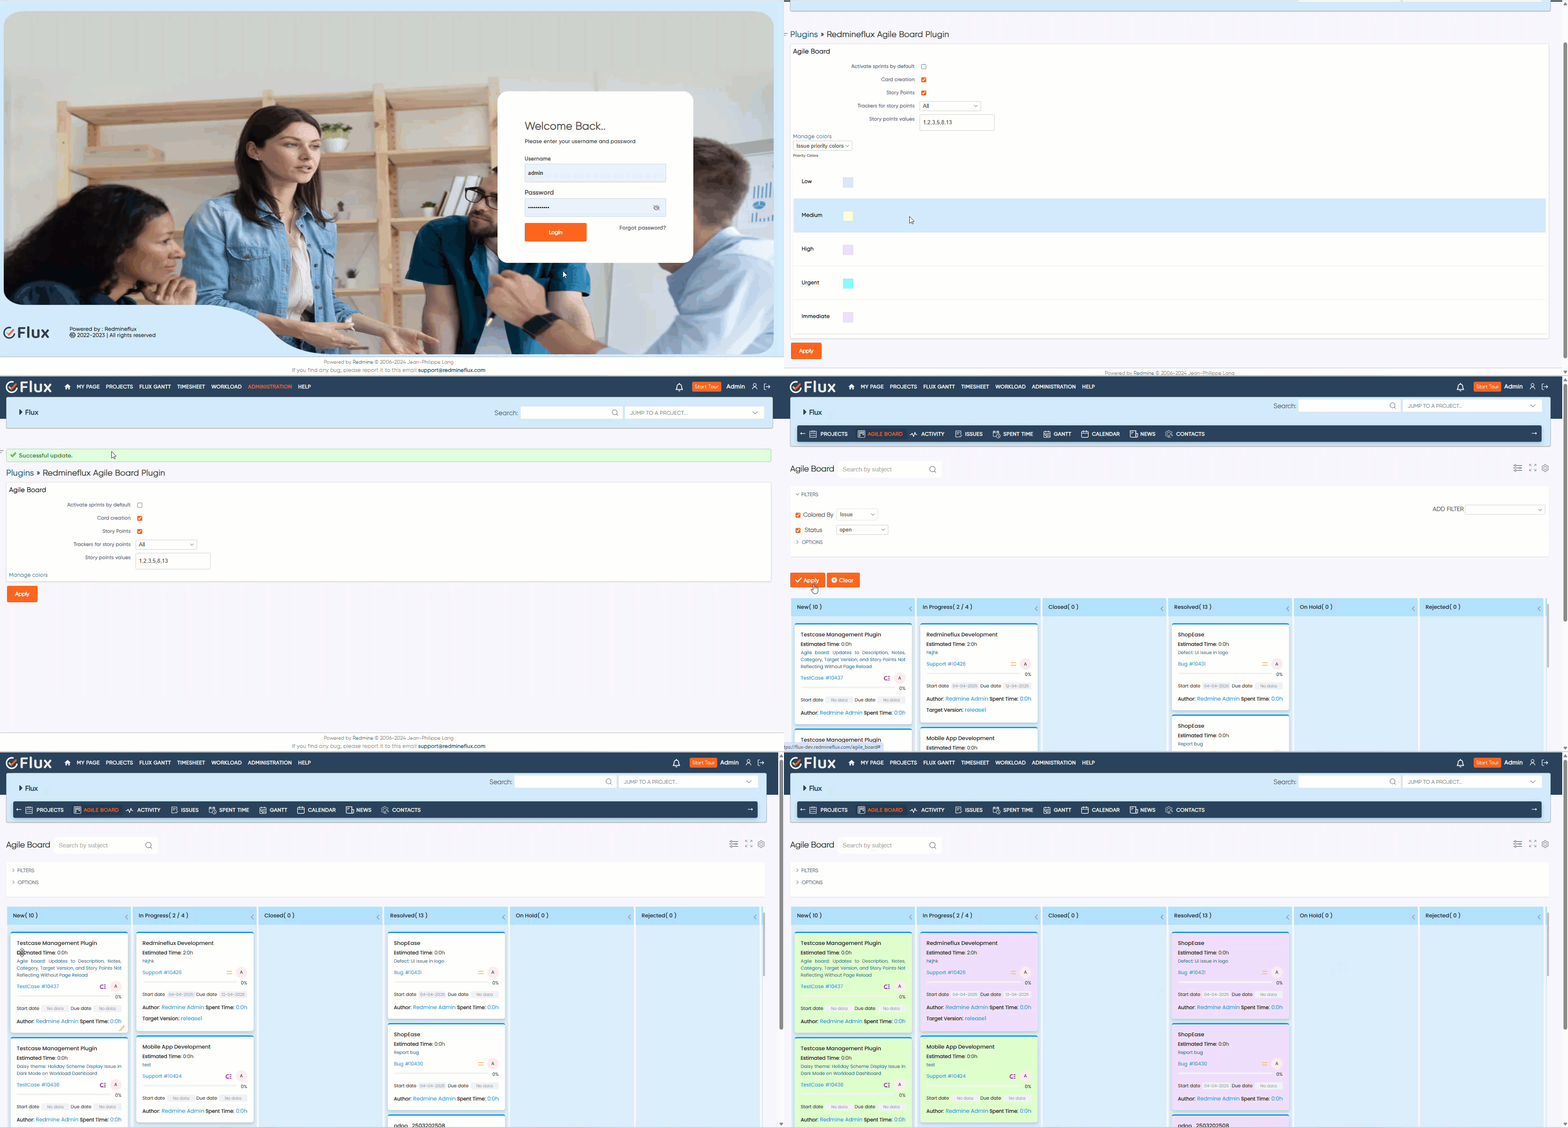
How to Add Color Customization for Cards in the Agile View Based on Tracker and Issue Priority #
To manage card colors based on tracker and issue priority in the Agile board, follow these steps:
- Log in to Redmine as an administrator.
- Click on the Administration tab from the top menu.
- Click on Plugins to view the list of installed plugins.
- Locate the Agile Board plugin and click on the Configure option.
- Within the configuration settings of the Agile Board plugin, find the Manage colors section click on it.
- You will see a dropdown menu with options like: Tracker Color, Issue Priority Color
- Depending on your project setup, you may have different trackers and issue priorities.
- Assign different colors for each tracker and priority as needed.
- After configuring the colors, click on the Apply button to save your changes.
How to Filter Tasks Based on Tracker or Issue Priority Color in Agile View
- Access the Agile Board of a specific project or view the board across all projects.
- Look for the Filter option, usually located at the top of the Agile Board interface.
- Click on Filter to open the filter settings.
- In the filter settings, locate the option labeled Color by.
- You can choose to color cards by Issue, Tracker, Priority, Spent Time, Assignee and Project.
- Based on your selection, the issue cards will be displayed in the corresponding configured colors for tracker and priority and for the remaining option it will generate random color.
- Example:
If you select Color by Tracker, all issue cards will be displayed in the colors assigned to their respective trackers.

Troubleshooting #
If you encounter any issues or problems with the Agile Board Plugin, you can follow these troubleshooting steps to resolve them
- Clear your browser cache: Sometimes, browser cache can interfere with the proper functioning of plugins. Clear your browser cache and try accessing the Agile Board again.
- Check plugin compatibility: Ensure that the installed version of the Redmineflux Agile Board Plugin is compatible with your Redmine installation. Verify the plugin version and compare it with the supported versions listed in the plugin documentation or website.
- Restart Redmine server: Restarting Redmine and server can often resolve temporary issues or conflicts. Restart the Redmine application server, and then try accessing the Agile Board again.
- Verify plugin installation: Double-check that the Redmine Agile Board Plugin is correctly installed and enabled in your Redmine instance. Ensure that all necessary files are present, and the plugin is activated in the Redmine administration settings.
- Disable conflicting plugins: Conflicts between different plugins can cause issues. Temporarily disable any other plugins that may be conflicting with the Agile Board Plugin and see if the issue persists. If the problem resolves, try enabling the conflicting plugins one by one to identify the specific conflict.
- Update or reinstall the plugin: If you are using an outdated version of the Agile Board Plugin, consider updating it to the latest version. Alternatively, try reinstalling the plugin to ensure all necessary files are in place.
- Seek support: If the troubleshooting steps mentioned above do not resolve the issue, consider reaching out to the plugin developer or community for further assistance. Provide them with detailed information about the problem, including any error messages or steps to reproduce the issue.
By following these troubleshooting steps, you can identify and resolve common issues with the Redmineflux Agile Board Plugin, ensuring smooth operation and effective use of the plugin in your Redmine environment.
Frequently Asked Questions (FAQ’s) #
Q1: What is the Redmineflux Agile Board Plugin?
A1: The Redmineflux Agile Board Plugin is for the Redmine project management tool that adds Agile project management capabilities. It provides a visual board view to manage and track tasks, allowing teams to plan, prioritize, and collaborate more efficiently.
Q2: How can I access the Agile Board in Redmine?
A2: To access the Agile Board, navigate to the project where you want to view the board. Click on the “Agile Board” tab to access the Agile Board specific to that project. Alternatively, you can go to the top menu and click on the “Agile Board” tab to view the Agile Board for all projects.
Q3: Can I customize the cards on the Agile Board?
A3: Yes, you can customize the cards on the Agile Board. Click on the “Settings” icon to open a pop-up window where you can customize the card fields. You can choose the desired customization options for Agile Board cards and click “Apply” to see the changes reflected in the board.
Q4: How can I add watchers to a task in the Agile Board?
A4: To add watchers to a task, open the task’s detail view by clicking on the card representing the task. Look for the option to add watchers, usually represented by an icon or text. Click on it, and a pop-up window will appear with a list of available watchers. Check the checkboxes next to the desired watchers and click “Add” to save the changes.
Q5: How can I track spent and estimated time in the Agile Board?
A5: In the task’s detail view, you can find sections or fields related to “Spent Time” and “Estimation Time”. The Agile Board will display and track the spent and estimation time for each task.
Q6: Can I filter tasks in the Agile Board based on specific criteria?
A6: Yes, you can filter tasks in the Agile Board based on various criteria such as assignee, status, priority, labels, due date, and custom fields. Look for the “Filter” option on the board and set the desired filter conditions to narrow down the tasks displayed on the board.
Q7: What should I do if I encounter issues with the Agile Board Plugin?
A7: If you experience any issues with the Agile Board Plugin, you can follow troubleshooting steps such as clearing browser cache, checking plugin compatibility, verifying installation and configuration, reviewing error logs, and seeking support from the plugin developer or community.
These FAQs cover some common questions related to the Redmineflux Agile Board Plugin. If you have any further queries or concerns, consider consulting the plugin documentation or reaching out to the plugin developer for more specific information.
Uninstallation of Plugin #
To uninstall the Redmineflux Agile Board Plugin, follow these steps
- Go to the Agile Board Plugin directory in Redmine.
- Delete the entire Agile Board directory from Redmine/plugins directory. This step removes the plugin files from your Redmine installation.
- If the plugin required a migration, run the following command to downgrade your database (make a db backup before):
Bundle exec rake redmine:plugins:migrate Name=plugin name VERSION=0
- Restart the Redmine server to see the changes.
- This will uninstall the Redmineflux Agile Board Plugin from Redmine.
Conclusion #
The Agile Board Plugin is a valuable tool for teams practicing Agile project management methodologies. By following this step-by-step documentation, you can install, configure, and effectively use the plugin to enhance collaboration, visualize project progress, and improve overall productivity. Feel free to refer to this documentation whenever you require assistance or guidance with the Agile Board Plugin.
Daisy Redmine Theme
Scarlet Redmine Theme
All Plugins Combo
Project Management Combo
Redmine Essential Plugin Combo
Plugins
Redmine Implementation & Support Services
Cloud Redmine
Redmine Themes
Plugins
Plugin Combo
Cloud Redmine
Themes

Knowledgebase
FAQ’s
Use Cases
About Us
Change Log
Testimonials
Blog


