
- Introduction
- Version Compatibility
- Installation
- Configuration
- How to View Helpdesk
- How to view the Helpdesk Dashboard
- How to Create a Helpdesk Ticket
- How to Add an Internal Note to a Ticket
- How to Create Organization
- How to Create Holiday
- How to Create Helpdesk SLA
- How to Create Support Level
- Waiting for Customer Status
- SLA Reminders & Escalation Notifications
- Helpdesk Reports
- Knowledgebase
- How to Create a Knowledgebase Article
- How to Create a Child / Nested Article
- How to Edit a Knowledgebase Article
- How to Search the Knowledgebase
- How to Share a Knowledgebase Article
- How to Export a Knowledgebase Article to PDF
- How to View Article Version History
- How to Manage Article Attachments
- Knowledgebase Permissions
- How to Create Canned Responses
- How to Use Canned Responses
- Customer Management
- Customer Portal (My Helpdesk)
- Products
- Ticket Management
- Troubleshooting
- Frequently Asked Questions (FAQs)
- Conclusion
Introduction #
The Redmineflux Helpdesk Plugin is a fully integrated support management system built on top of the Redmine project management system, designed to streamline customer communication, automate workflows, and improve response efficiency.
Version Compatibility #
The Redmineflux Helpdesk Plugin is compatible with the following
Redmine Versions:
- 5.0.x, 5.1.x
- 6.0.x
Installation #
To install Redmineflux Helpdesk Plugin follow these steps: –
- Make sure you have a working installation of Redmine.
- Unzip the archive and upload the
redmineflux_helpdeskfolder toRedmine/pluginsand do not change the folder name. - Run the following command to install the required dependencies:
bundle install - Run the database migration.
Production:RAILS_ENV=production bundle exec rails redmine:plugins:migrateDevelopment:RAILS_ENV=development bundle exec rails redmine:plugins:migrate - Redis is required to handle background jobs for the plugin. Follow these steps to install and start Redis
5.1 . Install Redis (if not already installed)
- On Ubuntu/Debian
sudo apt update
sudo apt install redis-serversudo service redis-server start
- On macOS (using Homebrew)
brew install redisbrew services start redis
Note: Sidekiq is not officially supported on native Windows because it relies on Unix-based process features. We recommend running Redis and Sidekiq using WSL2 (Windows Subsystem for Linux) or Docker Desktop.
Using WSL2:- Enable WSL2 and install Ubuntu from the Microsoft Store.
- Open the Ubuntu terminal and run:
sudo apt update sudo apt install redis-server sudo service redis-server start - Verify Redis is running:
redis-cli pingExpected output:PONG
docker run -d --name redis -p 6379:6379 redis - On Ubuntu/Debian
- Start Sidekiq for Background Jobs Sidekiq is required to process background jobs for the plugin. Start Sidekiq using
bundle exec sidekiq
Windows Users: Run this command from your WSL2 terminal or Linux-based Docker container, not from the native Windows Command Prompt or PowerShell.
- Start the Rails Server:
rails s
Note:
If you encounter any UI-related issues after installing the plugin, such as missing styles or JavaScript functionality (for example, CSS or JavaScript files not loading properly), run the following command and then restart your Redmine server:
RAILS_ENV=production bundle exec rake assets:precompile
This command regenerates the plugin assets and helps ensure that all CSS and JavaScript files are loaded correctly.
Configuration #
Step 1: To Enable REST API
- Login as a administrator.
- Navigate to the Administration tab from the top menu.
- Click on Settings and find the API tab and enable the rest API.
Step 2: Enabling Helpdesk Plugin in a project
- Navigate to the projects tab on top menu.
- Click on any project from the list.
- Navigate to project settings
- Enable the Helpdesk from the modules and click on save to apply the changes.
- Now you can see the Helpdesk plugin on the project menu.
Step 3: Ensure that default values are set for the following attributes
To ensure the Helpdesk module works correctly, the following default settings must be configured in the project and system. These settings are mandatory prerequisites before using Helpdesk features such as tickets, SLA, and support levels.
Enable Helpdesk Module in Project #
The plugin includes a pre-configured environment:
Steps:
- Go to Project Settings → Modules
- Ensure Helpdesk module is checked/enabled
Only projects with the Helpdesk module enabled can use Helpdesk features like Customers, SLA, Support Levels, and Tickets.
Support Tracker Configuration (Mandatory) #
The Support Tracker is compulsory for Helpdesk ticket creation.
Requirements:
- A Support Tracker must exist in the system.
- If the Support Tracker is not already created, it must be created first from: Administration → Trackers → New Tracker
- After creation, the Support Tracker must be added to the Helpdesk-enabled project:
- Go to Project Settings → Trackers
- Select Support Tracker
Helpdesk tickets can only be created using the Support Tracker.fication and reporting.
Enabling Helpdesk Plugin Email Configuration in a Project #
The Helpdesk plugin allows each project to configure its incoming email, outgoing email, and ticket settings.
This enables automatic ticket creation from emails and ensures replies are sent from the project’s support mailbox.
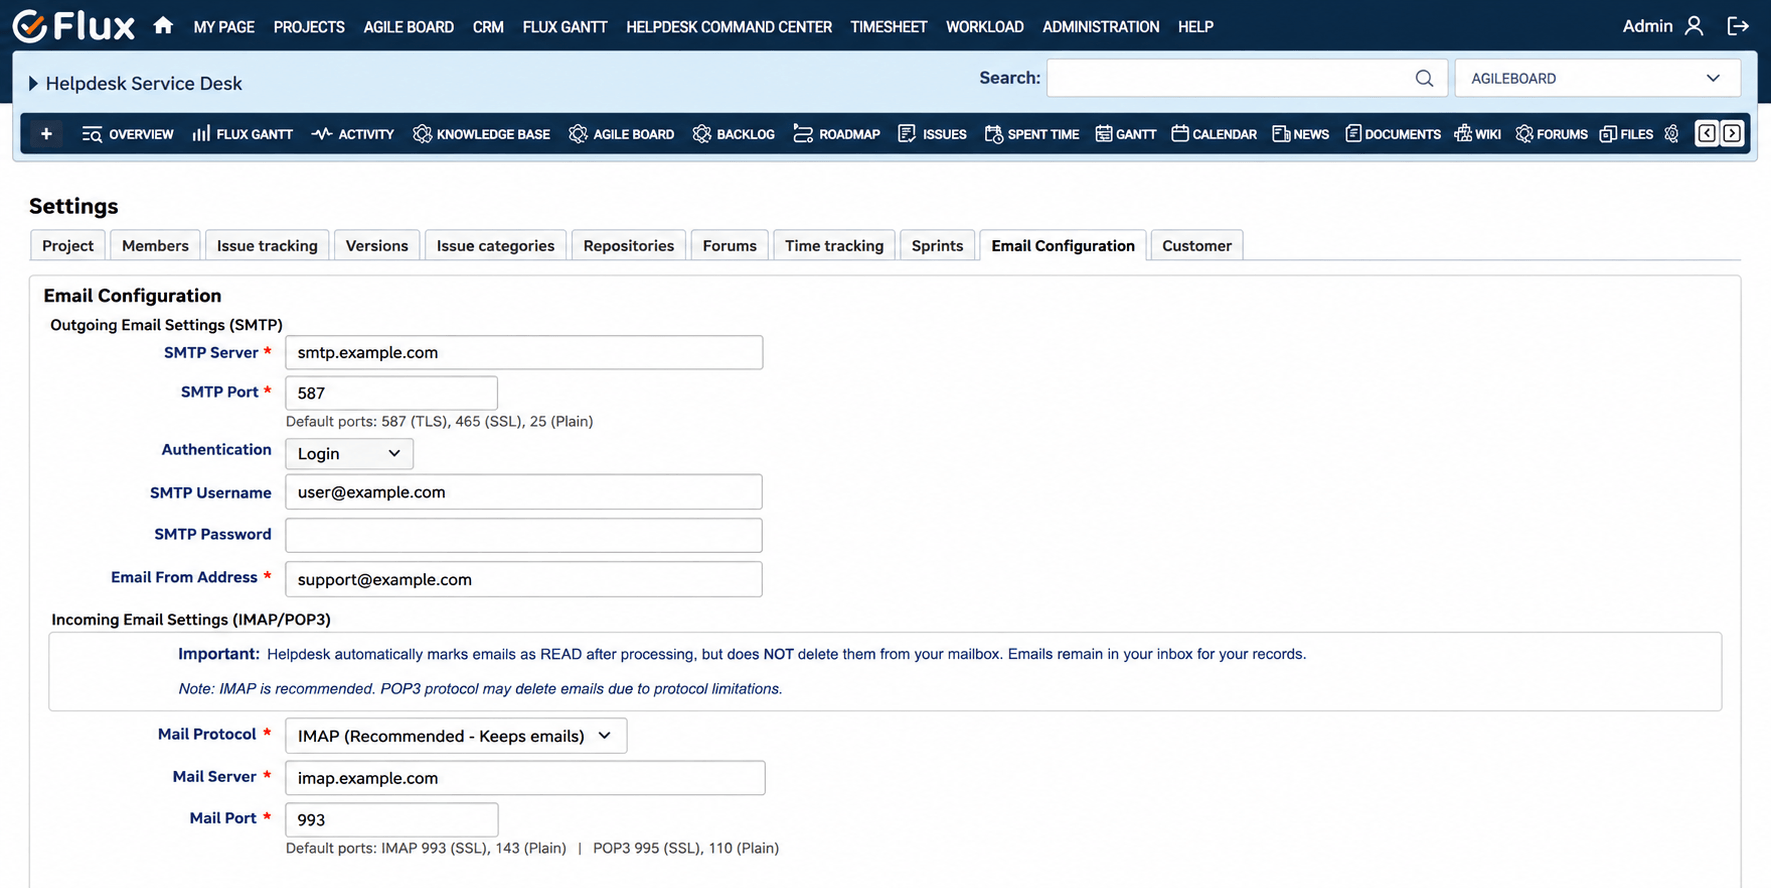
The Email Configuration page is divided into three sections:
1.Outgoing Email Configuration (SMTP)
Used for sending replies, notifications, and acknowledgment emails from the helpdesk.
Fields:
- SMTP Server – Mail server hostname
- SMTP Port – Default: 587 (TLS)
- Authentication – Authentication method (e.g., Plain)
- SMTP Username – Outgoing email account username
- SMTP Password – Outgoing email account password
- Email From Address – Email address used as sender for all helpdesk emails
This ensures that all helpdesk replies and notifications are sent from the configured support email address.
2. Incoming Email Configuration (IMAP/POP3)
Used to receive customer emails and convert them into helpdesk tickets.
Fields:
- Mail Protocol – IMAP (Recommended – keeps emails) or POP3
- Mail Server – Incoming mail server hostname
- Mail Port – Default: 993 for IMAP SSL
- Mail Username – Inbox username
- Mail Password – Inbox password
- Use SSL/TLS – Enable for secure email retrieval
Note: IMAP is recommended because emails remain in the mailbox. POP3 may delete emails depending on server configuration.
3. Ticket Settings
Defines how emails are converted into tickets and how automation works.
Fields:
- Identifier Keywords – Keywords used to detect ticket-related emails (e.g., redmineflux)
- Email Subject Prefix – Prefix added to ticket email subjects (e.g., Email ticket -)
- Default Tracker – Tracker type for tickets created via email (e.g., Support)
- Auto Close Ticket (Days) – Automatically close resolved tickets after specified days (leave blank to disable)
After Saving Configuration
- The project mailbox will automatically convert incoming emails into tickets
- Support agents can reply directly from Redmine
- Acknowledgment and auto-response emails will be sent correctly
- Auto-close rules will work based on configured days
How to View Helpdesk #
To access the Helpdesk for a specific project, navigate to the project where you want to view helpdesk tickets and features.
Inside the project, click on the “Helpdesk” tab to open the Helpdesk dashboard for that project.
Global Helpdesk (Helpdesk Control Center)
The Global Helpdesk is displayed as “Helpdesk Control Center” in the top menu.
- The Helpdesk Control Center is visible only to Admin users.
- Admins can view all helpdesk tickets, activities, and project-wise helpdesk data from a single centralized dashboard.
How to view the Helpdesk Dashboard #
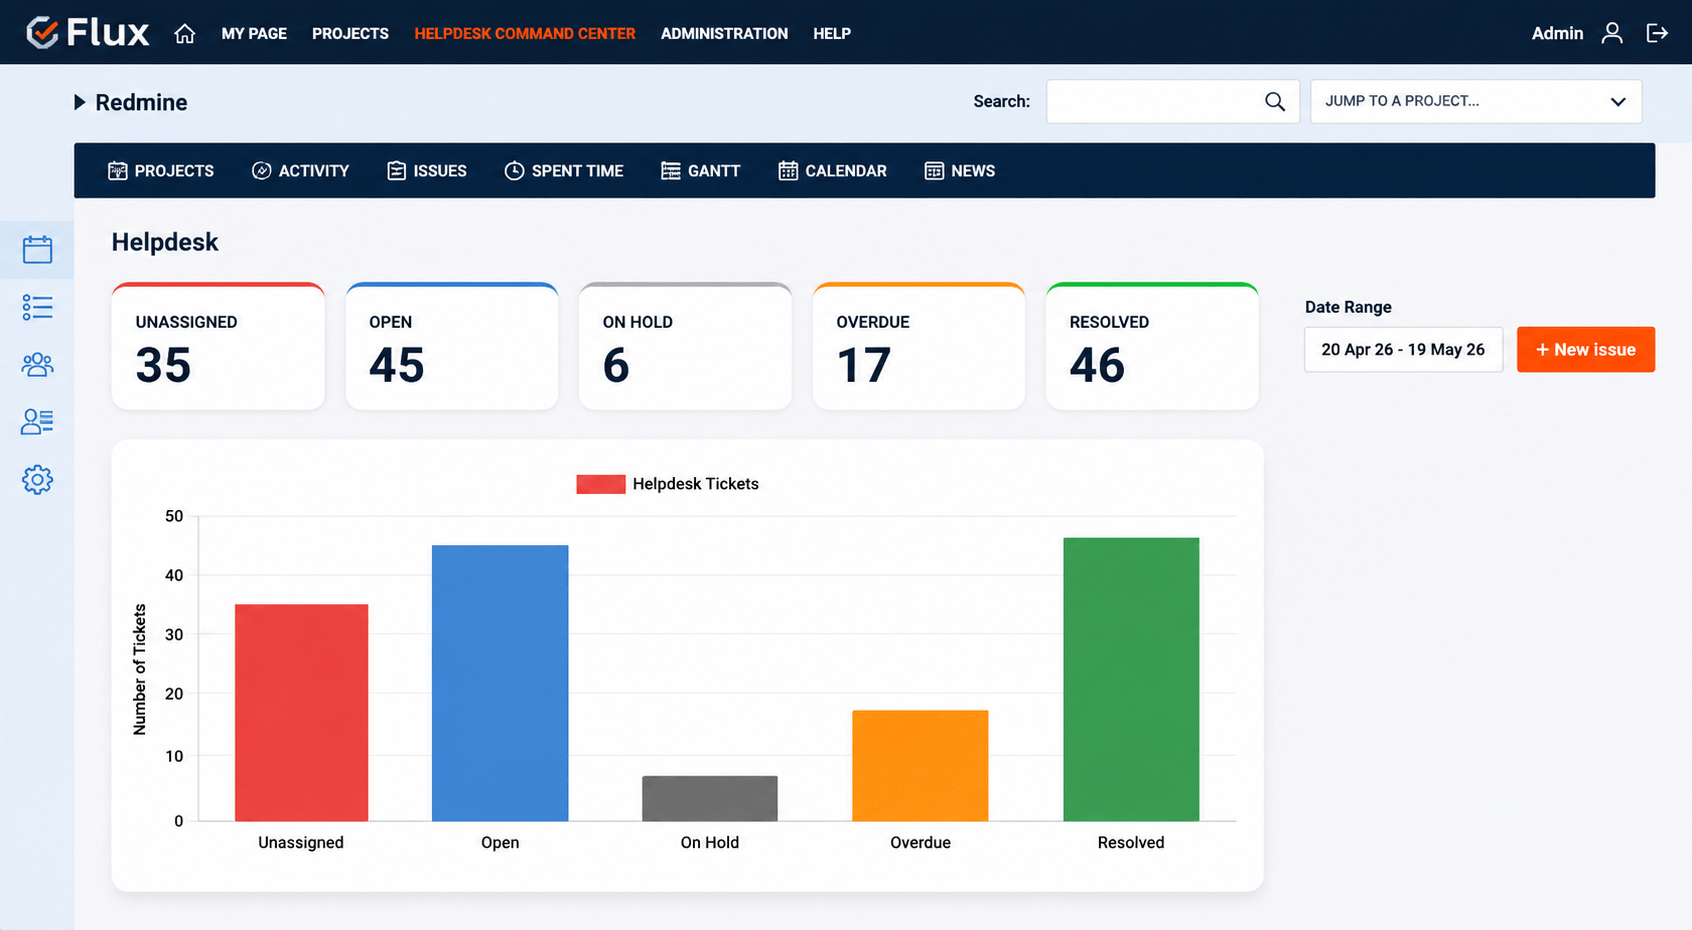
Shows the overall status of tickets for the current month. You can filter by custom dates and create new tickets directly from the dashboard.
- Go to the top menu and click on “Helpdesk Control Center” to open the global helpdesk view.
- The Helpdesk Dashboard will automatically appear, showing ticket data for the current month.
- The dashboard displays ticket status cards such as Unassigned, Open, On Hold, Overdue, and Unresolved.
- A bar chart is shown with the count of tickets based on their status.
- Use the Date From/To filter on the top-right to view ticket data for any custom date range.
- Click on the “New Ticket” button to create a new helpdesk ticket directly from the dashboard.
How to Create a Helpdesk Ticket #
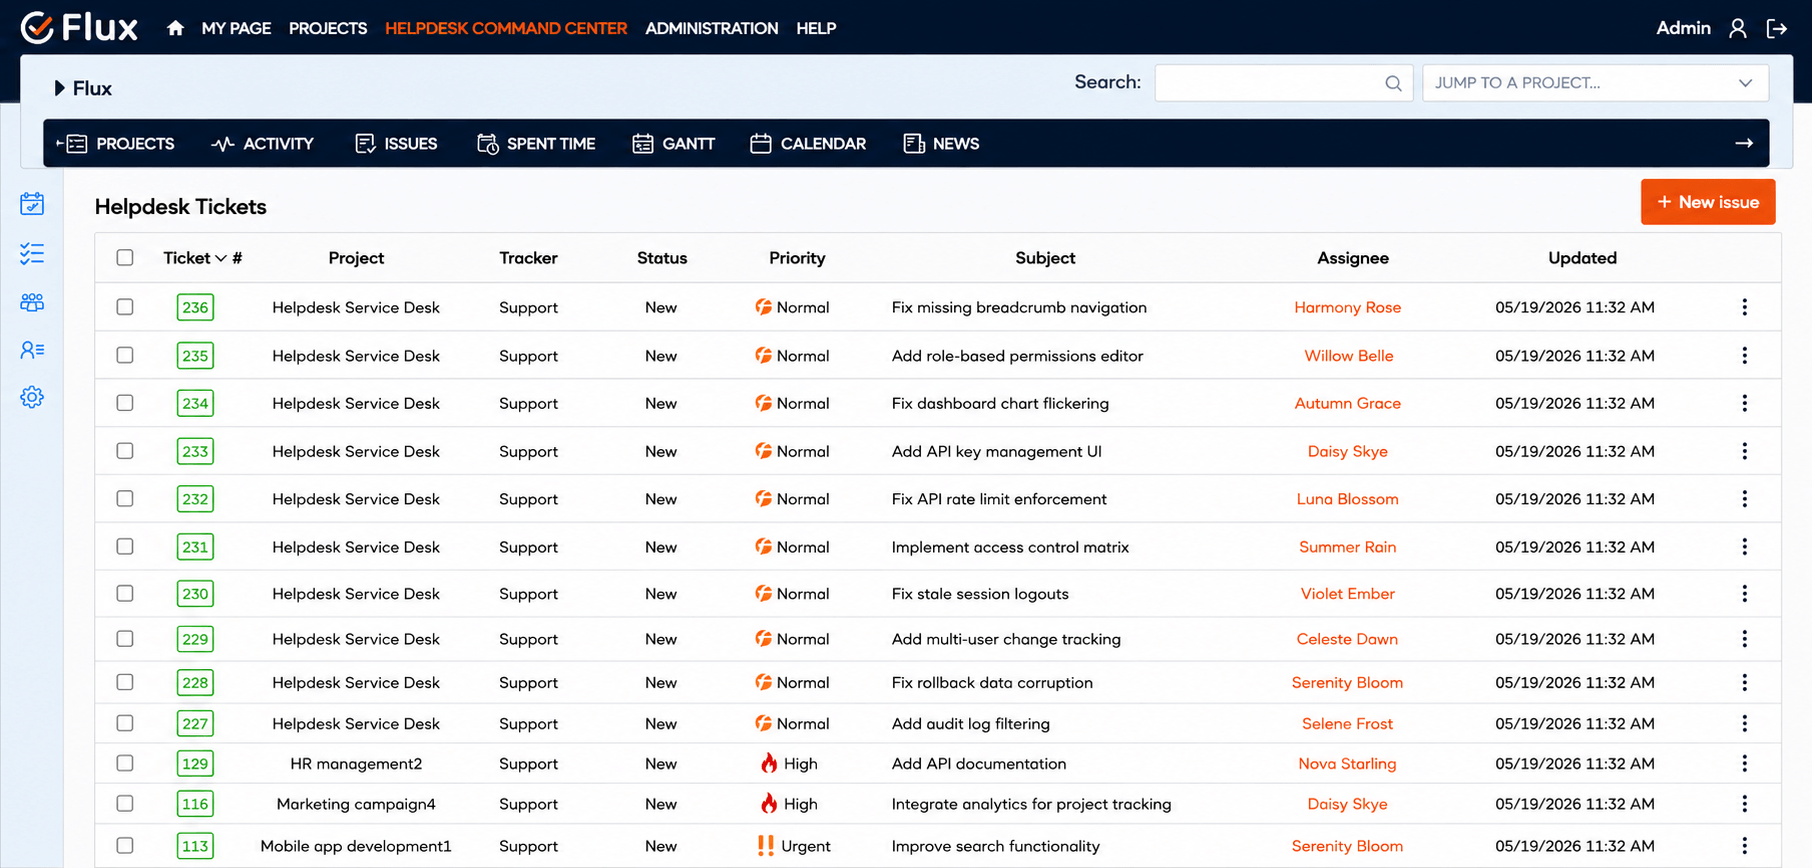
Allows you to manually create a new support ticket by entering the subject, description, status, priority, organization, and other custom fields.
Admins and Support roles can assign tickets to agents
- Go to the Global Helpdesk from the top menu.
- On the left sidebar, click on the Helpdesk Ticket Tabs. This will display the Support Ticket List for all projects.
- Click on the “New Ticket” button on the right side.
- Fill in the required ticket details such as Subject, Description, Tracker, Priority, and Status.
- Select the custom fields (Products, Issue Category, etc.).
- (Optional) Assign the ticket to a Support Agent — This option is available for users with Admin or Support Desk roles.
- (Optional) Attach files or screenshots if needed.
- Click “Create” or “Save” to generate the ticket.
- The newly created ticket will now appear on the Support Tickets list.
How to Add an Internal Note to a Ticket #
Internal notes are private comments visible only to support agents and admins. Customers never see them. They are useful for team discussions, escalation reasons, or internal follow-up reminders without exposing that information to the customer.
- Open the helpdesk ticket (Issue Details page).
- Scroll down to the Notes section.
- Write your note in the text area.
- Check the Internal Note checkbox below the text area.
- Click Save.
The note is saved in the ticket history with a lock indicator to distinguish it from public replies.
Key behaviours:
- Internal notes are not visible to customers in the ticket conversation or via email notifications.
- Only agents with the View Private Notes permission can read internal notes.
- Adding an internal note does not count as an agent reply — the ticket remains in Waiting for Customer Response status if it was already set that way, and the SLA clock stays paused.
- To respond to the customer and resume the SLA clock, submit a reply with the Internal Note checkbox unchecked.
How to Create Organization #
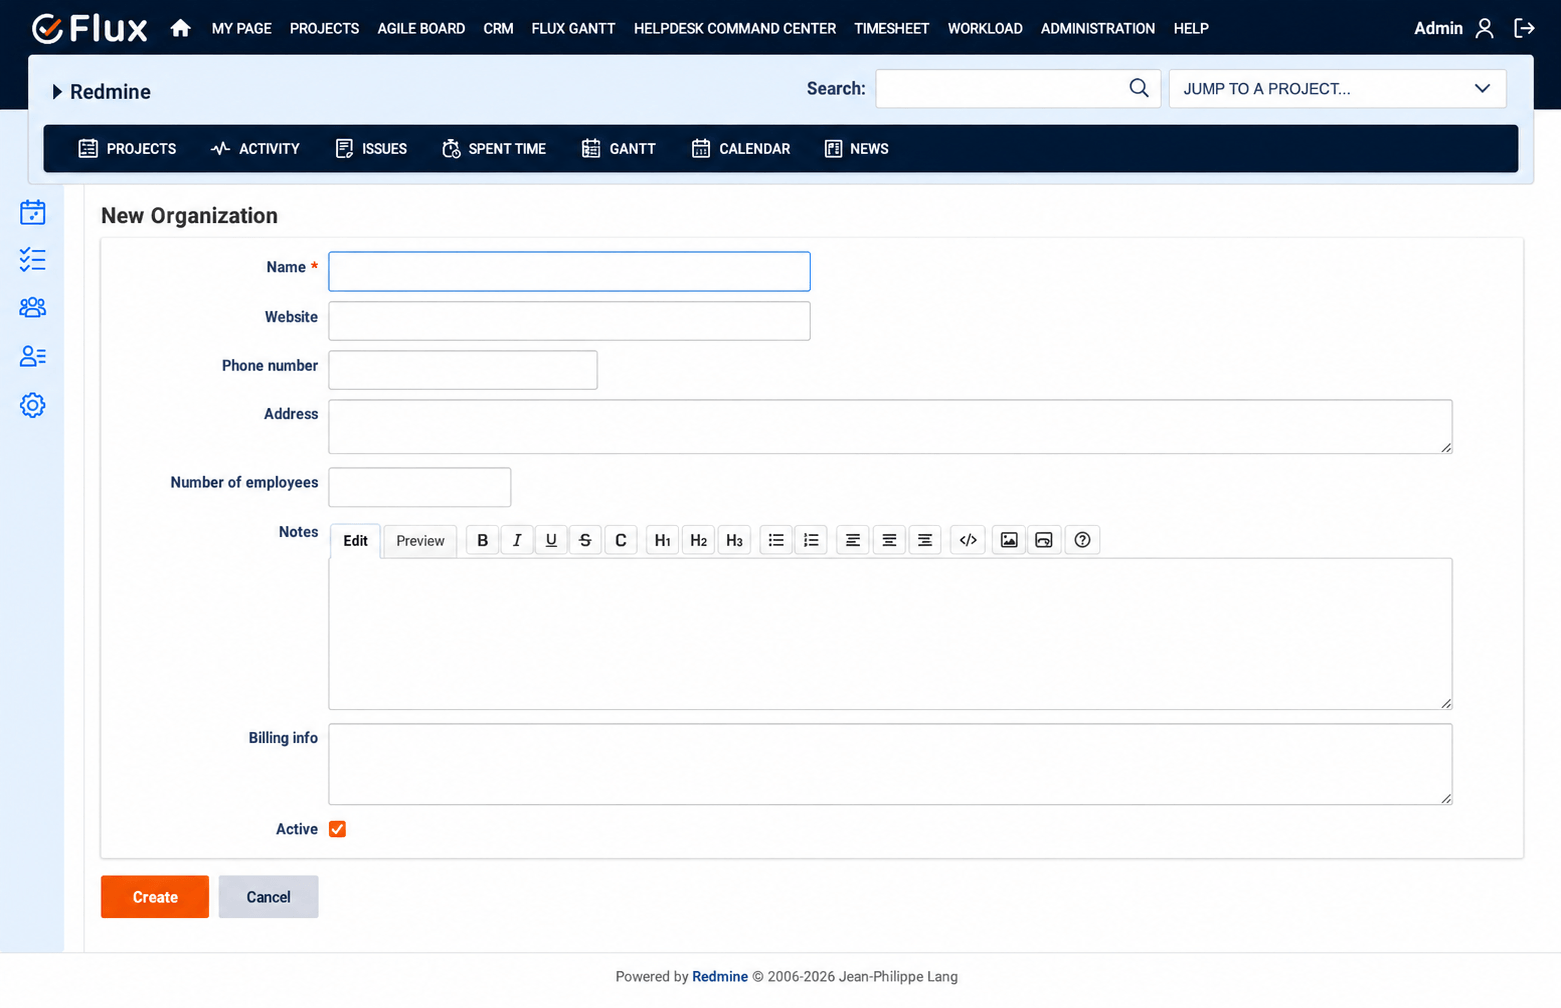
Organizations can be created and managed at both the global level and project level. The same organization can be reused across multiple projects, ensuring consistent configuration and centralized management.
- Go to the Top Menu and click on Helpdesk Control Center.
- In the left sidebar, click on the Organization tab.
- Click the “Add Organization” button on the right side.
- Enter the organization details
- Click Save to create the organization.
- The newly created organization will appear in the organization list, where you can:
- Edit the organization details
- Delete the organization if required
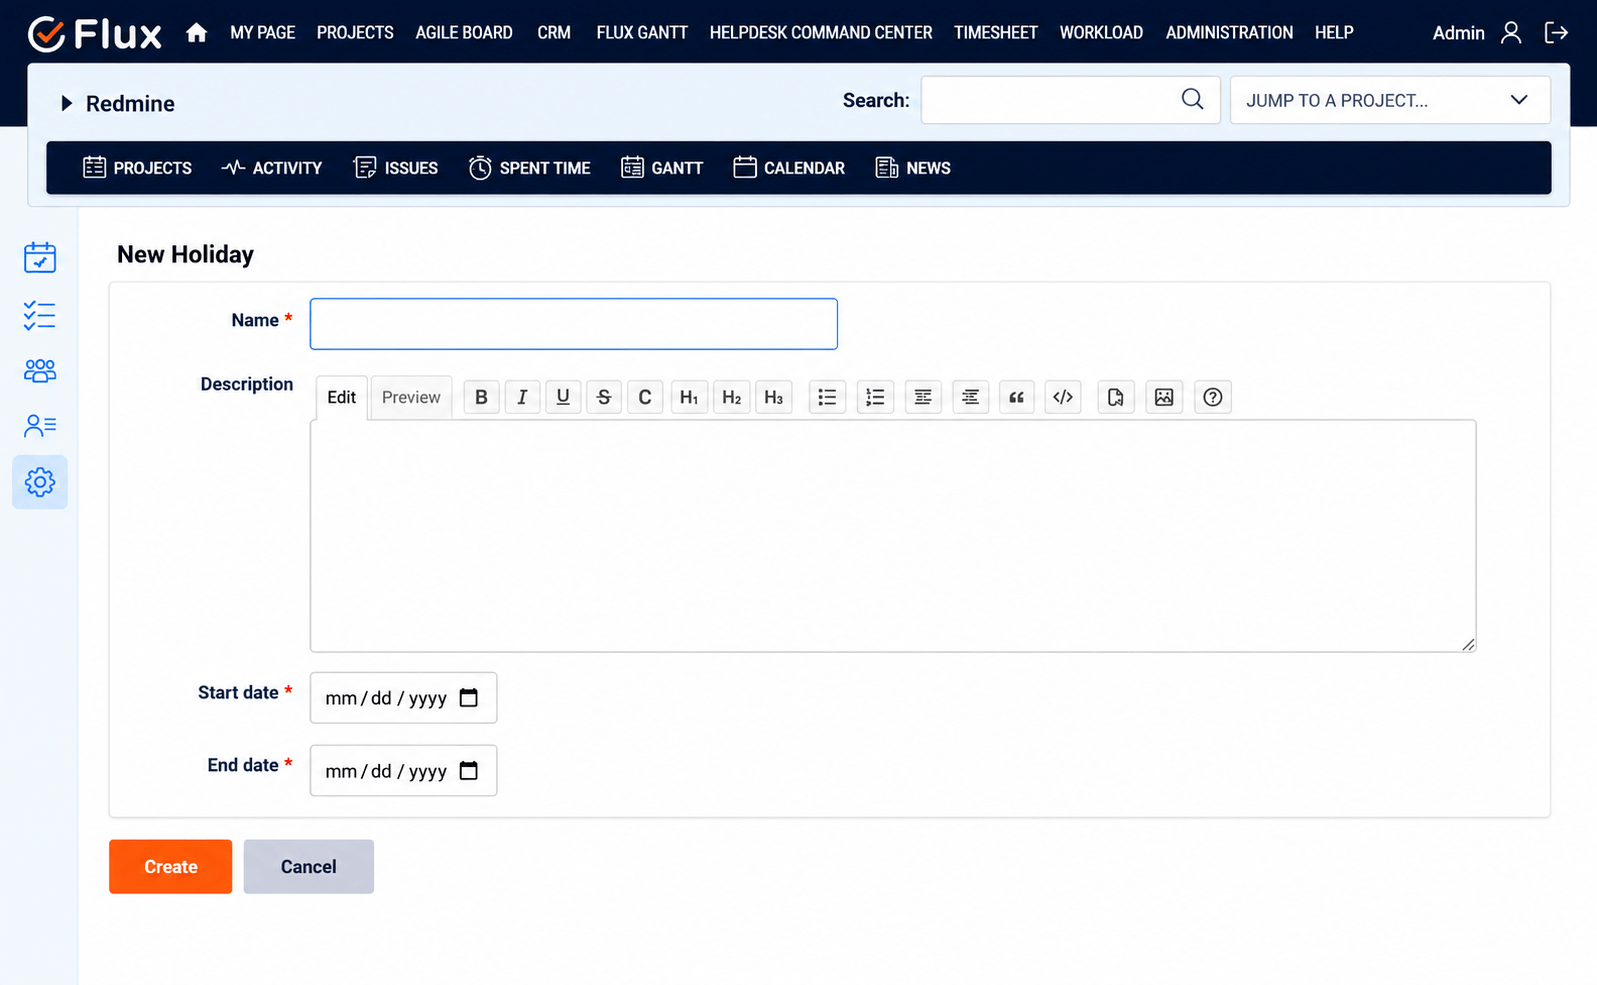
How to Create Holiday #
Holidays can be created at both the global level and project level, and the same holiday can be reused for both scopes.
Holidays are used in SLA calculations to exclude non-working days. When a holiday is configured, the SLA timer skips that date, so tickets are not marked as late.
Purpose of Holidays in SLA #
- Holidays block non-working days from SLA response and resolution calculations.
- Tickets created or active on holidays will not count toward SLA for breach of timing.
- Go to the Top Menu and click Helpdesk Control Center.
- In the left sidebar, click on the Settings tab.
- Under Settings, select the Holidays section.
- Click the “Add Holiday” button on the right side.
- Enter the following holiday details:
- Holiday Name
- Start Date
- End Date
- Description
- Click Save to add the holiday.
- The newly added holiday will appear in the Holiday List, where you can:
- Edit the holiday
- Delete the holiday
How to Create Helpdesk SLA #
SLA (Service Level Agreement) is configured project-wise and is used to define response time, resolution time, working hours, holidays, and escalation rules.
This SLA helps the system track tickets, calculate deadlines, and trigger automatic escalations.
- Go to the Project Menu and open the project where you want to configure the SLA.
- In the left sidebar, click on the Helpdesk SLA tab.
- Click the “New SLA” button on the right side.
- Fill in the SLA details, including:
- SLA Name
- Description
- First Response Time
- Resolution Time
- Working Hours
- Working Days
- Holidays
- Active SLA checkbox
- (Optional) Upload the SLA Agreement document if required.
- Click Save to create the SLA.
- The newly created SLA will appear on the SLA List.
- From the list, you can:
- Edit SLA configuration
- Delete the SLA
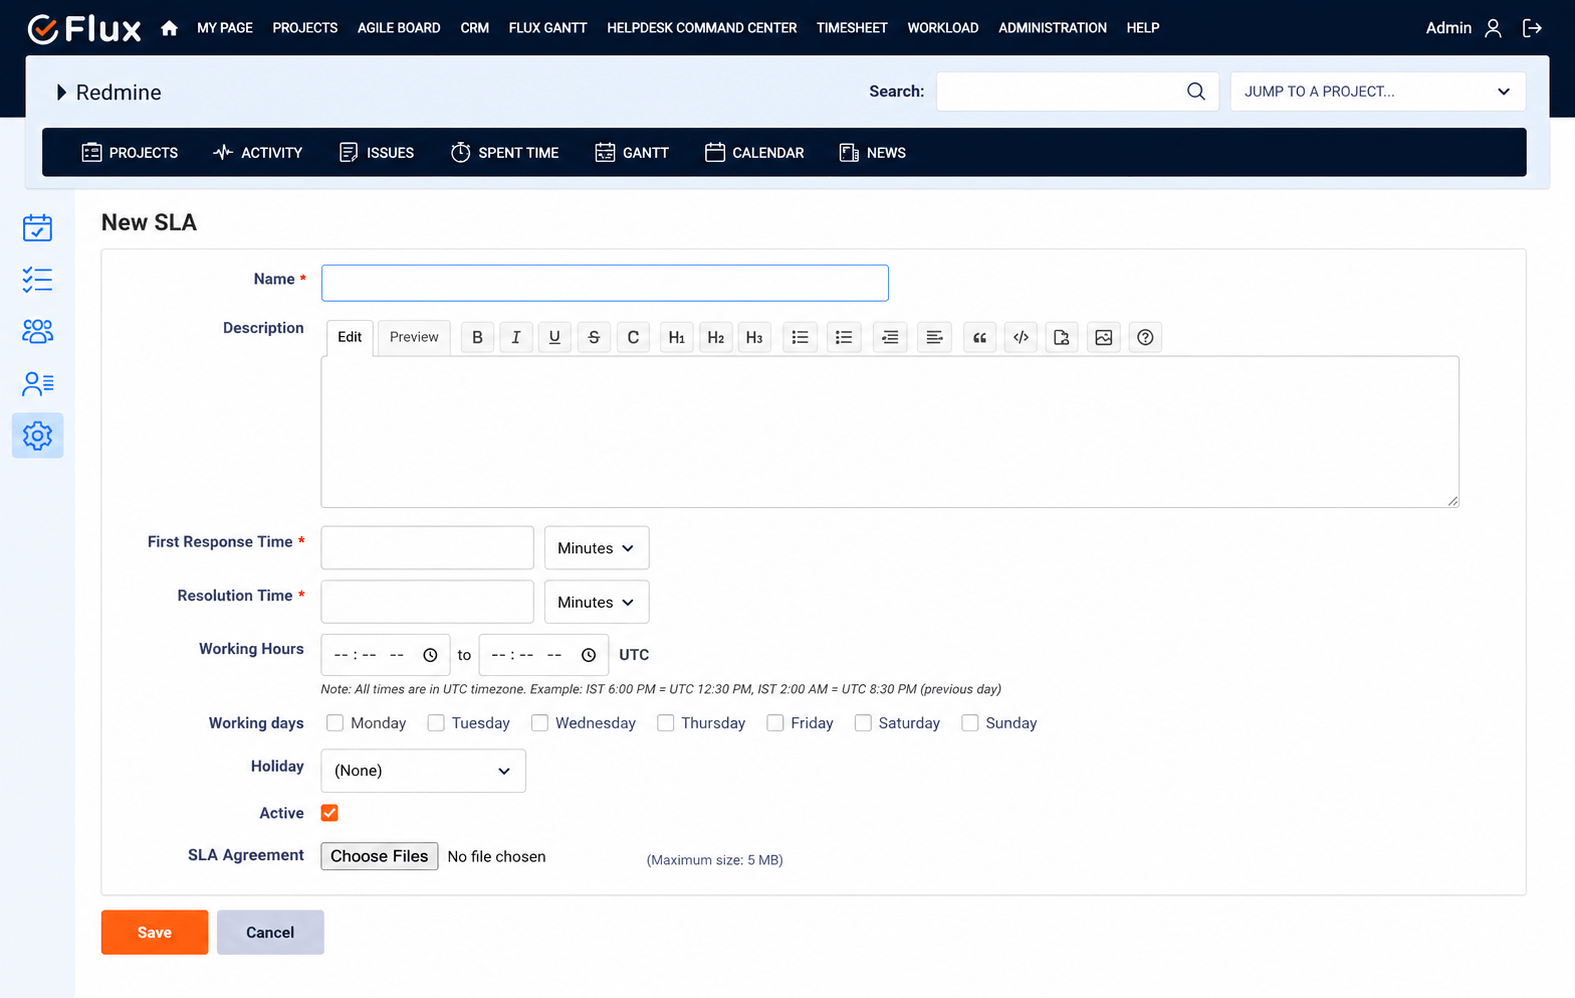
Note: All times are stored in UTC timezone
How to Create Support Level #
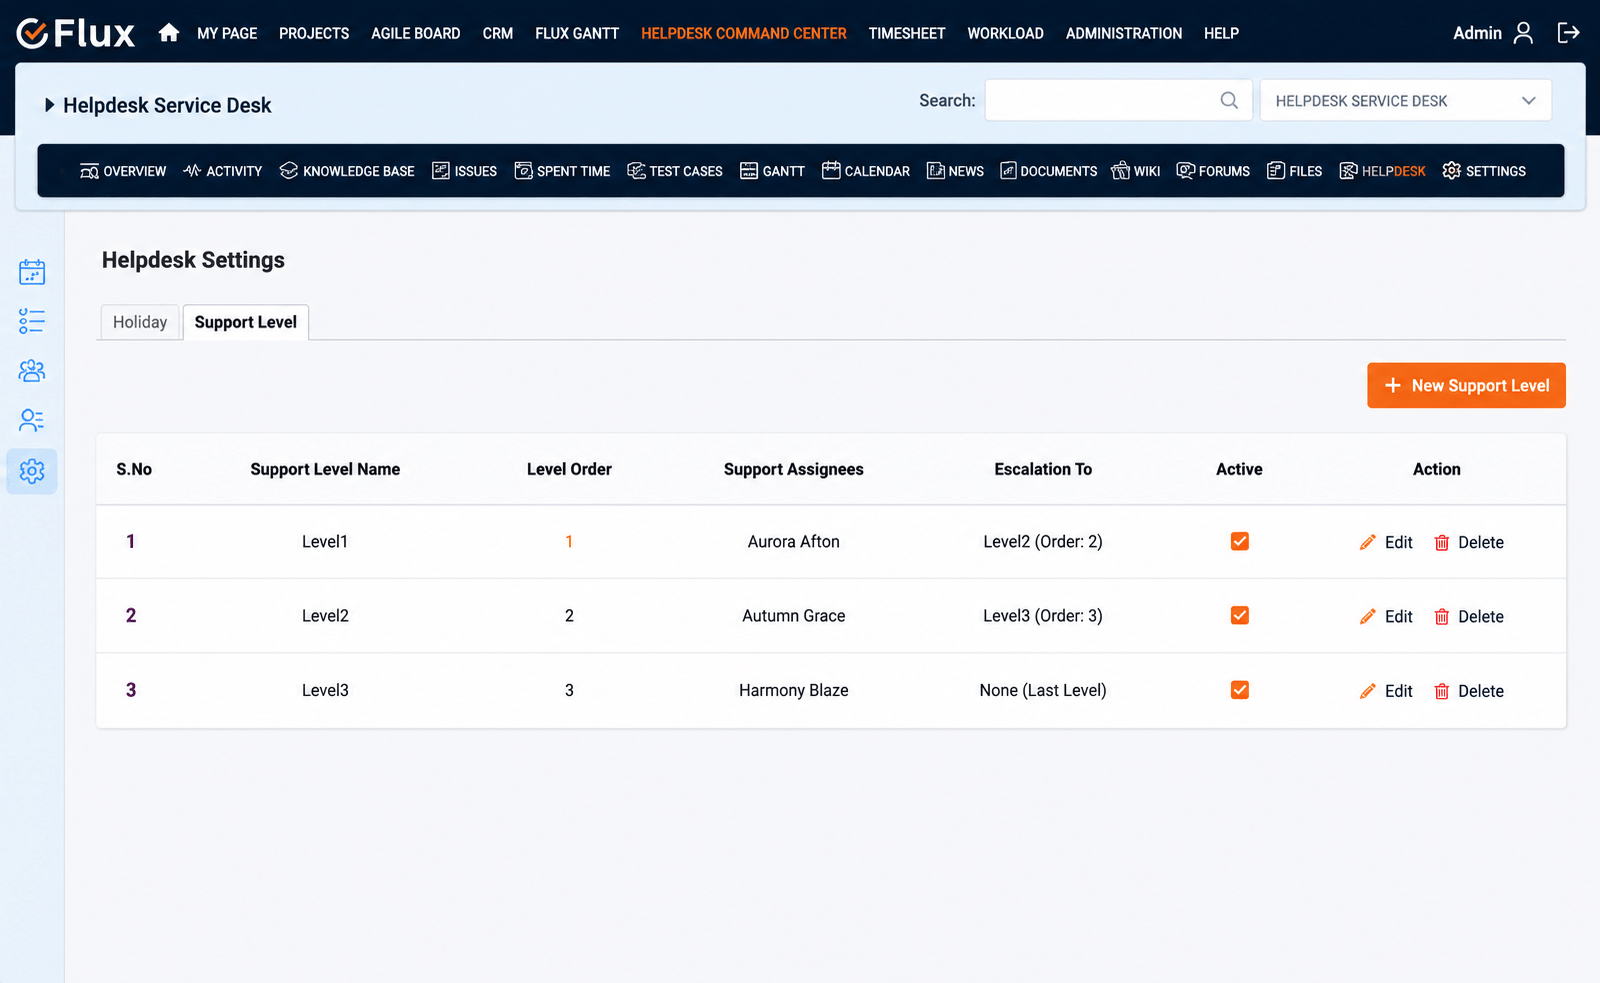
Support Levels are configured project-wise to define multi-level ticket handling (L1, L2, L3, etc.)
They are used for ticket assignments and escalation workflows based on defined support hierarchy.
- Go to the Project Menu and open the project where you want to configure the support levels.
- In the left sidebar, click on the Helpdesk Support Level tab.
- Click the “New Support Level” button on the right side.
- Fill in the support level details, including:
- Support Level Name
- Level Order
- Description
- Support Assignees
- Escalation Level
- Active checkbox
- Click Save to add the support level.
- The newly created support level will appear in the Support Level List.
- From the list, you can:
- Edit support level details
- Change escalation mapping
- Delete the support level
Escalation To #
- None (Last Level) or select a higher-level support group (Admin User).
- Escalation is allowed only to higher levels based on Level Order.
Example: Level Order 1 → can escalate to Level Order 2 or 3.
How Support Level Escalation Works #
- New Ticket Assignment:
- A new ticket is created by a customer or system (email/web/helpdesk form).
- By default, the ticket status is Unassigned.
- A Support Team member or Admin reviews the ticket.
- The ticket is assigned to a support user or support level (L1/L2/L3).
- After assignment, SLA timers and escalation rules start based on the configured SLA.
- L1 to L2 Escalation:
- If L1 assignee doesn’t respond within SLA response time
- Ticket automatically escalates to L2 Support user
- L2 to L3 Escalation:
- If L2 assignee doesn’t respond within SLA response time
- Ticket automatically escalates to L3 Support user
- Critical Alert:
- If L3 (final level) breaches SLA
- Critical SLA Breach Alert is sent to all L3 team members
- Manual intervention required
How to View the SLA Information Panel on a Ticket #
Every helpdesk ticket has a dedicated SLA Information tab on the issue detail page. It shows the full SLA lifecycle of that ticket — deadlines, current health, escalation history, and a chronological activity log.
Steps:
- Open any helpdesk ticket.
- On the issue detail page, click the SLA Information tab (displayed alongside Notes, Email History, etc.).
SLA Overview fields:
| Field | Description |
|---|---|
| Organization | The customer’s organization linked to this ticket |
| SLA Policy | Name of the SLA assigned to this ticket |
| Support Level | Current support level (L1, L2, L3, etc.) |
| SLA Started | Date and time when the SLA timer started |
| Initially Assigned To | First agent assigned to the ticket |
| Current Assignee | Agent currently responsible |
SLA Health Badge (top-right, color-coded):
| Badge | Meaning |
|---|---|
| On Track | SLA deadlines are within limits |
| Completed | Ticket has been resolved |
| On Hold | SLA timer is paused |
| Needs Attention | Deadline is approaching or overdue |
| SLA Missed | SLA has been breached |
The panel also shows a SLA Journey Table (each support level stage with agent, active period, response/resolution SLA status, and escalation trigger) and an Activity Log (chronological timeline of all SLA events).
Note: If no SLA is assigned to a ticket, the panel shows: “No SLA assigned — this ticket does not have an SLA policy attached.”
How to View SLA History #
The SLA History page shows a complete audit trail of all changes made to an SLA policy definition — who changed it, when, and what was modified.
Steps:
- Go to the Project Menu and open the target project.
- In the left sidebar, click the Helpdesk SLA tab.
- Click on any SLA from the list to open its detail page.
- Click the History tab.
Each change displays an action badge (CREATE, UPDATE, or DELETE), the user who made the change, a timestamp, and a field-level diff for UPDATE actions showing old and new values. Fields tracked include: SLA Name, First Response Time, Resolution Time, Working Hours, Working Days, Holidays, Active status, and SLA Agreement document.
Waiting for Customer Status #
The Waiting for Customer status is an automatic ticket management feature that pauses the SLA clock when a support agent replies to a ticket and resumes it when the customer responds. This ensures that SLA timers accurately reflect only the time the support team actually owes a response, not time spent waiting on the customer.
How Waiting for Customer Status Works #
When an Agent Replies:
- A support agent opens a ticket and submits a reply note (non-private).
- The ticket status automatically changes to Waiting for Customer Response.
- The SLA clock is paused — no breach is counted while the system waits for the customer.
- The status change is recorded in the ticket journal for full audit visibility.
When the Customer Replies:
- The customer replies via the web UI or by replying to the notification email.
- The ticket status automatically reverts to In Progress.
- The SLA clock resumes from where it was paused and SLA deadlines continue calculating normally.
When a Customer Replies to a Closed Ticket:
- If a customer replies to a ticket that is already Resolved or Closed, the ticket is automatically Reopened.
- The SLA is reactivated and recalculated for the new response cycle.
Waiting for Customer — Key Behaviours #
| Scenario | Ticket Status | SLA Clock |
|---|---|---|
| Agent submits a reply | Waiting for Customer Response | Paused |
| Customer replies | In Progress | Resumed |
| Ticket unassigned | — | Paused |
| Ticket reassigned | — | Resumed |
| Customer replies to closed ticket | Reopened | Reactivated |
Note: Private (internal) notes do not trigger the Waiting for Customer status. Only replies visible to the customer cause the automatic status change.
Note: The SLA pause during Waiting for Customer status is independent of working hours and holiday rules — the clock simply does not advance while the status is active.
SLA Reminders & Escalation Notifications #
The Helpdesk plugin includes an automatic SLA monitoring and escalation system that runs in the background using Sidekiq. It continuously monitors active tickets for SLA breaches and triggers escalations or alert notifications without any manual intervention.
How SLA Monitoring Works #
The SLA Monitor Worker runs on a scheduled interval and checks all active support tickets against their configured SLA deadlines. It performs two checks per ticket:
- First Response Deadline Check — Has the first response been given within the required time?
- Resolution Deadline Check — Has the ticket been resolved within the required time? (Only checked after the first response is given.)
Closed and resolved tickets are excluded from monitoring.
Escalation Paths #
Path A — Multi-Level Escalation (current support level has an Escalation To level configured):
- The ticket is automatically reassigned to the first available agent in the next support level.
- SLA response and resolution deadlines are recalculated for the new support level.
- An Escalation Notification email is sent to the new assignee.
- The escalation is recorded in the ticket’s escalation history.
- The process can repeat through L1 → L2 → L3 until no further escalation level exists.
Path B — Critical Breach Alert (ticket is already at the last support level with no further escalation configured):
- The ticket is escalated to the system Admin user.
- A Critical SLA Breach Alert email is sent to the Admin.
- Manual intervention is required to resolve the breach.
Escalation Notification Email #
The escalation email sent to the new assignee includes: Ticket ID and subject, Project name, Current ticket status, Previous and new support level, SLA name and breach type (response or resolution), Total escalation count for the ticket, and a direct link to view the ticket.
SLA Escalation History #
Every escalation event is recorded for full traceability (From level / To level, From assignee / To assignee, Old and new deadlines, Breach reason, Escalation timestamp). You can view the escalation history directly on the ticket detail page under the SLA section.
Note: SLA deadlines are recalculated at each escalation step using the working hours and holidays configured for the SLA assigned to the ticket.
Helpdesk Reports #
The Helpdesk Reports section provides comprehensive analytics dashboards that give support managers and admins a data-driven view of team performance, SLA compliance, and ticket activity. Reports are accessible from the Helpdesk Control Center in the top menu.
How to Access Reports #
- Go to the top menu and click Helpdesk Control Center.
- In the left sidebar, click the Reports tab.
- Use the tab navigation at the top to switch between the five report types.
- Use the Date From / To filter to select a custom date range and apply additional filters as needed.
Report Types #
1. SLA Analytics Report — SLA compliance overview: overall compliance/breach rate, first response and resolution SLA percentages, breach breakdown by priority and project, weekly compliance trend chart, and list of breached tickets.
2. Agent Performance Report — Individual agent activity: ticket distribution per agent, resolved/open ticket counts, average response and resolution times, breach rate, escalation count, and workload comparison chart.
3. Ticket Summary Report — High-level ticket activity: total/open/closed/overdue ticket counts, breakdown by status, priority, and project, and a daily ticket volume trend chart.
4. Organization Report — Ticket activity grouped by customer organization with open, closed, and overdue counts per organization.
5. Project Report — SLA performance and ticket volume per project: total tickets, SLA breach/compliance counts, and project-wise SLA compliance percentage.
How to Export Reports #
All five report types support exporting data. Click the Export button at the top-right of the report and select the format:
| Format | Description |
|---|---|
| CSV | Raw data in comma-separated format, suitable for spreadsheets |
| Excel | Formatted table export for Microsoft Excel |
| Styled report with KPI cards, charts, and summary tables |
Note: The Reports section is visible only to users with Admin or Support Desk Manager permissions.
Knowledgebase #
The Knowledgebase is a built-in documentation and self-service portal within the Helpdesk. Support teams can create structured articles to document solutions, FAQs, and guides. Articles support rich text formatting, file attachments, version history, and public share links.
The Knowledgebase is accessible from the Helpdesk tab inside a project, under the Knowledgebase menu item in the left sidebar.
How to Create a Knowledgebase Article #
- Navigate to your project and click the Helpdesk tab.
- In the left sidebar, click Knowledgebase.
- Click the + (Add Article) button at the top of the article tree.
- Enter the Article Title (required, max 150 characters) and click Save — the article opens in the editor in draft mode.
- Write the article content using the rich text editor (supports headings, lists, code blocks, tables, quotes, images, and file attachments).
- Click the Save icon to save a draft, or click Publish to make the article live.
How to Create a Child / Nested Article #
- In the article tree, locate the parent article and click the options menu (three dots) next to its title.
- Select Add Child Article, enter the title, and click Save.
- Write and publish the child article as normal.
How to Edit a Knowledgebase Article #
- Click the article title to open it, then click the Edit (pencil) icon.
- Make your changes in the editor.
- Click Save to save as a draft, or click Republish to update the live version.
How to Search the Knowledgebase #
- Click the Search box at the top of the article tree sidebar.
- Type a keyword — results appear in real time showing matching article titles and content.
- Click any result to open that article directly.
How to Share a Knowledgebase Article #
Articles can be shared via a public link — the recipient does not need to log in.
- Open the article and click the Share icon (top-right).
- The public URL is automatically copied to clipboard — a “URL Copied” confirmation appears.
- Paste the link to share it with anyone.
How to Export a Knowledgebase Article to PDF #
- Open the article and click the Export icon (top-right).
- The article is downloaded as a formatted PDF.
How to View Article Version History #
- Open the article and click the options menu (three dots), then select Page History.
- The history tab shows all versions with version number, date/time, and the user who made the change.
- Click any version to preview its content, or click Restore to roll back to that state.
How to Manage Article Attachments #
- Open the article and click the Attachments tab.
- All uploaded files are listed with name, size, uploader, and upload date.
- Click a file to download it, or click the delete icon to remove it.
- To upload a new file, use the attachment button in the rich text editor toolbar while editing the article.
Knowledgebase Permissions #
| Permission | Who Has It |
|---|---|
| View KB articles | All agents with view_helpdesk permission |
| Create articles | Agents with add_kb_page permission |
| Edit articles | Agents with edit_kb_page permission |
| Delete articles & attachments | Agents with delete_kb_page permission |
Note: Customers typically have read-only access to the Knowledgebase depending on how permissions are configured for the project.
How to Create Canned Responses #
These are quick pre-written responses used by support agents in replies.
Canned responses save time by allowing agents to insert ready-made text for common issues.
- Go to the ADMINISTRATION menu from the top navigation.
- Open Plugins Section.
- Plugin will appear, In the Redmineflux helpdesk plugin configuration, navigate to the Canned Responses tab.
- Click on the “New Canned Response” button.
- A form will appear to enter the following details: Name, Content.
- (Optional) Add dynamic placeholders like {%ticket.subject%} and add attachments if needed.
- Click Save to create the canned response.
- The newly created canned response will appear in the list, where you can edit or delete it anytime.

How to Use Canned Responses #
Canned Responses are predefined reply to templates that help support agents respond to tickets quickly and consistently.
They can be inserted directly into the reply to editor while responding to an issue.
- Go to the Issue Details / Show Issue page.
- Click the Reply button.
i) This will open the Reply Note section. - Below the reply note editor, locate the Canned Response dropdown.
- Select your desired Canned Response template from the dropdown.
- After Selecting a Canned Response
- The template content is automatically inserted into the reply note text box.
- Macros (placeholders) in the template (e.g., customer name, ticket ID, project name) are automatically replaced with actual values.
- You can edit or customize the inserted text before sending the reply.
- Review or modify the inserted canned response content.
- Click Save to send the reply.
Result:
- The reply note is saved in the Helpdesk Conversation Tab.
- An email is automatically sent to the customer with the reply content.
Customer Management #
How to Register a New Customer #
Customers can be added from the Helpdesk Control Center to manage helpdesk users and link them with organizations and tickets.
- Go to the Top Menu and click on Helpdesk Control Center.
- In the left sidebar, click on the Customers tab.
- Click the “Add Customer” button on the right side.
- Fill in the customer details, including:
- Login
- First Name
- Last Name
- Password
- Click Save Customer to create the customer.
- The newly created customer will appear in the customer list, where you can:
- Edit customer details
- Delete the customer record
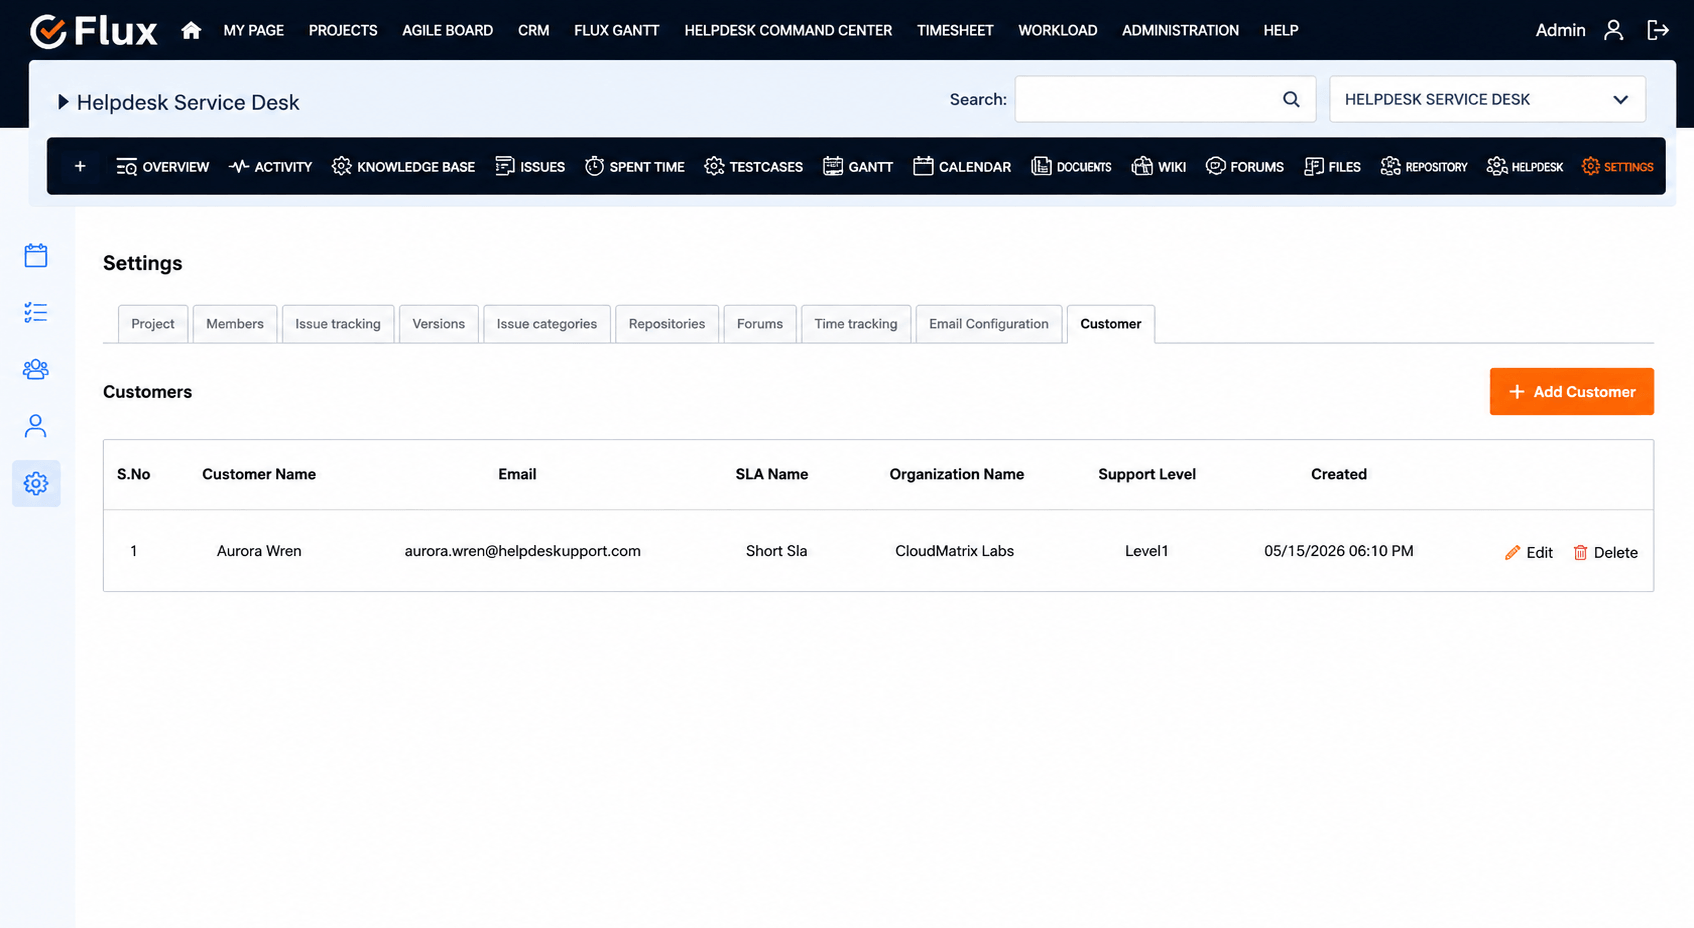
How to Add Customer to a Project #
- Navigate to your project
- Go to project Settings tab
- Select Customer tab
- Click Add Customer button
- Under Customer, select one or more customers from the list (checkbox).
- Select the SLA Name, Organization Name, Support Level (L1, L2, L3, etc.) from the dropdown (optional but recommended).
- Click Add to add the customers
After Adding
- The selected customer will be linked to the ticket / helpdesk project.
- SLA rules, organization mapping, and support level escalation will be applied to that customer.
How to Edit Customer Assignment #
- Go to Helpdesk Enabled Project → Settings → Customer tab
- Find the customer in the list
- Click the Edit icon next to the customer
- Update the following as needed:
- SLA
- Organization
- Support Level
- Click Save
How to Remove Customer from Project #
- Go to Helpdesk Enabled Project → Settings → Customer tab
- Find the customer you want to remove
- Click the Delete icon
- Confirm the removal
Customer Portal (My Helpdesk) #
The Customer Portal is a dedicated interface for helpdesk customers. When a registered customer logs in, they see a simplified My Helpdesk view instead of the full agent dashboard. The portal lets customers view their own tickets, submit new ones, and reply to ongoing conversations — without access to any internal or administrative features.
How the Customer Portal Differs from the Agent View #
| Feature | Agent / Admin | Customer |
|---|---|---|
| Top menu label | Helpdesk Control Center | My Helpdesk |
| Tickets visible | All tickets across projects | Only their own tickets |
| Internal notes visible | Yes | No |
| Email Configuration | Yes | No |
| SLA details & escalation paths | Yes | No |
| Canned responses library | Yes | No |
| Organization / Support Level management | Yes | No |
| Customer management | Yes | No |
| Reports & analytics | Yes | No |
| Create new ticket | Yes | Yes |
| Reply to own ticket | Yes | Yes |
How a Customer Accesses the Portal #
- The customer logs in to Redmine using the account created for them by the admin (see Customer Management).
- In the top navigation, they click My Helpdesk.
- The customer dashboard appears, showing the projects they are linked to.
- The customer clicks View on a project to see their tickets for that project.
How a Customer Views Their Tickets #
- Click My Helpdesk from the top menu.
- Select the relevant project.
- The ticket list shows all tickets the customer has submitted — with columns for Ticket ID, Subject, Status, Priority, and Last Updated.
- Click any ticket to open the full conversation thread.
How a Customer Creates a New Ticket #
- In the My Helpdesk dashboard or ticket list, click New Ticket.
- Fill in the required fields: Subject, Description, Priority.
- (Optional) Attach files or screenshots.
- Click Create to submit the ticket.
The customer receives a confirmation email and the ticket appears in their ticket list.
How a Customer Replies to a Ticket #
- Open a ticket from the ticket list.
- The full conversation thread is displayed — the customer can see all public replies from agents.
- Scroll to the reply area and write a response in the text field.
- Click Save to submit the reply.
The agent is notified by email, and the SLA clock resumes automatically.
Note: Customers cannot see Internal Notes left by agents. Only public replies are visible in the customer view.
Note: Customers can only access projects they have been explicitly added to via Project Settings → Customer tab.
Products #
Products are dedicated entities that can be linked to helpdesk tickets to classify and track support requests by the product involved. Each product is scoped to a specific project and can be managed from both the global Helpdesk Control Center and from individual project settings.
How to Create a Product #
- Go to the top menu and click Helpdesk Control Center.
- In the left sidebar, click the Products tab.
- Click the New Product button on the right side.
- Fill in the product details:
- Name — Required. Must be unique within the project.
- Code — Required. Auto-converted to uppercase. Must be unique within the project.
- Category — Optional. Used to group related products.
- Description — Optional. Supports wiki-style formatting.
- Project — Required. The project this product belongs to.
- Active — Check to make the product available for ticket assignment.
- Click Save to create the product.
Once created, you can edit, toggle active/inactive, or delete the product from the list.
Note: A product cannot be deleted if it is already linked to one or more tickets. Deactivate it instead to prevent it from appearing in new ticket forms.
How to Create a Product from Project Settings #
- Navigate to your project.
- Go to the Helpdesk section in the left sidebar.
- Click the Settings tab, then select the Products tab.
- Click New Product, fill in the details, and click Save.
How to Assign a Product to a Ticket #
- Open a helpdesk ticket or create a new one.
- In the ticket form, locate the Product field.
- Select the relevant product from the dropdown — only active products for the current project are listed.
- Save the ticket.
The selected product is displayed on the ticket detail page. Each ticket can have one product assigned at a time. To remove the product assignment, select the blank option from the dropdown.
Product Fields Reference #
| Field | Required | Description |
|---|---|---|
| Name | Yes | Display name of the product. Unique per project. |
| Code | Yes | Short identifier. Auto-uppercased. Unique per project. |
| Category | No | Optional grouping label for the product. |
| Description | No | Free-text description. Supports wiki formatting. |
| Project | Yes | The project this product is scoped to. |
| Active | Yes | If unchecked, the product is hidden from ticket forms. |
Ticket Management #
How to Create a Ticket from Email #
For Registered Customers:
- Customer must be registered as a helpdesk customer in our helpdesk system
- Customer must be added to the project
- Customer sends an email to the configured helpdesk email address
- Email subject and body are checked against Identifier Keywords (if configured)
- If keywords match (or no keywords configured), ticket is automatically created
- Email Subject Prefix is added to the ticket subject
- Customer receives confirmation email
For Unregistered Users:
- Unregistered users who send emails receive a notification: “You have not registered on our Redmineflux platform. Please register yourself first.”
- Their ticket creation request is blocked
How to Reply to a Ticket via Email #
- Customer receives ticket notification email
- Customer replies directly to that email
- Their reply is automatically added to the ticket as a note
- Reply is saved in Email History tab (not shown in Notes tab)
- Support team can view the reply in Email History
- Email threading is maintained for conversation flow
How to View Ticket Email History #
- Open any helpdesk ticket
- Click on the Email History tab
- You can see:
- All incoming and outgoing emails related to this ticket
- Sender and recipient addresses
- Email subject and content
- Timestamps
How to Send Notes to Customers #
Support agents can send notes to customers directly from the Helpdesk ticket. These notes are saved in the ticket conversation and sent via email to the customer.
- Open the Helpdesk Ticket (Issue Details / Show Issue page).
- Click the Reply button.
- This will open the Reply Note section.
- In the notes section, check the “Send Note” checkbox.
- Write your response in the Reply Note editor.
Troubleshooting #
- Emails are not creating tickets
- Check IMAP settings (server, port, SSL).
- Verify the IMAP username/password.
- Make sure the mailbox is accessible and not blocked by firewalls.
- Confirm that “Incoming Email Configuration” is enabled for the project.
- Outgoing emails are not being sent
- Validate SMTP server, port, and authentication type.
- Ensure SMTP username/password is correct.
- Enable STARTTLS if required by your email provider.
- SLA is not triggering or calculating incorrectly
- Verify that SLA is set to Active.
- Check if the ticket has an assigned agent (SLA starts after assignment).
- Confirm working hours, holidays, and timezone settings.
- Helpdesk tab not visible in project
- Make sure the Helpdesk module is enabled under Project Settings → Modules.
- Ensure your role has permission to view helpdesk items.
- Organization or Customer not showing in dropdowns
- Confirm that the organization/customer is marked as Active.
- Check if the user belongs to the organization.
- Confirm that the reply being submitted is not a private/internal note — only public replies trigger the automatic status change.
- Verify that the Waiting for Customer Response status exists in Administration → Issue Statuses.
- Check that the status is not excluded from the workflow for the Support Tracker.
- Verify that outgoing email is configured and working (Administration → Email Notifications → Send a test email).
- Check that the Sidekiq background job worker is running — the SLA monitor runs as a Sidekiq job. If Sidekiq is not running, no SLA checks or escalation emails will fire.
- Confirm that the escalated ticket has an assignee in the next support level. If no agent is available in that level, the escalation email has no recipient.
- Verify that the selected date range in the report filter covers a period that has ticket activity.
- Confirm that your user account has Admin or Support Desk Manager permission. Regular agents cannot access Reports.
- Check that you are viewing the correct report tab (SLA Analytics, Agent Performance, etc.).
- Ensure the Helpdesk module is enabled for the project: Project Settings → Modules → check Helpdesk.
- Confirm that your role in the project has the view_helpdesk permission.
- If the Knowledgebase is still not showing, check that the
add_kb_pageorview_helpdeskpermission is granted in Administration → Roles and permissions.
- Confirm the article is in Published status — draft articles are not visible to customers.
- Check that the customer’s role in the project has view_helpdesk permission.
- Verify the customer is added to the project (Project Settings → Customer tab).
- Verify the customer account exists in Redmine: Administration → Users — check that the account is active and not locked.
- Confirm that the customer is linked to a project via Project Settings → Customer.
- Check that the customer was registered through the Helpdesk Customer Management process and is not just a regular Redmine user without the customer role.
- Verify that the note was saved with the Internal Note checkbox checked. If submitted without that checkbox, the note is a public reply.
- If using the email-to-ticket workflow: replies received via email are always treated as public notes. Internal notes must be created through the web UI.
- Check that the customer role does not have the View Private Notes permission in Administration → Roles and permissions.
- Confirm that an SLA policy is assigned to the ticket’s project. Go to the project → Helpdesk SLA tab and verify an active SLA exists.
- Verify that the ticket is a Helpdesk issue (created via the Helpdesk module, not a regular Redmine issue).
- Check that the customer linked to the ticket belongs to an organization that has the SLA policy assigned.
Frequently Asked Questions (FAQs) #
Q1.Who can access the Helpdesk?
A1: Users with Admin, Support Agent, or Support Desk Role permissions.
Q2. How does SLA get applied to a ticket?
A2: SLA is assigned based on the Organization linked to the customer and starts when the ticket is assigne
Q3. Can customers create tickets without logging in?
A3: Yes, if email-to-ticket functionality (IMAP) is configured.
Q4. How do escalations work?
A4: Based on SLA rules:
L1 → L2 → L3 escalation depending on priority and allowed response time.
Q5. Does the Helpdesk plugin support multiple languages?
The plugin interface follows the Redmine locale. Redmine supports multiple languages; switching the Redmine locale changes the interface language for the Helpdesk too. Email templates can be customized per language in Administration → Email Notifications.
Q6. Can I assign multiple agents to a single helpdesk ticket?
No. Each helpdesk ticket has one assigned agent at a time. However, multiple agents can collaborate using Internal Notes (private comments visible only to agents) without the customer seeing the discussion. Ticket assignment can be changed at any point.
Q7. What happens to SLA timers when a ticket is put on hold?
If a ticket is manually set to a Hold status (as configured in the SLA policy), the SLA clock is paused automatically. The clock resumes when the ticket is moved back to an active status. The SLA Information panel will show “On Hold” as the SLA health badge.
Q8. Can customers reply to tickets via email?
Yes. When a customer receives an email notification about a ticket, they can reply directly to that email. The reply is automatically added to the ticket as a public note and the SLA clock resumes if the ticket was in Waiting for Customer status.
Q9. How do I prevent the SLA from counting time outside business hours?
Configure Working Hours and Working Days in the SLA policy settings. The SLA calculator will only count time during the defined working window. You can also attach a Holiday schedule to exclude specific dates from SLA calculations.
Q10. Can I export Knowledgebase articles?
Yes. Each Knowledgebase article can be exported as a PDF from the article view using the Export icon. The PDF includes the full article content with formatting preserved.
Q11. Is there a way to track which agent is performing best?
Yes. The Agent Performance Report (under Helpdesk Reports) shows per-agent statistics including resolved tickets, average response time, average resolution time, breach rate, and escalation count. You can filter by date range to analyze performance over any period.
Q12. Can the same product be used across multiple projects?
No. Products in the Helpdesk plugin are scoped to a single project. If you need similar products in multiple projects, you must create them separately in each project. This ensures clean separation between project-specific ticket classifications.
Conclusion #
The Redmineflux Helpdesk Plugin provides a complete, customizable solution for managing customer support within Redmine. With powerful features like SLA tracking, automatic SLA escalation and reminders, Waiting for Customer status with SLA pause/resume, email-to-ticket automation, comprehensive analytics reports, a rich Knowledgebase, a dedicated Customer Portal, internal notes for agent collaboration, organizations, customers, canned responses, products, and multi-level support tiers, your support team can work efficiently and professionally.


