Introduction
Redmineflux Crux is the AI layer built into Redmineflux. It gives your team Ask Crux, a chat assistant that knows your projects, and a set of ready-made AI agents. Each agent handles one area of your work, such as projects, time, sales, support or testing. Crux reads what it needs from Redmineflux before it answers. When you ask for a change, Crux first shows you exactly what it will do and makes the change only after you approve it.
Your team can ask questions like:
- “What’s at risk in my projects this week?”
- “Who hasn’t logged time this week?”
- “Which support tickets will breach their SLA today?”
- “Create a bug for the login page in the Mobile App project.”
- “What’s left in the current sprint?”
This guide explains what you receive, how to install and connect the three parts, how to give your team access, and how to fix common problems.
What You Receive
Crux is delivered as a bundle of three parts. Install all three. Crux does not work if any part is missing.
| Part | File you receive | What it does | Where it runs |
|---|---|---|---|
| Redmineflux MCP Server | redmineflux-mcp.zip |
The tools the agents use to read and change Redmineflux data. | Your Linux server, as a system service |
| Crux core | redmineflux-crux-core.zip |
The service that runs Ask Crux, the agents, Work Packages and approvals. | Your Linux server, as a system service |
| Redmineflux Crux plugin | redmineflux_crux_plugin.zip |
The Crux screens inside Redmineflux: dashboard, Ask Crux, Agents and settings. | Redmineflux’s plugins/ folder |
Note: The MCP Server and Crux core are delivered as ready-to-run compiled programs. You don’t need Docker, Python or any source code to run them.
The Redmineflux MCP Server is also sold on its own, to connect AI assistants such as Claude directly to Redmineflux. In the Crux bundle it is included, and Crux uses it for every agent. For using the MCP Server on its own, see the Redmineflux MCP Server (Self-Hosted) knowledgebase.
How the Parts Work Together
Person in Redmineflux (Ask Crux, chat bubble, Dashboard)

│

▼

Redmineflux Crux plugin        (inside Redmineflux)

│  sends the request to

▼

Crux core                      (port 8787, same server)

│  asks the AI model, then uses tools through

▼

Redmineflux MCP Server         (port 8080, same server)

│  reads and changes data with the person's own permissions

▼

Your Redmineflux data
What this means for you:
- Every action runs with the permissions of the person who asked. Nobody can see or change more through Crux than they can in Redmineflux.
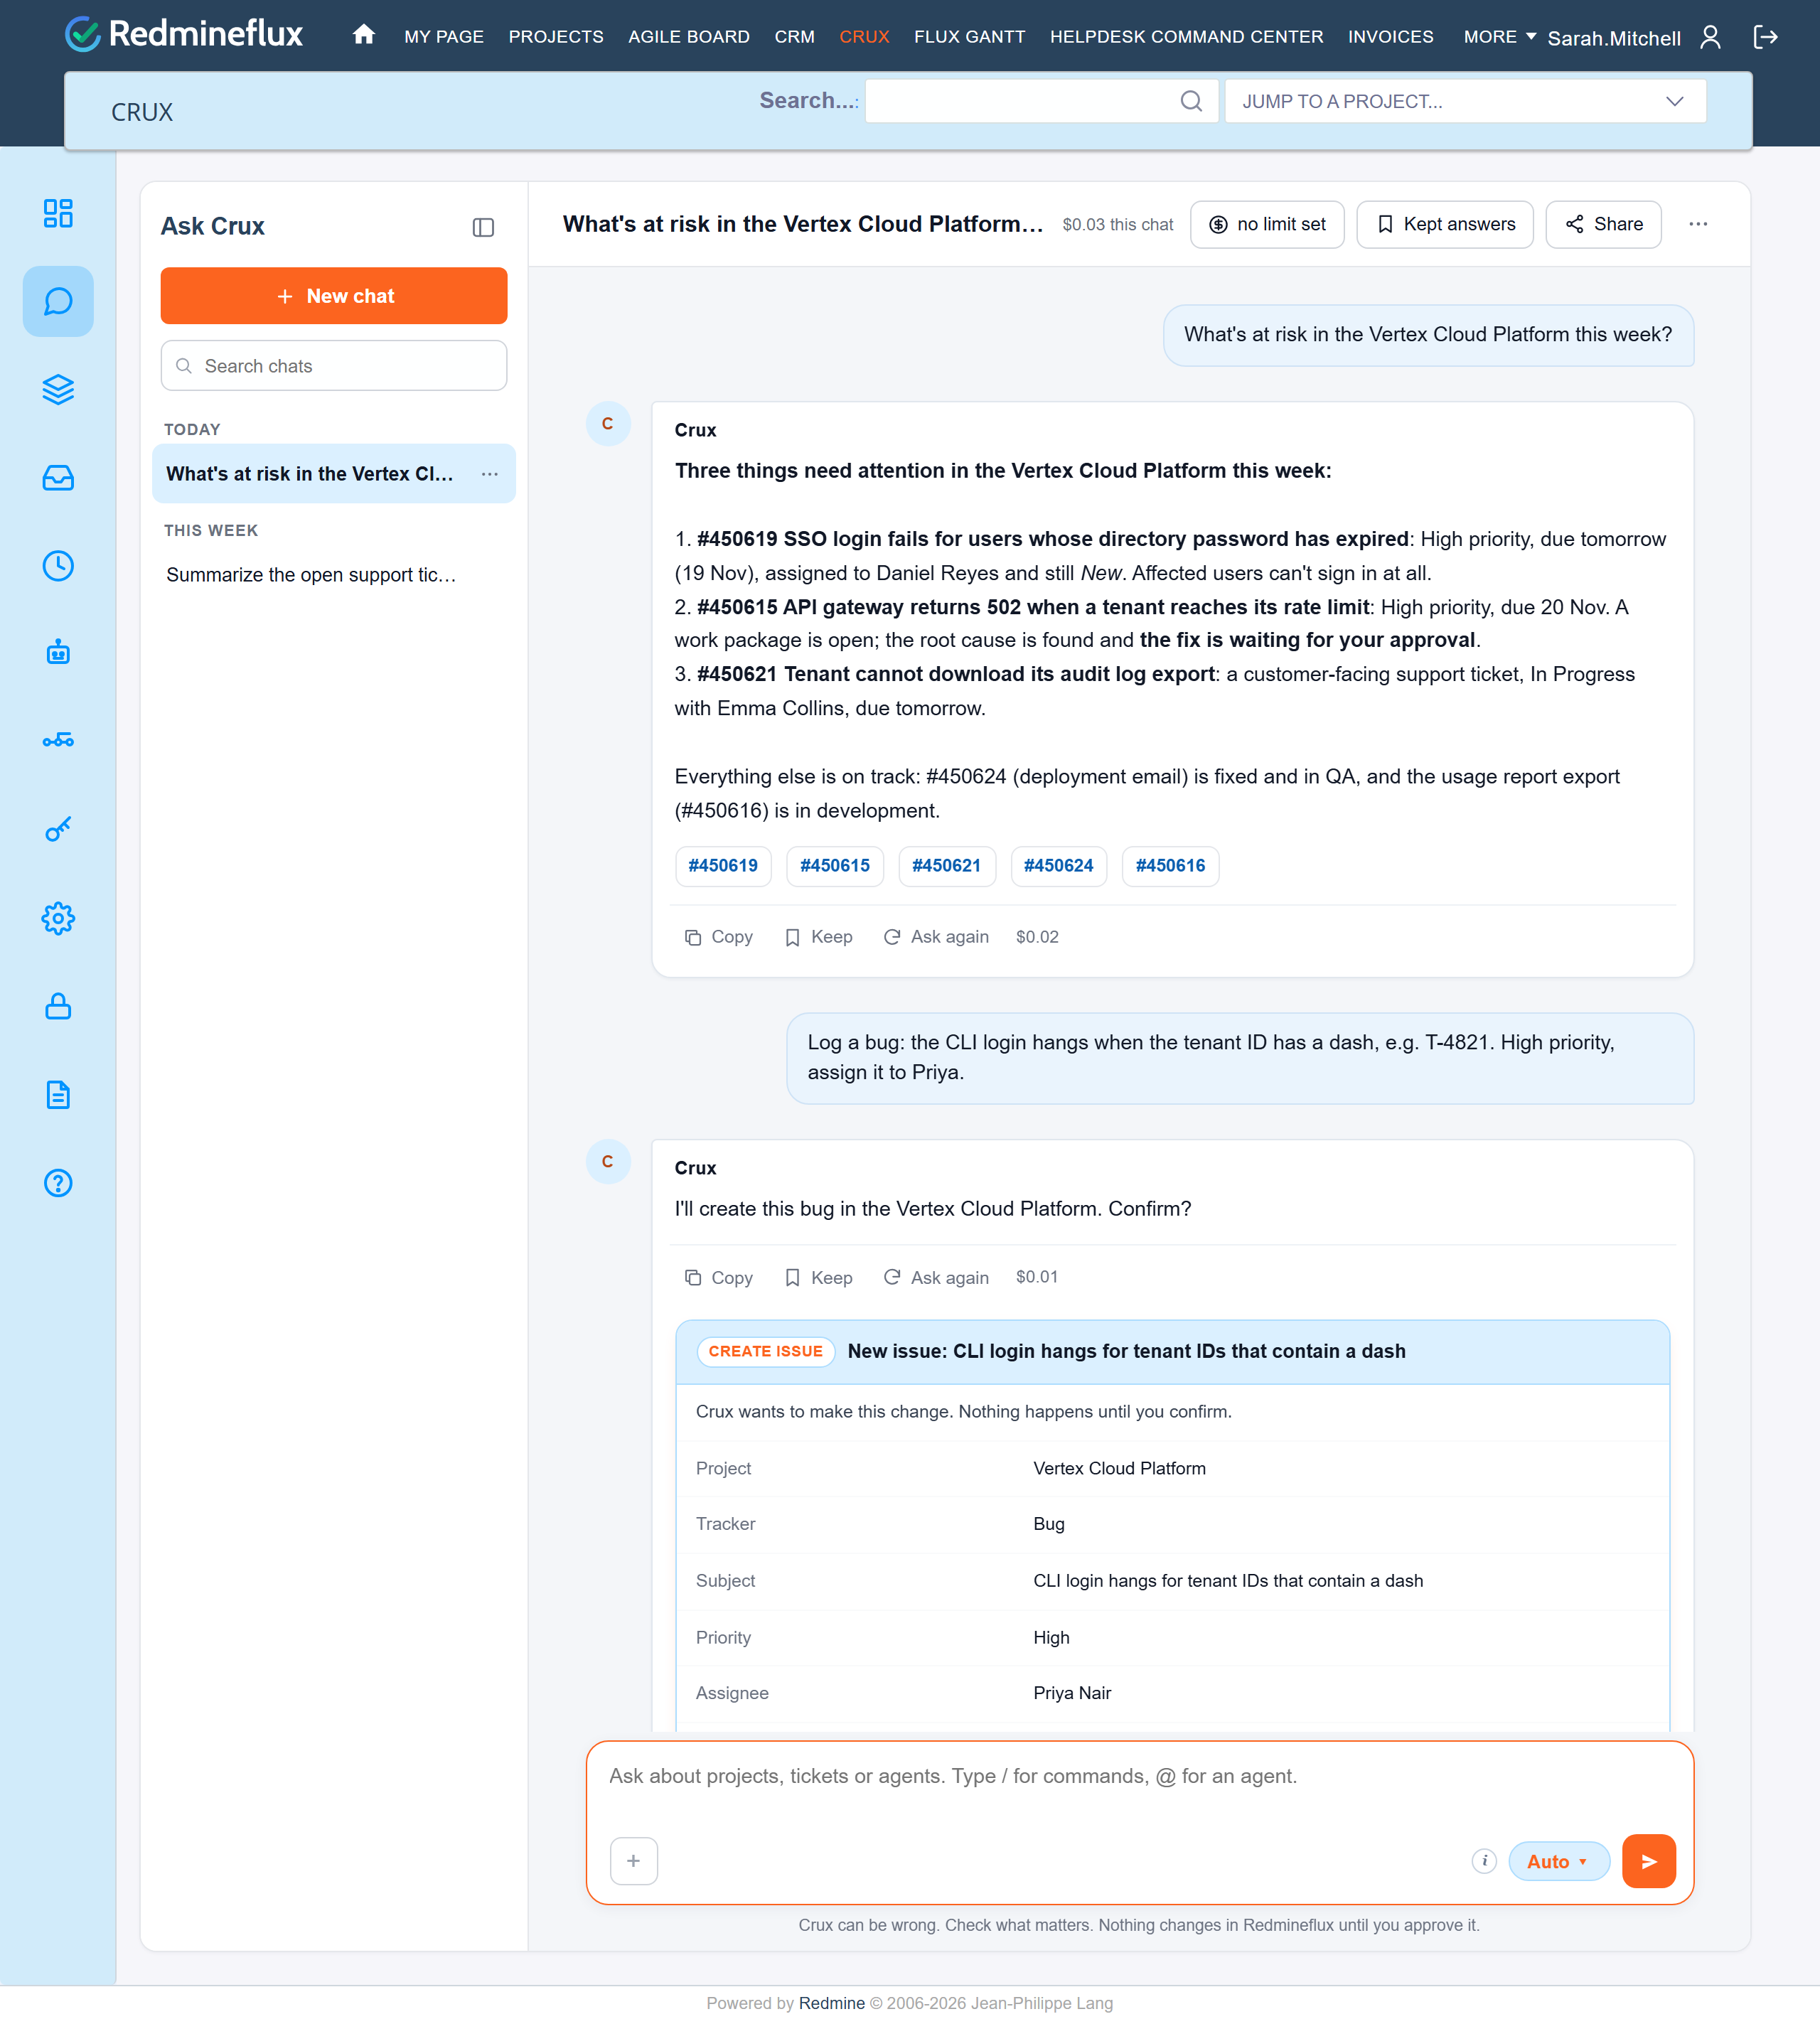
- Changes always need approval. When an agent wants to create, update or delete something, Crux shows a confirmation card first, and the change runs only after the person clicks to approve it.
- Crux core and the MCP Server are reached only by the Crux plugin on the same server. They don’t need to be open to the internet. Crux core listens only on the server itself; for the MCP Server, keep port 8080 closed in your firewall, or set
REDMINEFLUX_HOST=127.0.0.1in its.env.
System Requirements
| Item | Requirement |
|---|---|
| Redmineflux (Redmine) | 5.0 or later |
| Server | Linux x86_64: CentOS 7 / RHEL 7 or later, or any current Ubuntu or Debian |
| Recommended setup | All three parts on the same server as Redmineflux |
| Tools on the server | unzip and systemd (standard on current Linux distributions) |
| Redmineflux REST API | Enabled: Administration → Settings → API → Enable REST web service |
| Redmineflux Tags plugin | Needed for the Ready queue, which uses the readyforagent tag. The plugin is free: download the Redmineflux Tags plugin. Ask Crux, the agents and the Dashboard work without it. |
| AI provider account | An API key from a supported AI provider, for example OpenRouter or Anthropic, with credit available |
| Outbound internet | The server must reach your AI provider over HTTPS |
Before You Start
Prepare these two API keys from Redmineflux. To find a key, log in as that user, open My account, and use API access key → Show on the right.
| Key | Used by | Recommended user |
|---|---|---|
| MCP server key | The MCP Server, only at start-up, to check the connection and detect installed plugins | A dedicated low-privilege user such as mcp-bot, with the Reporter role on one project |
| Crux core key | Crux core, to read projects and plugin settings | An administrator account |
Important: Treat API keys like passwords. They are stored in files on your server that only the service can read. Every person’s own actions in Crux still use their own permissions.
Quick Setup Checklist
The whole setup takes about 30 minutes. Do these six steps in order. Each step is explained in detail below.
| # | Step | Done when |
|---|---|---|
| 1 | Install the MCP Server and set 3 values in its .env |
Its log shows Detected plugins: … |
| 2 | Install Crux core and set 4 values in its .env |
curl http://127.0.0.1:8787/api/health answers "ok": true |
| 3 | Install the Crux plugin in Redmineflux and restart Redmineflux | Crux appears in the top menu |
| 4 | In Crux Settings, click Test connection, then add an AI key | Test connection says Crux is connected |
| 5 | Turn on the Redmineflux Crux module in your projects and give roles the Crux permissions | Your team sees the chat bubble |
| 6 | Ask Crux “Show me my open issues” | You get an answer with your own data |
Installation
Install the parts in this order: MCP Server first, then Crux core, then the Crux plugin. Each step builds on the one before.
Step 1 — Install the Redmineflux MCP Server
- Copy
redmineflux-mcp.zipto your server and unzip it:
unzip redmineflux-mcp.zip

cd redmineflux-mcp - Run the installer:
sudo ./install.sh
It copies the server to/opt/redmineflux-mcp, creates a dedicated service user, creates the settings file and installs the system service. - Open the settings file:
sudo nano /opt/redmineflux-mcp/.env - Set these values:
Setting Value REDMINE_URLYour Redmineflux address, for example https://redmine.yourcompany.comREDMINE_API_KEYThe MCP server key (the mcp-botuser’s key)REDMINEFLUX_READ_ONLYfalse. Required for Crux: agents need it to make the changes people approve.Leave every other setting as it is.
- Start the server:
sudo systemctl enable --now redmineflux-mcp - Check the log:
journalctl -u redmineflux-mcp -f
A line likeRedmineflux MCP v… : … tools … Detected plugins: …means the server reached Redmineflux and is ready.
Step 2 — Install Crux core
- Copy
redmineflux-crux-core.zipto the same server and unzip it:
unzip redmineflux-crux-core.zip

cd redmineflux-crux-core - Run the installer:
sudo ./install.sh
It copies core to/opt/redmineflux-crux-core, creates a dedicated service user, creates the settings file with a unique security key (CRUX_SECRET), and installs the system service. - Open the settings file:
sudo nano /opt/redmineflux-crux-core/.env - Set these values:
Setting Value REDMINEFLUX_URLYour Redmineflux address, for example https://redmine.yourcompany.comREDMINEFLUX_API_KEYThe Crux core key (an administrator’s key) CRUX_PROJECTThe identifier of the project Ask Crux uses by default (shown in Project → Settings) CRUX_MCP_URLKeep http://127.0.0.1:8080/mcpwhen the MCP Server runs on this same serverCRUX_REDMINE_PUBLIC_URLOptional. The address people open in their browser, if it differs from REDMINEFLUX_URL. Crux uses it for links in its answers.CRUX_RESULT_STATUSOptional. The name of the status a ticket moves to when an agent reports finished work and Crux adds the result note (see Ticket status changes). Default: In Peer Review. If your Redmineflux has no status with this name, Crux adds the note and leaves the status unchanged.CRUX_CLAIM_STATUSOptional. The name of the status a ticket moves to when Crux adds the claim note for an agent that took it from the Ready queue (see Ticket status changes). Default: In Progress. The same rule applies when no status has this name.Leave every other setting as it is.
- Start core:
sudo systemctl enable --now redmineflux-crux-core - Check that it is running:
curl http://127.0.0.1:8787/api/health
A reply with"ok": truemeans core is running.
Never change
CRUX_SECRETafter setup. It protects the AI provider keys you will add in Step 4. If it changes, those keys can no longer be read and must be added again.
Step 3 — Install the Redmineflux Crux plugin
- Make sure Redmineflux is installed and running.
- Extract the plugin archive.
- Upload the plugin folder to
redmine/plugins/redmineflux_crux. - Do not rename the plugin folder.
- Install dependencies:
bundle install - Run the plugin migration.
For production:RAILS_ENV=production bundle exec rake redmine:plugins:migrate NAME=redmineflux_crux
For development:RAILS_ENV=development bundle exec rake redmine:plugins:migrate NAME=redmineflux_crux - Restart Redmineflux.
After Redmineflux starts, the plugin connects to Crux core on its own within a few seconds. A Crux entry appears in the top menu for administrators, and for people whose role has the View Crux dashboard permission.
Note:
If the Crux pages show missing styles or buttons that don’t respond after installation, run the following command and then restart Redmineflux:
RAILS_ENV=production bundle exec rake assets:precompile
Step 4 — Connect and add an AI key
- Log in to Redmineflux as an administrator and click Crux in the top menu.
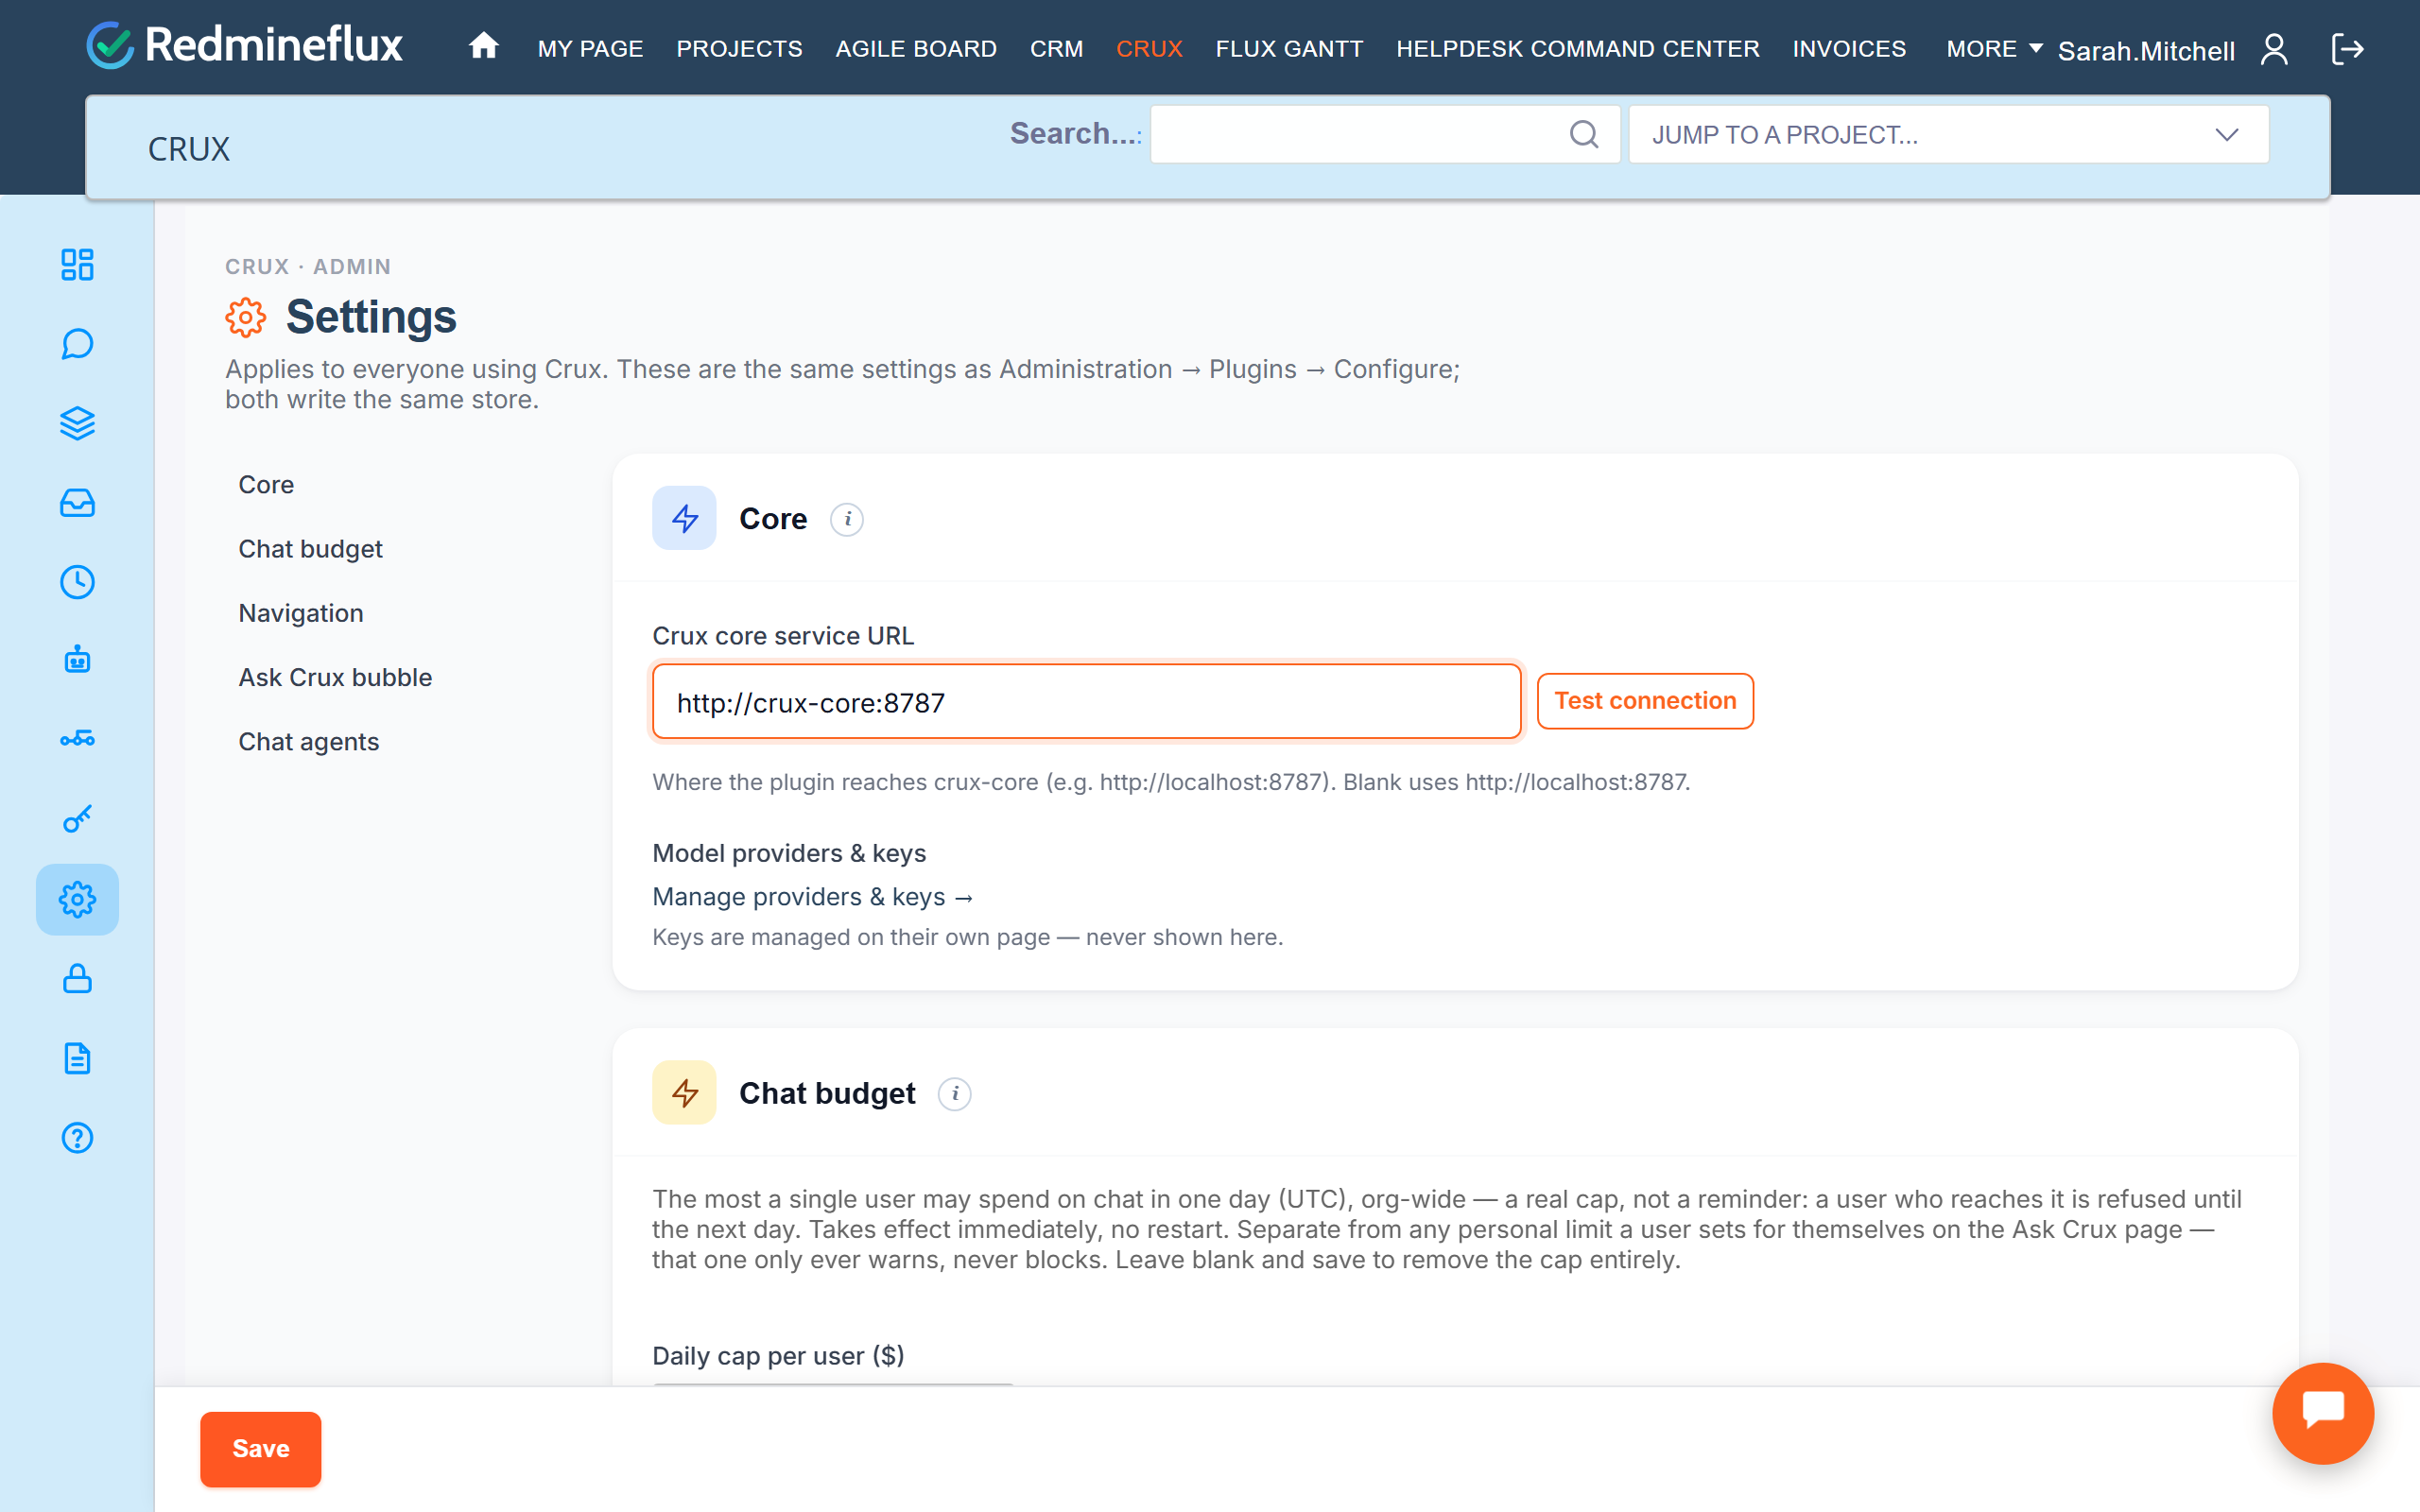
- Open Crux Settings (the gear icon in the Crux side bar on the left). The Crux core service URL must be
http://localhost:8787, which is the default when core runs on the Redmineflux server. Click Test connection. It must say Crux is connected. - Go to Administration → Crux — providers & keys, add your AI provider and paste its API key.
Step 5 — Turn on Crux for your projects and roles
- For each project that should use Crux, open Project → Settings → Modules, tick Redmineflux Crux and save.
- Open Administration → Roles and permissions, choose a role, and give it the Crux permissions it needs (see Roles and Permissions).

Step 6 — Verify
- Click the round chat button at the bottom right of any Redmineflux page, or open Crux → Ask Crux.
- Ask: “What can you help me with?”
- Then ask about real data, for example: “Show me my open issues.”
If you get an answer with your own data, setup is complete.
Roles and Permissions
Crux permissions are given per role, under Administration → Roles and permissions → [Role] → Redmineflux Crux. The Redmineflux Crux module must also be turned on in each project.
| Permission | What it allows |
|---|---|
| Use Ask Crux | The Ask Crux page, the chat bubble, the Improve with Crux wand on issues, and @-mentioning an agent in an issue comment |
| View Crux dashboard | The Crux dashboard, each project’s Crux tab, and the Agents and Pipelines pages |
| Approve Crux gates | Approving a pipeline stage that needs a person’s sign-off |
| Manage Crux agents | Adding, editing, pausing and retiring agents |
| Manage Crux pipelines | Creating and editing pipelines |
Tip: Administrators have every Crux permission automatically. Providers & keys, Logs, Frozen rules and Crux Settings are available to administrators only.
Crux never gives anyone more access than they already have. When a person asks an agent to read or change something, the agent works with that person’s own Redmineflux permissions.

Configuration
Crux Settings
Open Crux Settings (the gear icon in the Crux side bar) as an administrator to set:
- Core: the Crux core service URL, with Test connection, and a link to the AI providers and keys
- Chat budget: the most one person may spend on chat in a day. A person who reaches it can’t send chat messages until the next day (UTC). Leave it empty for no cap.
- Navigation: which Crux entries appear in the top menu, and the menu caption
- Ask Crux bubble: its position, size, icon, greeting, suggested questions and accent colour
- Chat agents: which agents people can choose in Ask Crux. Leave it empty to show all.
AI Providers and Keys
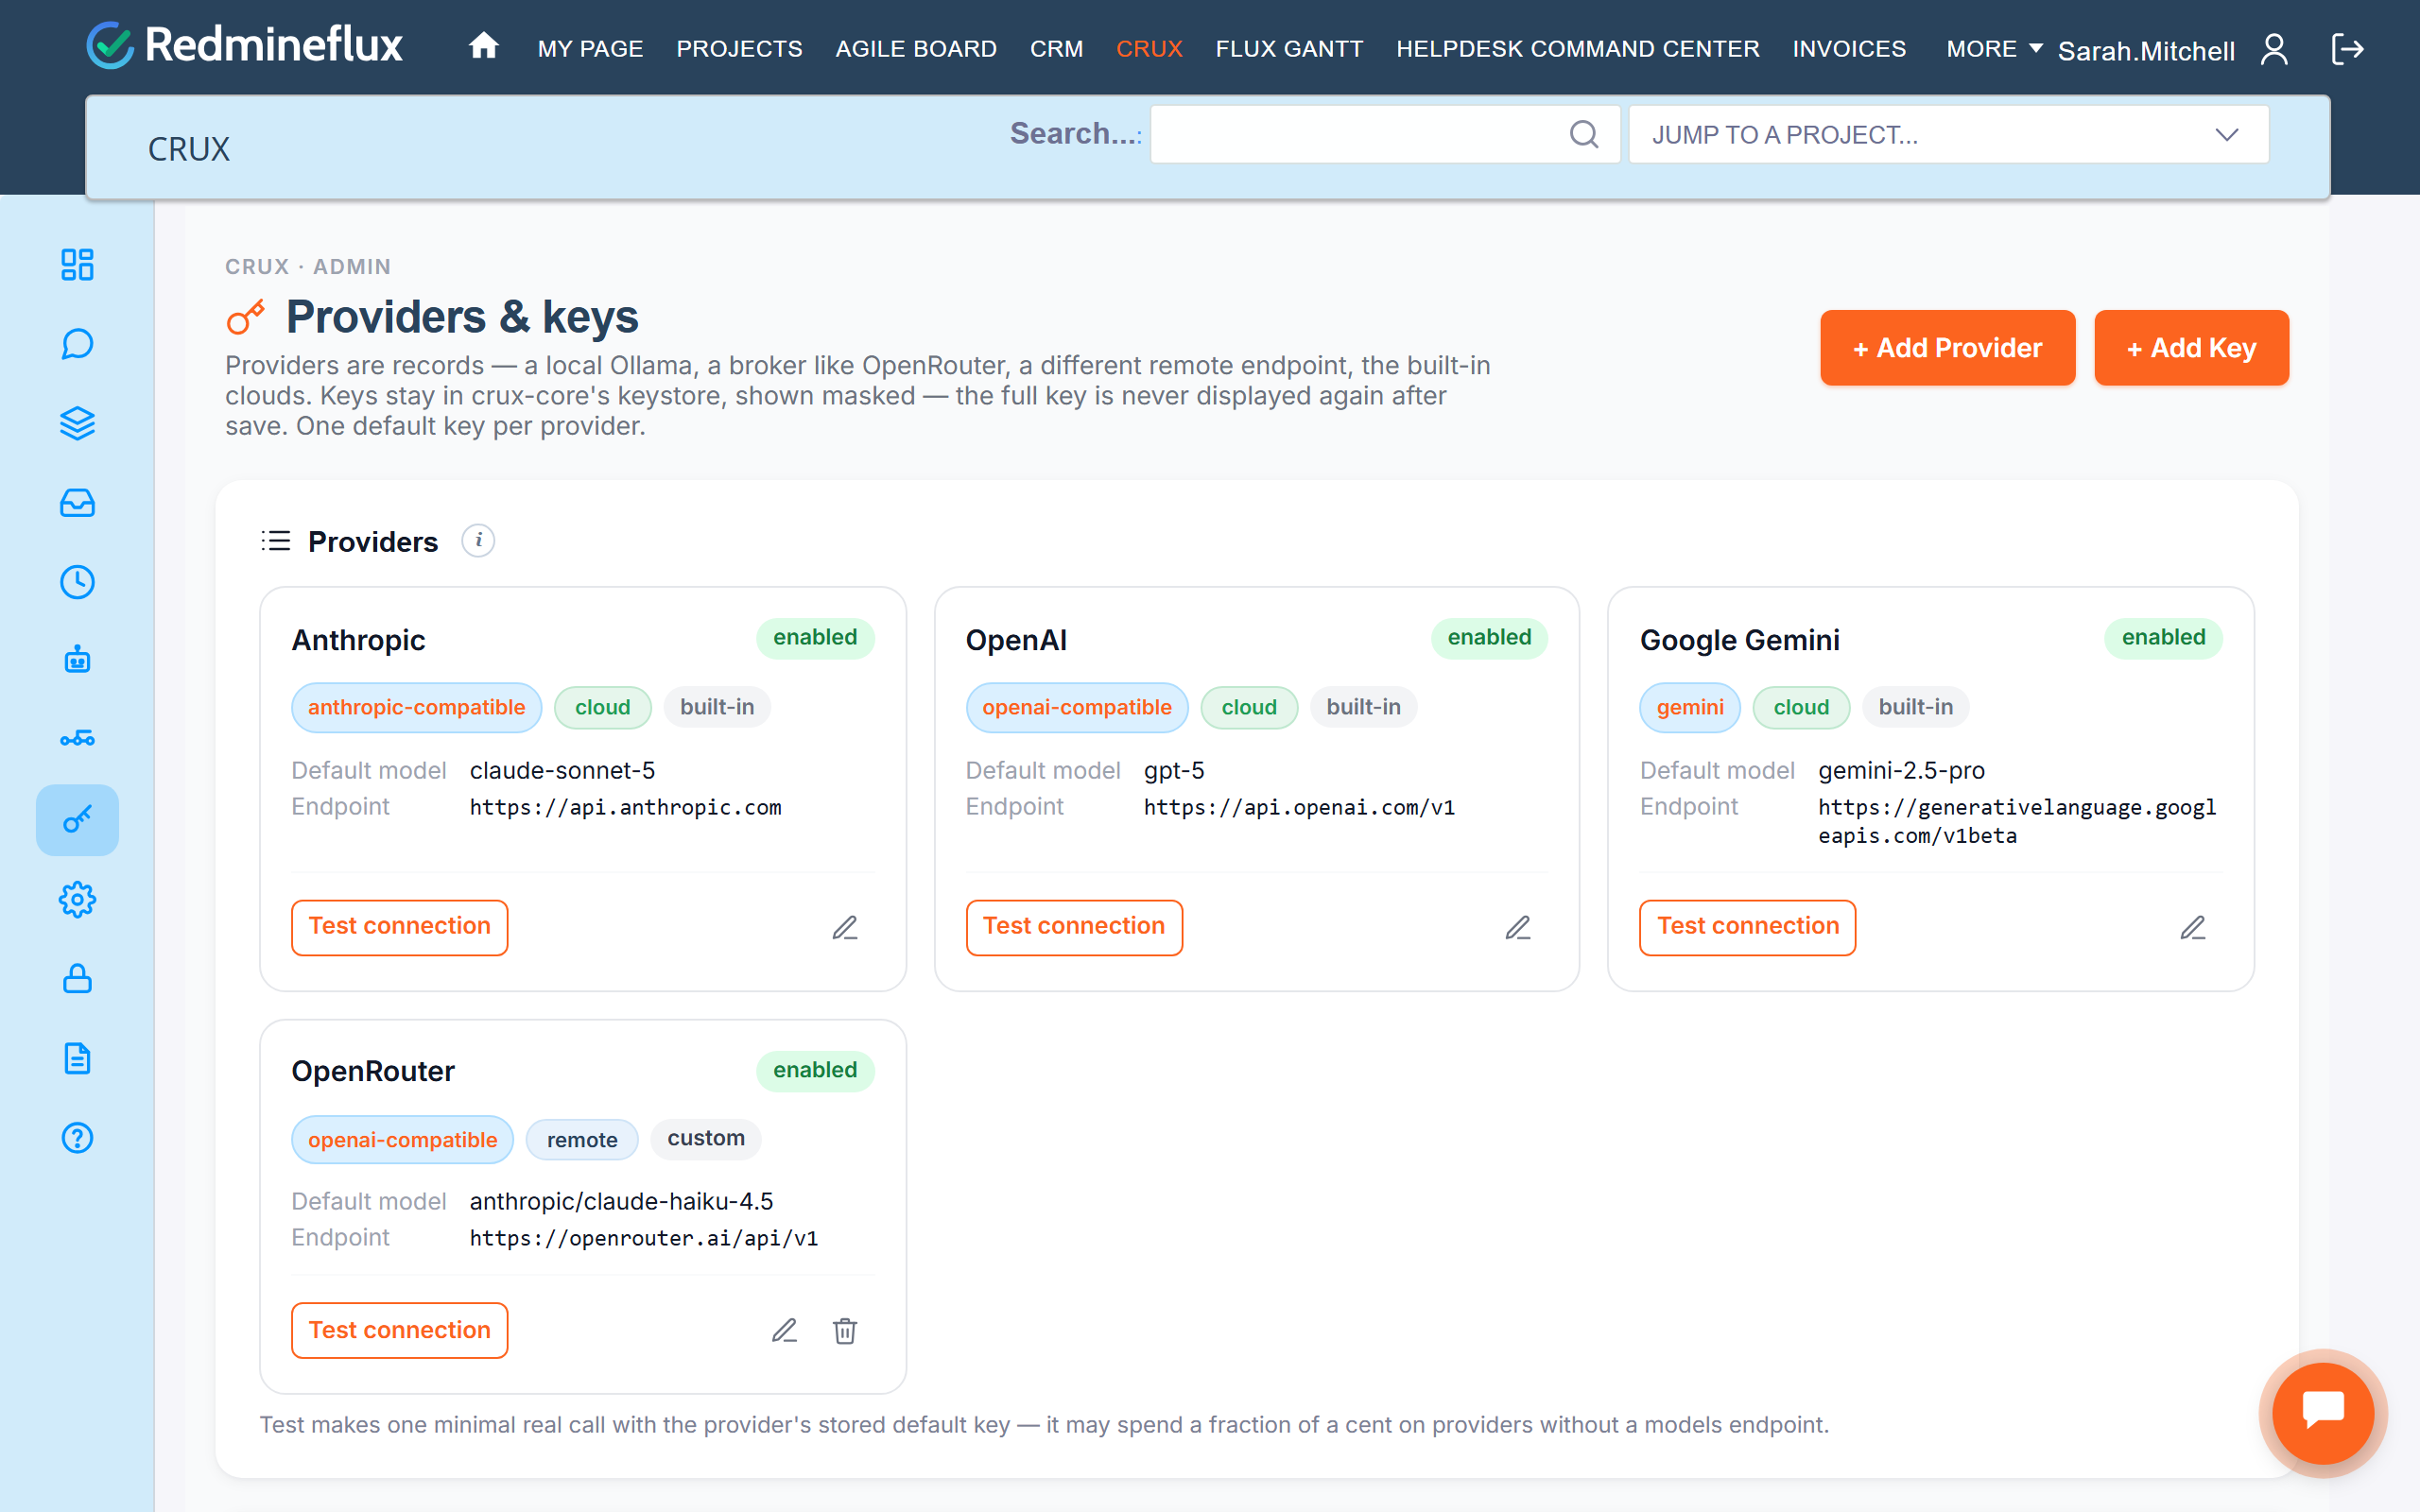
Open Administration → Crux — providers & keys to add, test or remove AI provider keys. For OpenRouter keys, the $ button shows the credit balance:
- how much Crux can still spend right now;
- the money left in the account;
- the key’s spending limit, and what has been spent today, this week and this month.
Frozen Rules (optional)
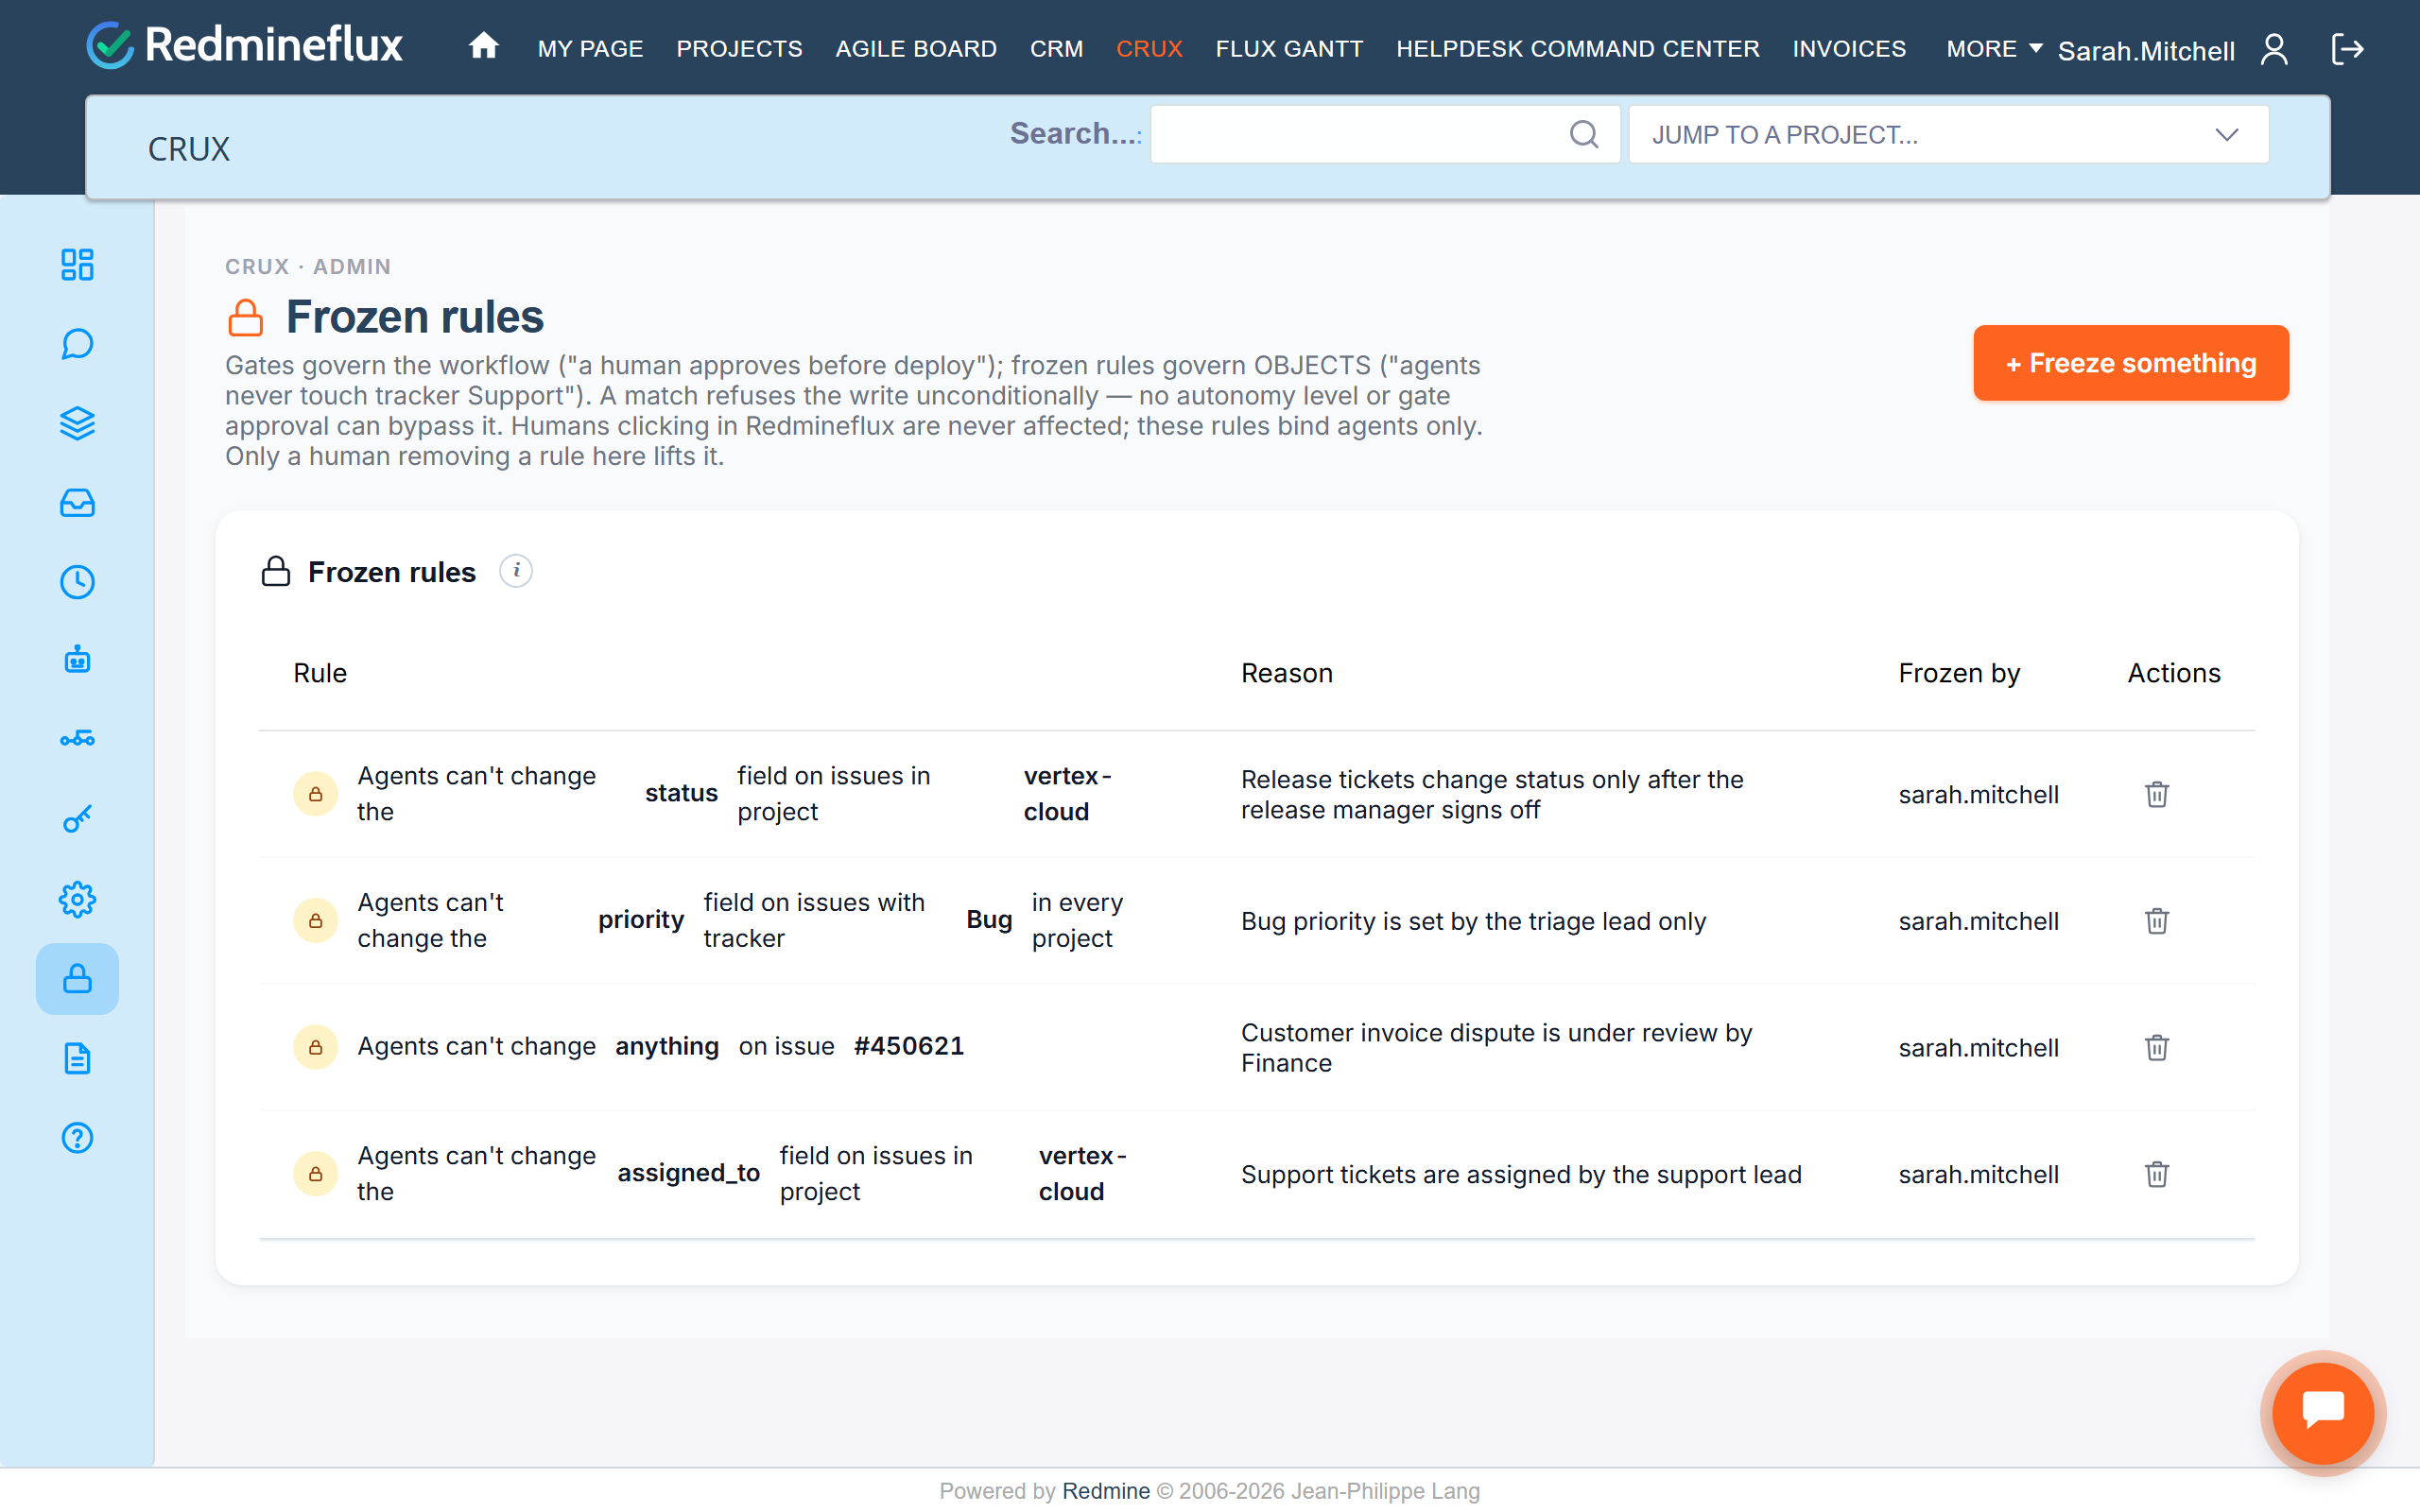
Open Administration → Crux — frozen rules to stop agents from changing chosen tickets, trackers, projects or fields. A frozen rule blocks agent changes at every level, even after approval.
The Built-in Agents
Crux comes with ready-made agents. In Ask Crux, Crux picks the right agent for each question automatically. People can also choose an agent themselves, or address it by name, for example “Timesheet Agent, who hasn’t submitted their timesheet?”. Each plugin’s agent is named after its plugin, so it is easy to tell which agent does what.
Agents for a Redmineflux plugin work only when that plugin is installed, because they use its tools. Crux handles this for you:
- An agent whose plugin isn’t installed is not offered in Ask Crux.
- On the Agents page it shows “Needs Redmineflux …” with a Learn more link to that plugin.
- If someone asks for it anyway, Crux answers that the plugin isn’t installed. No AI credits are used.
For example, if you have only the Timesheet plugin, you get the Timesheet Agent plus every agent marked “Redmineflux only” below, and the other plugin agents appear on the Agents page as “Needs …”.
| Agent | Handles | Needs |
|---|---|---|
| Project Manager | Project status, issues, members, versions, wiki and news | Redmineflux only |
| Project Setup Agent | Creating and setting up new projects | Redmineflux only |
| Crux Guide | Questions about how Crux works | Redmineflux only |
| Reviewer | Whether an issue meets its acceptance criteria | Redmineflux only |
| Test Author | A test plan or acceptance tests for an issue | Redmineflux only |
| Docs Writer | Release notes for a version, and wiki pages | Redmineflux only |
| Monitor | What needs attention in a project: urgent, overdue or stuck issues | Redmineflux only |
| Alert Triage | Whether a reported problem is a duplicate, and how severe it is | Redmineflux only |
| Root-Cause Analyst | The probable cause of a bug | Redmineflux only |
| Auto-Fixer | A plan to fix a bug, as subtasks or a Work Package (it writes no code) | Redmineflux only |
| Design Agent | User flows, screens and open questions for a feature | Redmineflux only |
| Research | Everything Redmineflux already holds on a topic, with sources | Redmineflux only |
| Improver | Breaking an issue into subtasks, or rewriting its description | Redmineflux only |
| Timesheet Agent | Timesheets, submissions and approvals | Timesheet plugin |
| CRM Agent | CRM pipeline, deals, contacts and companies | CRM plugin |
| Helpdesk Agent | Helpdesk tickets, customers and SLAs | Helpdesk plugin |
| Testcase Agent | Test cases, test runs and results | Testcase Management plugin |
| Agile Board Agent | Sprints, backlog and the agile board | Agile Board plugin |
| Workload Agent | Team workload, capacity and leave | Workload plugin |
| Budget Agent | Project budgets and approved hours | Budget and Audit plugin |
| Invoice Agent | Invoices, payments and team rates | Invoice plugin |
| Knowledgebase Agent | Knowledge base search and articles | Knowledgebase plugin |
| DevOps Agent | Builds, pull requests, releases, environments and deployments, incidents, security scans and DORA metrics | DevOps plugin |
| Code Reviewer | Reviewing pull requests, commits and builds | DevOps plugin |
Using Crux Day to Day
Ask Crux and the chat bubble
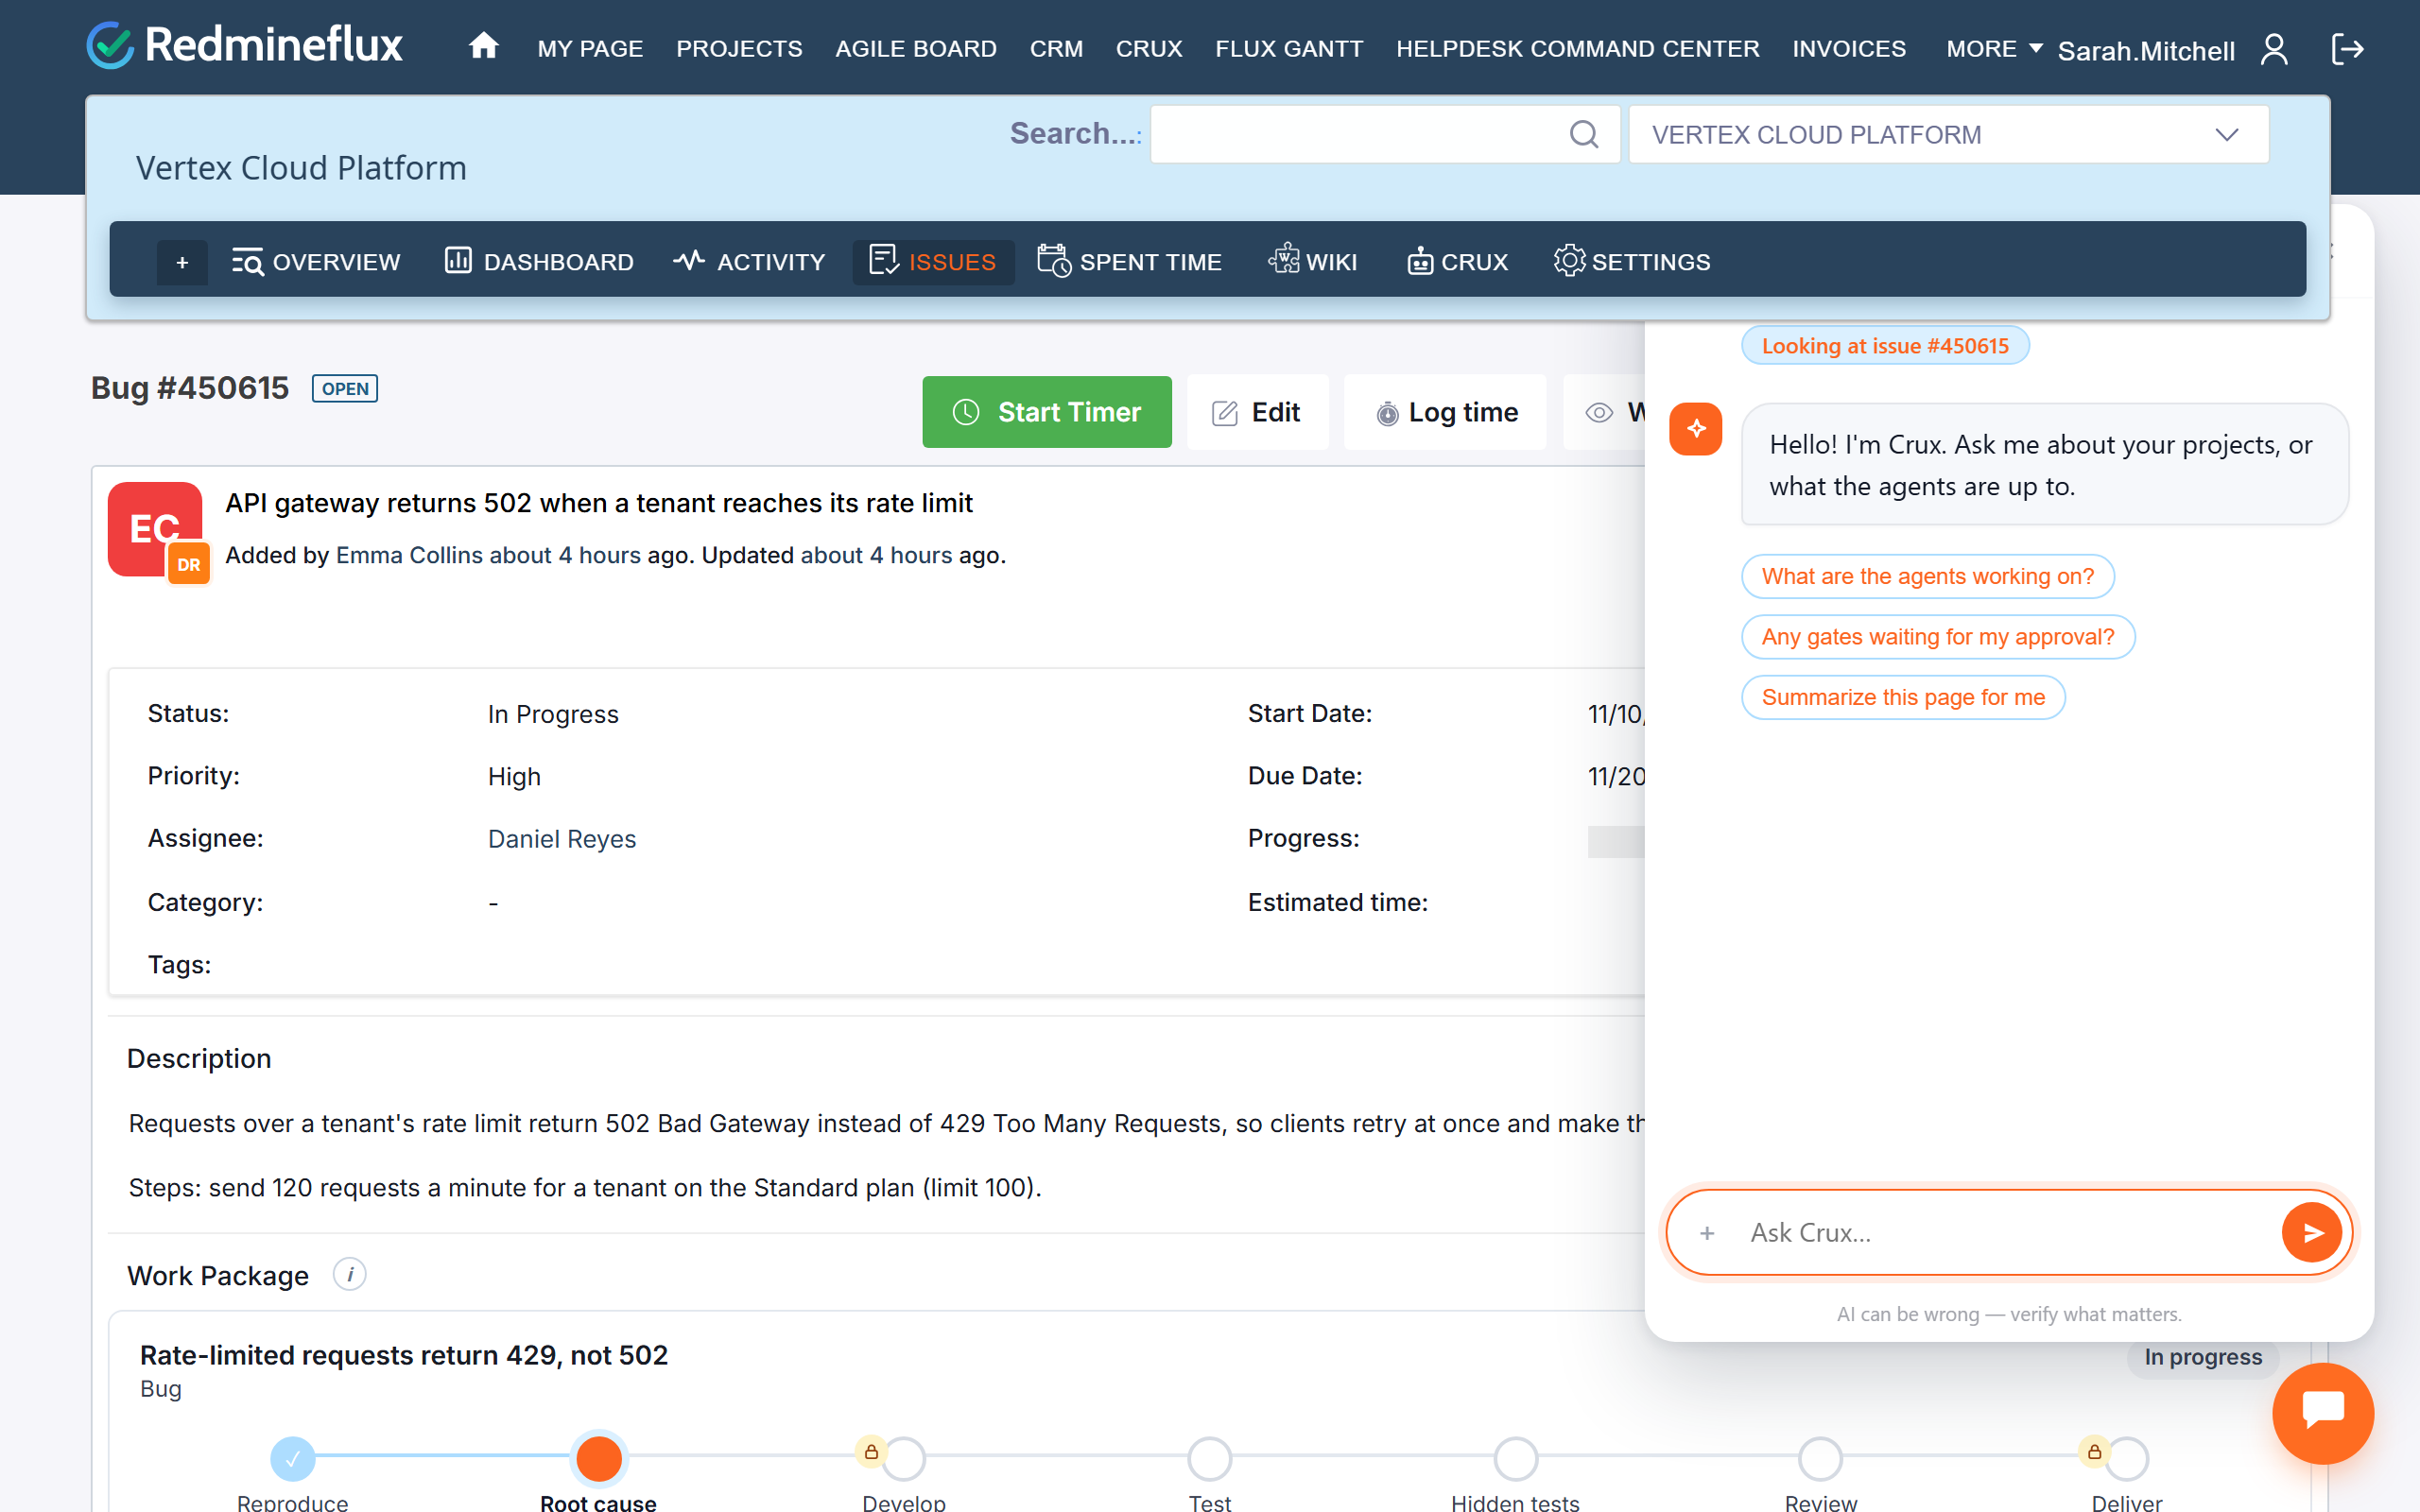
- The chat bubble, the round button on every Redmineflux page, opens a small chat window so you can ask about the page you are on.
- The Ask Crux page is the full chat. Your chats are listed on the left, where you can search, rename and pin them.
- Type
/for commands, or@to choose an agent. - Under each answer, Keep saves it to Kept answers. Share lets a teammate read the chat.
Approving changes
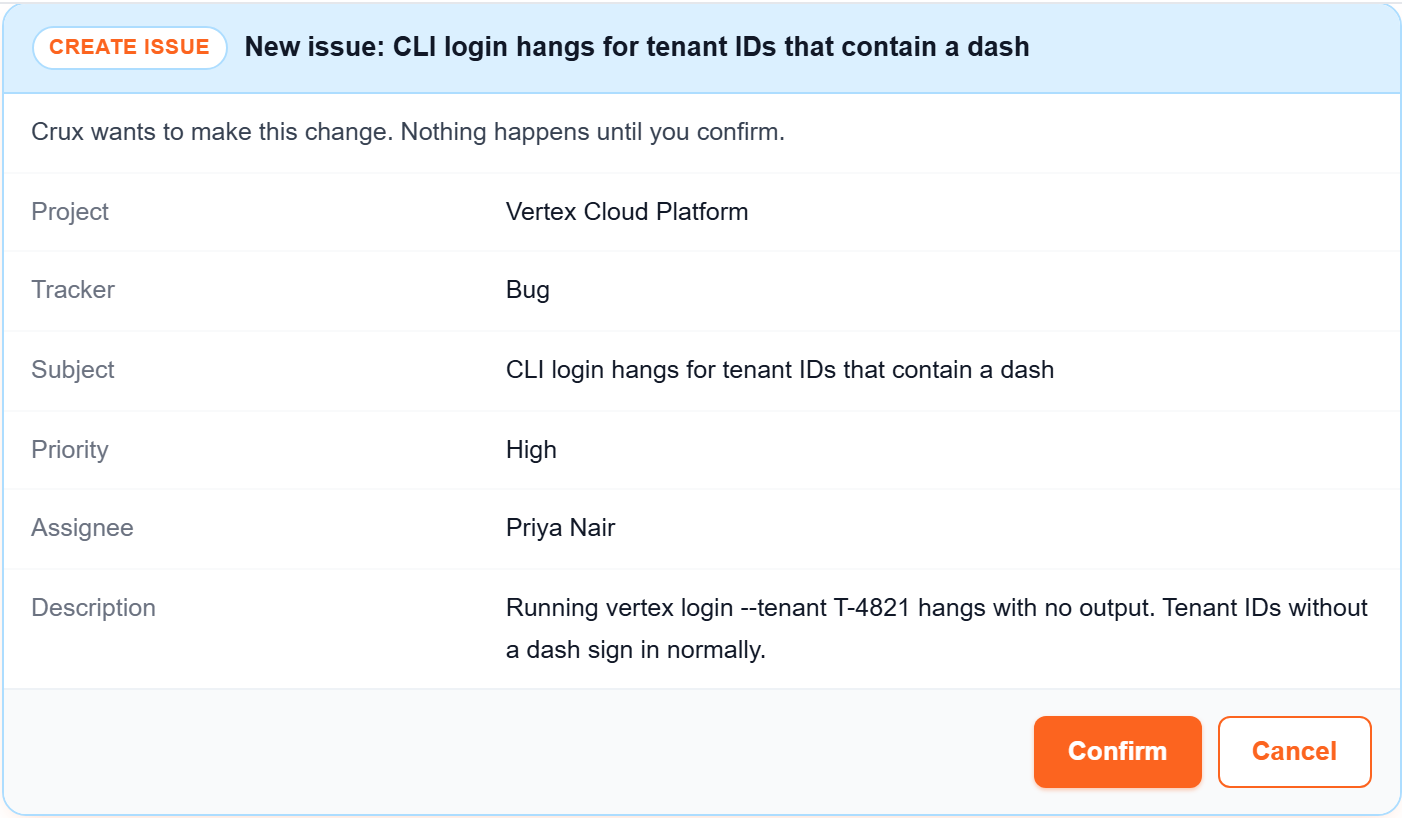
When you ask for a change, for example “Create a bug for the login page”, Crux shows a confirmation card with exactly what it will do. Nothing changes in Redmineflux until you click to approve it.
Dashboard
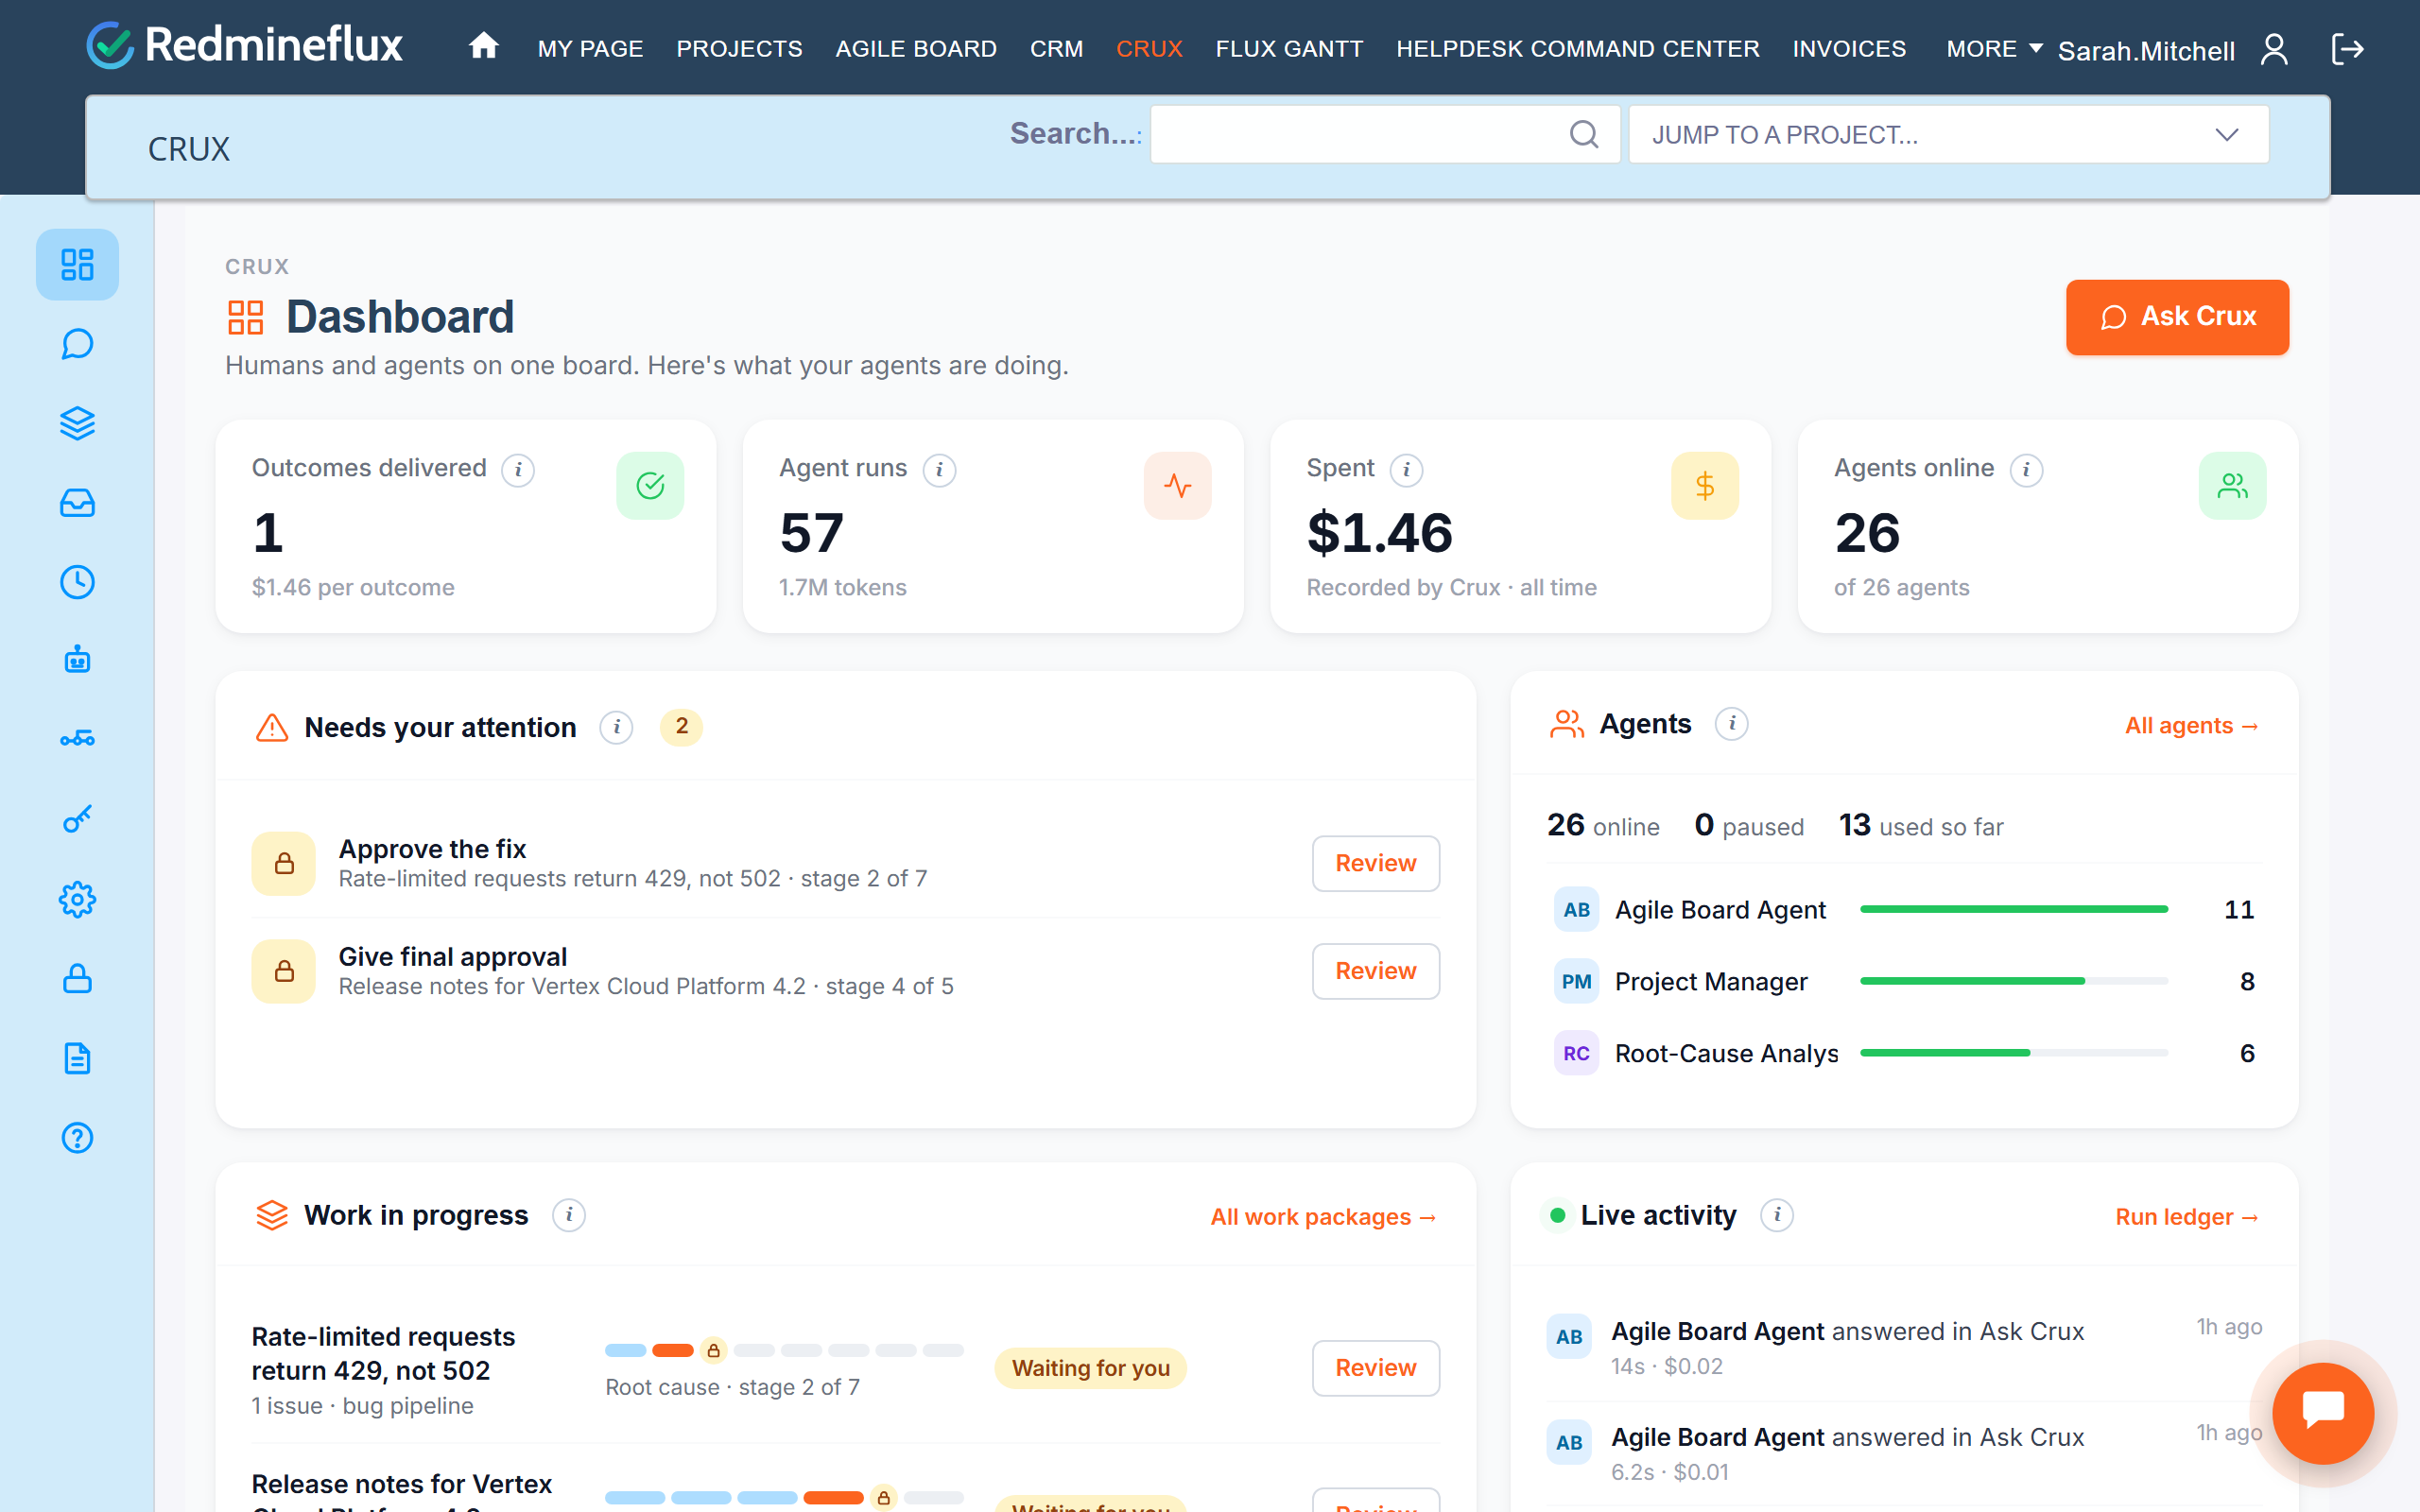
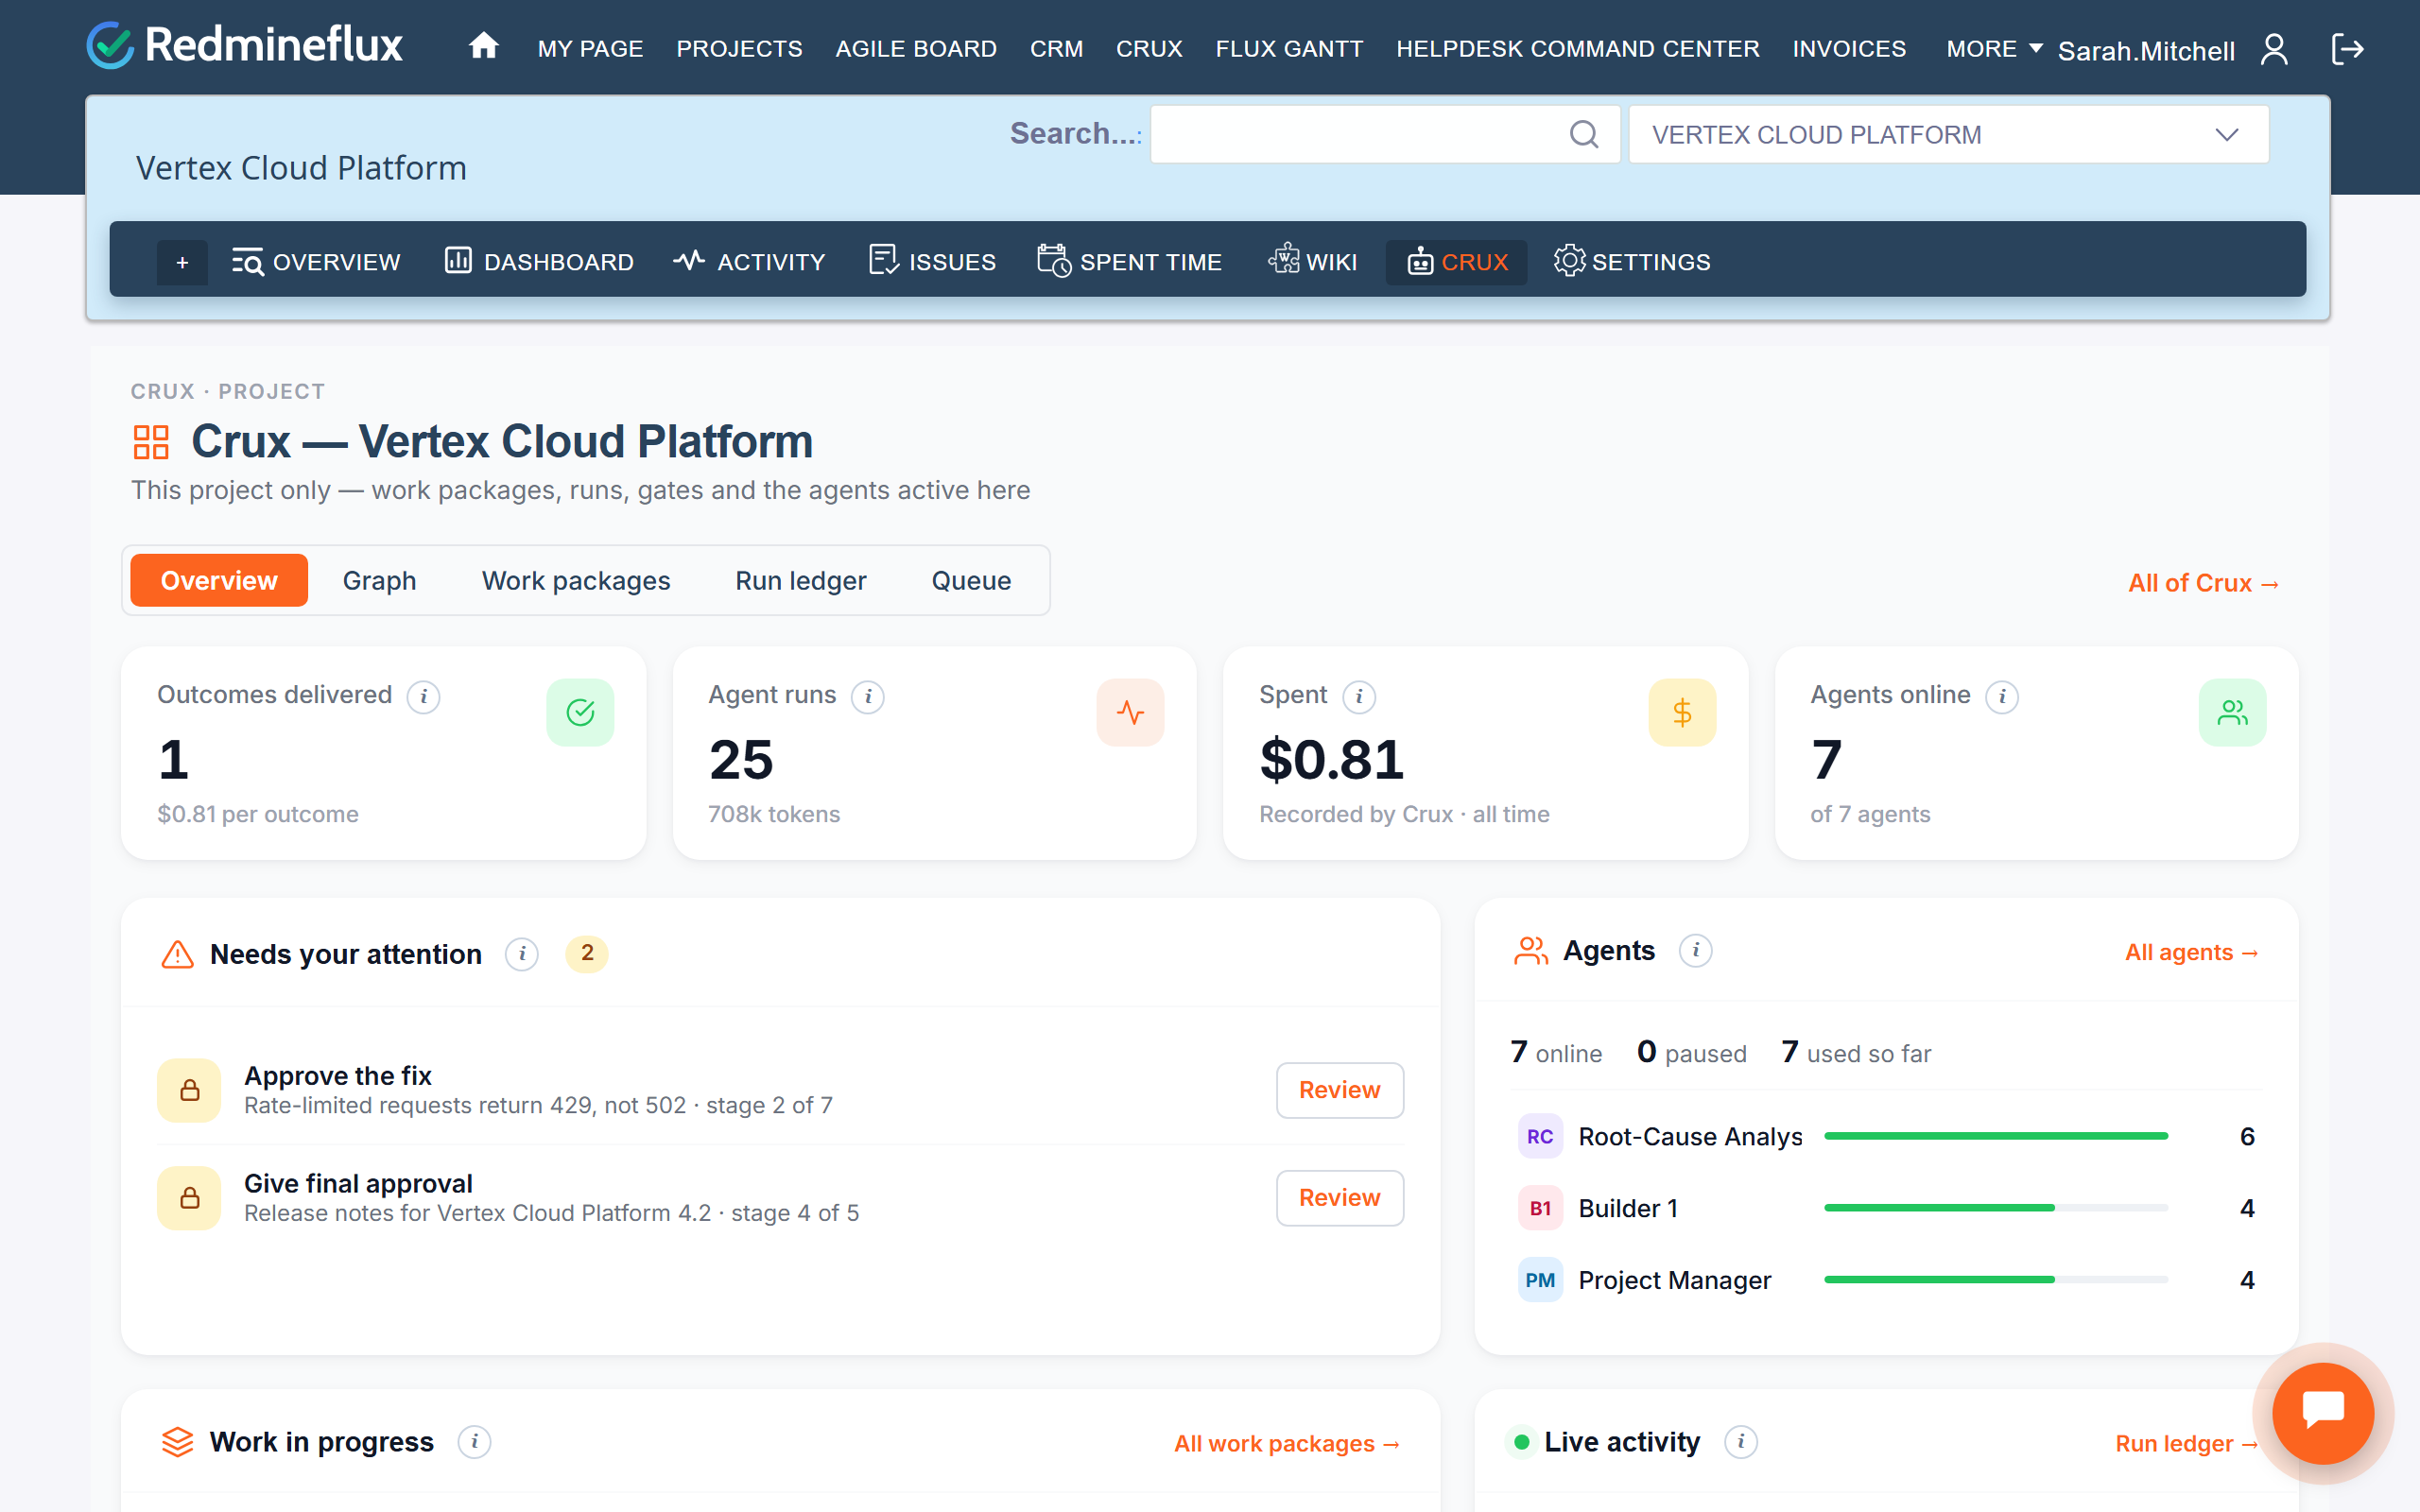
Crux → Dashboard shows what needs your attention, such as approvals and failed runs, along with the agents, work in progress, live activity and issues that are ready for agents. Each project with the module turned on has its own Crux tab.
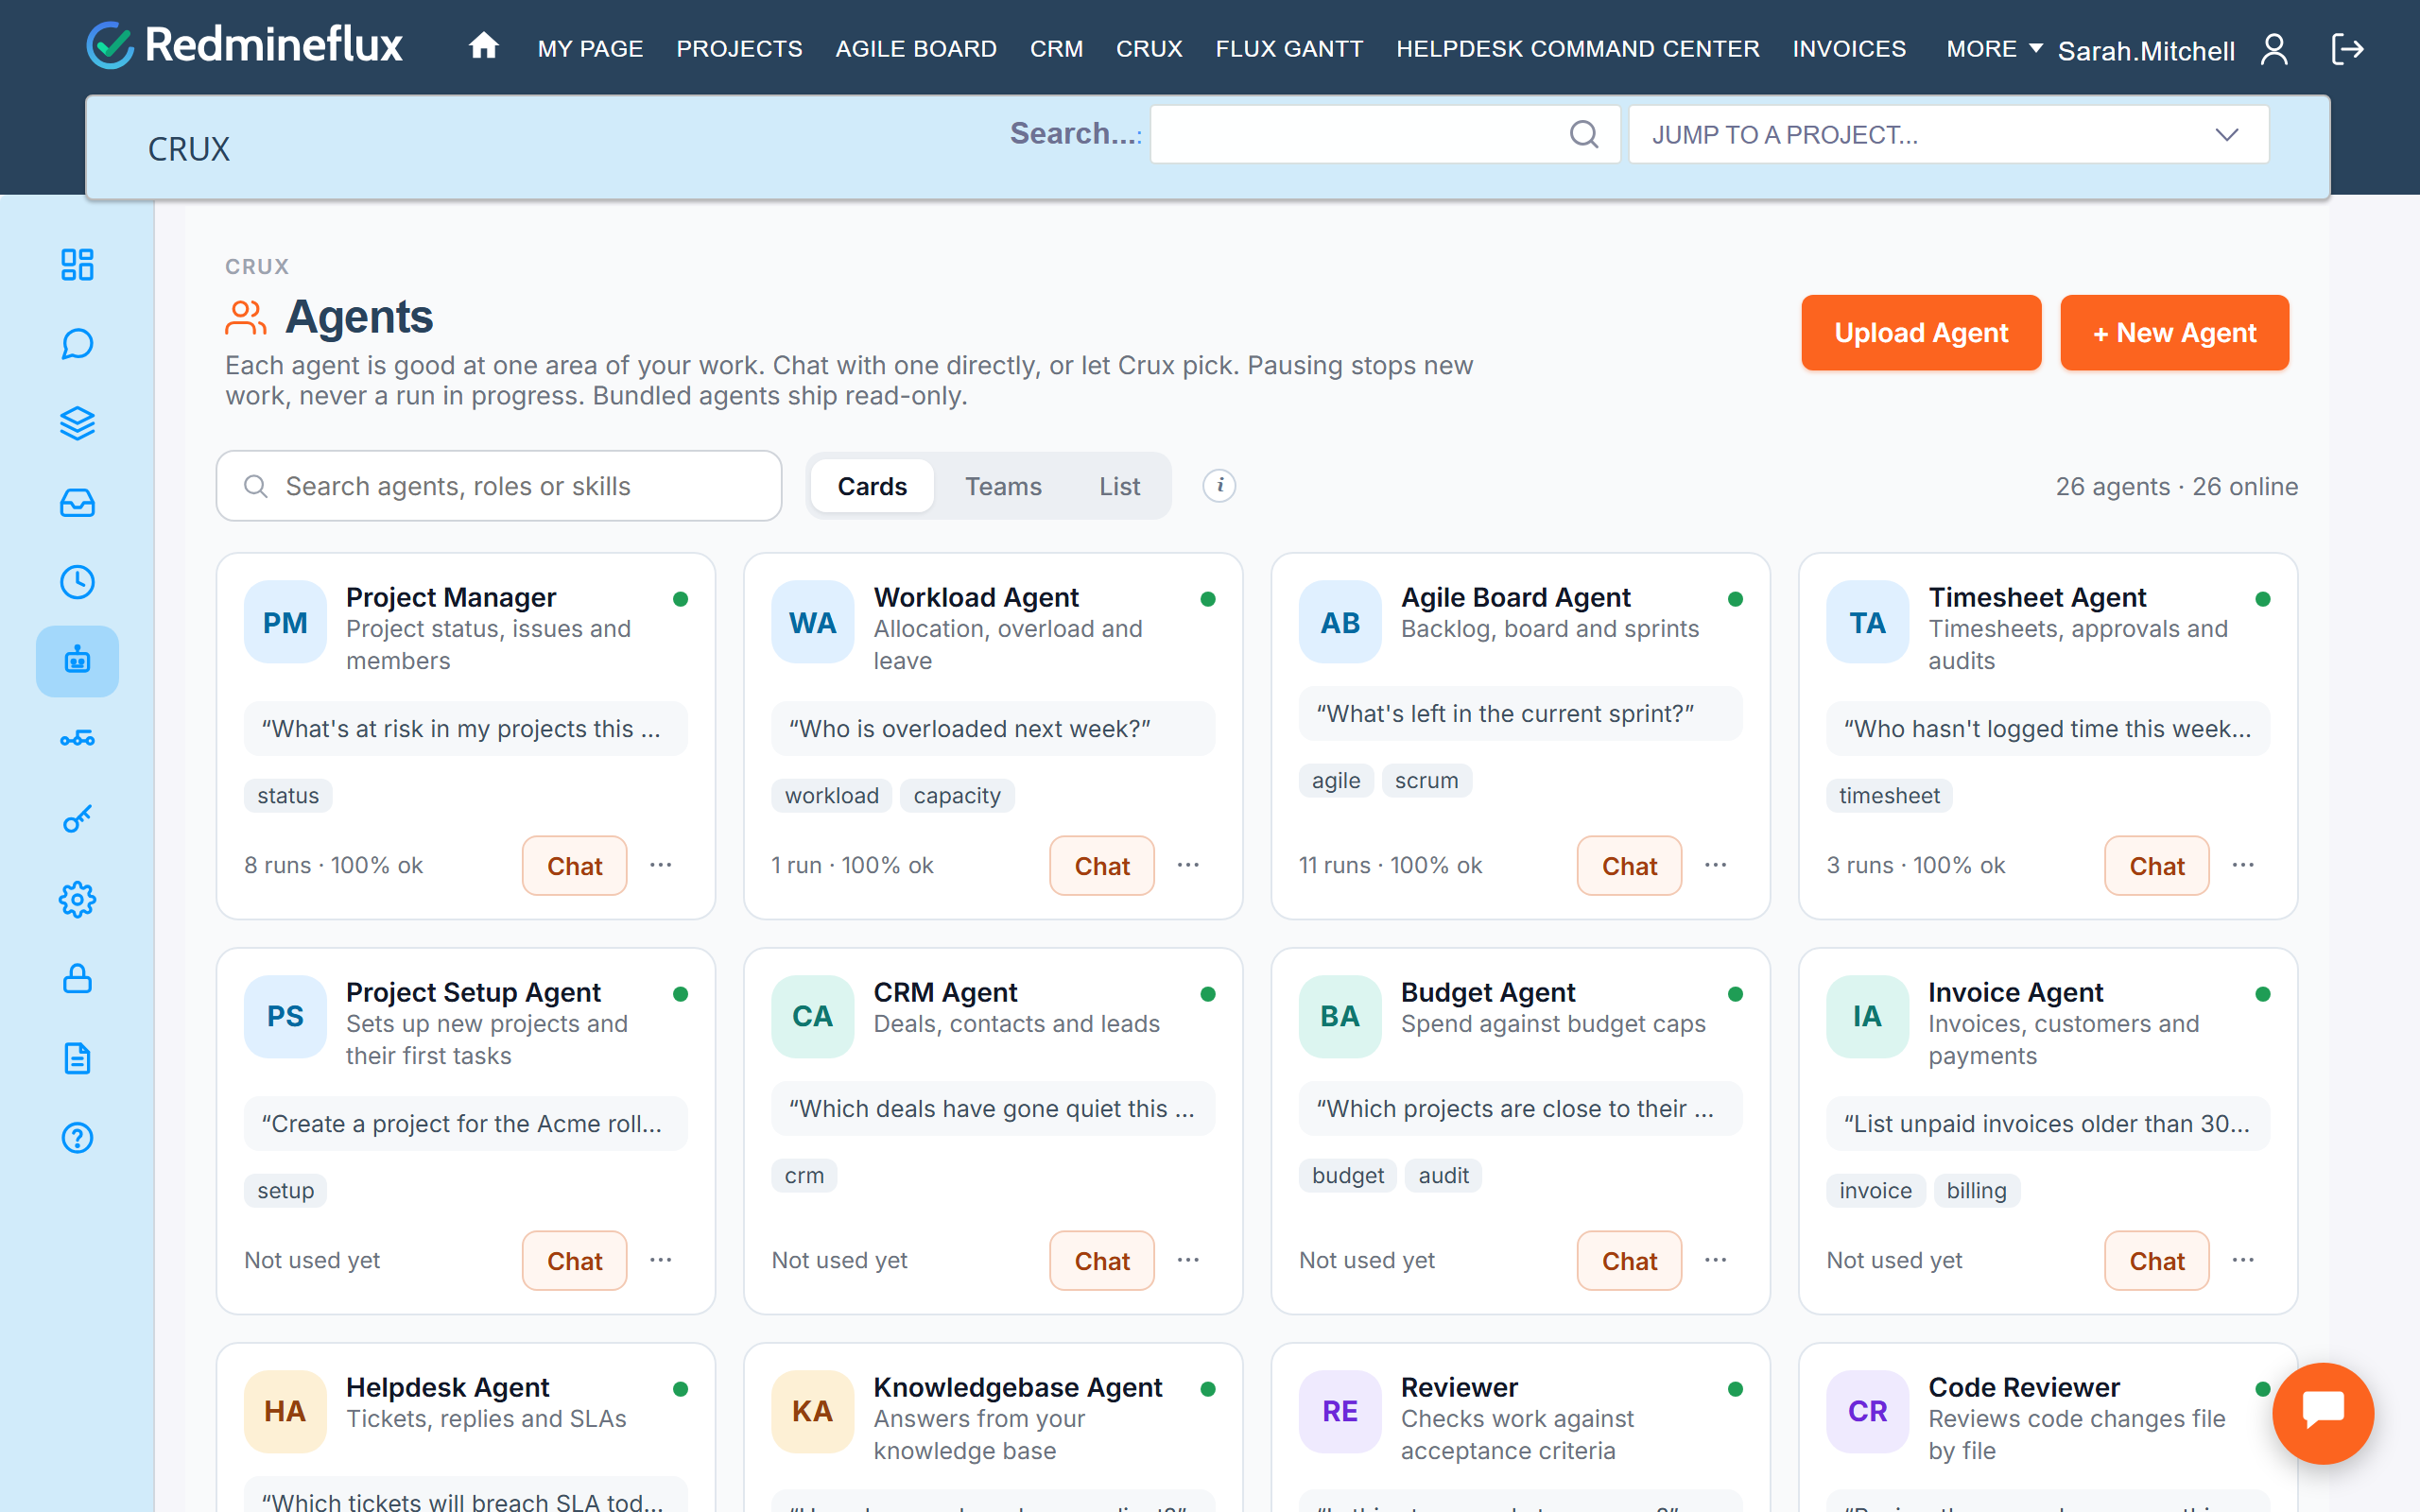
Agents
Crux → Agents lists every agent with its skills, recent runs and spend. Chat starts a chat with that agent.
Improve with Crux and @-mentions
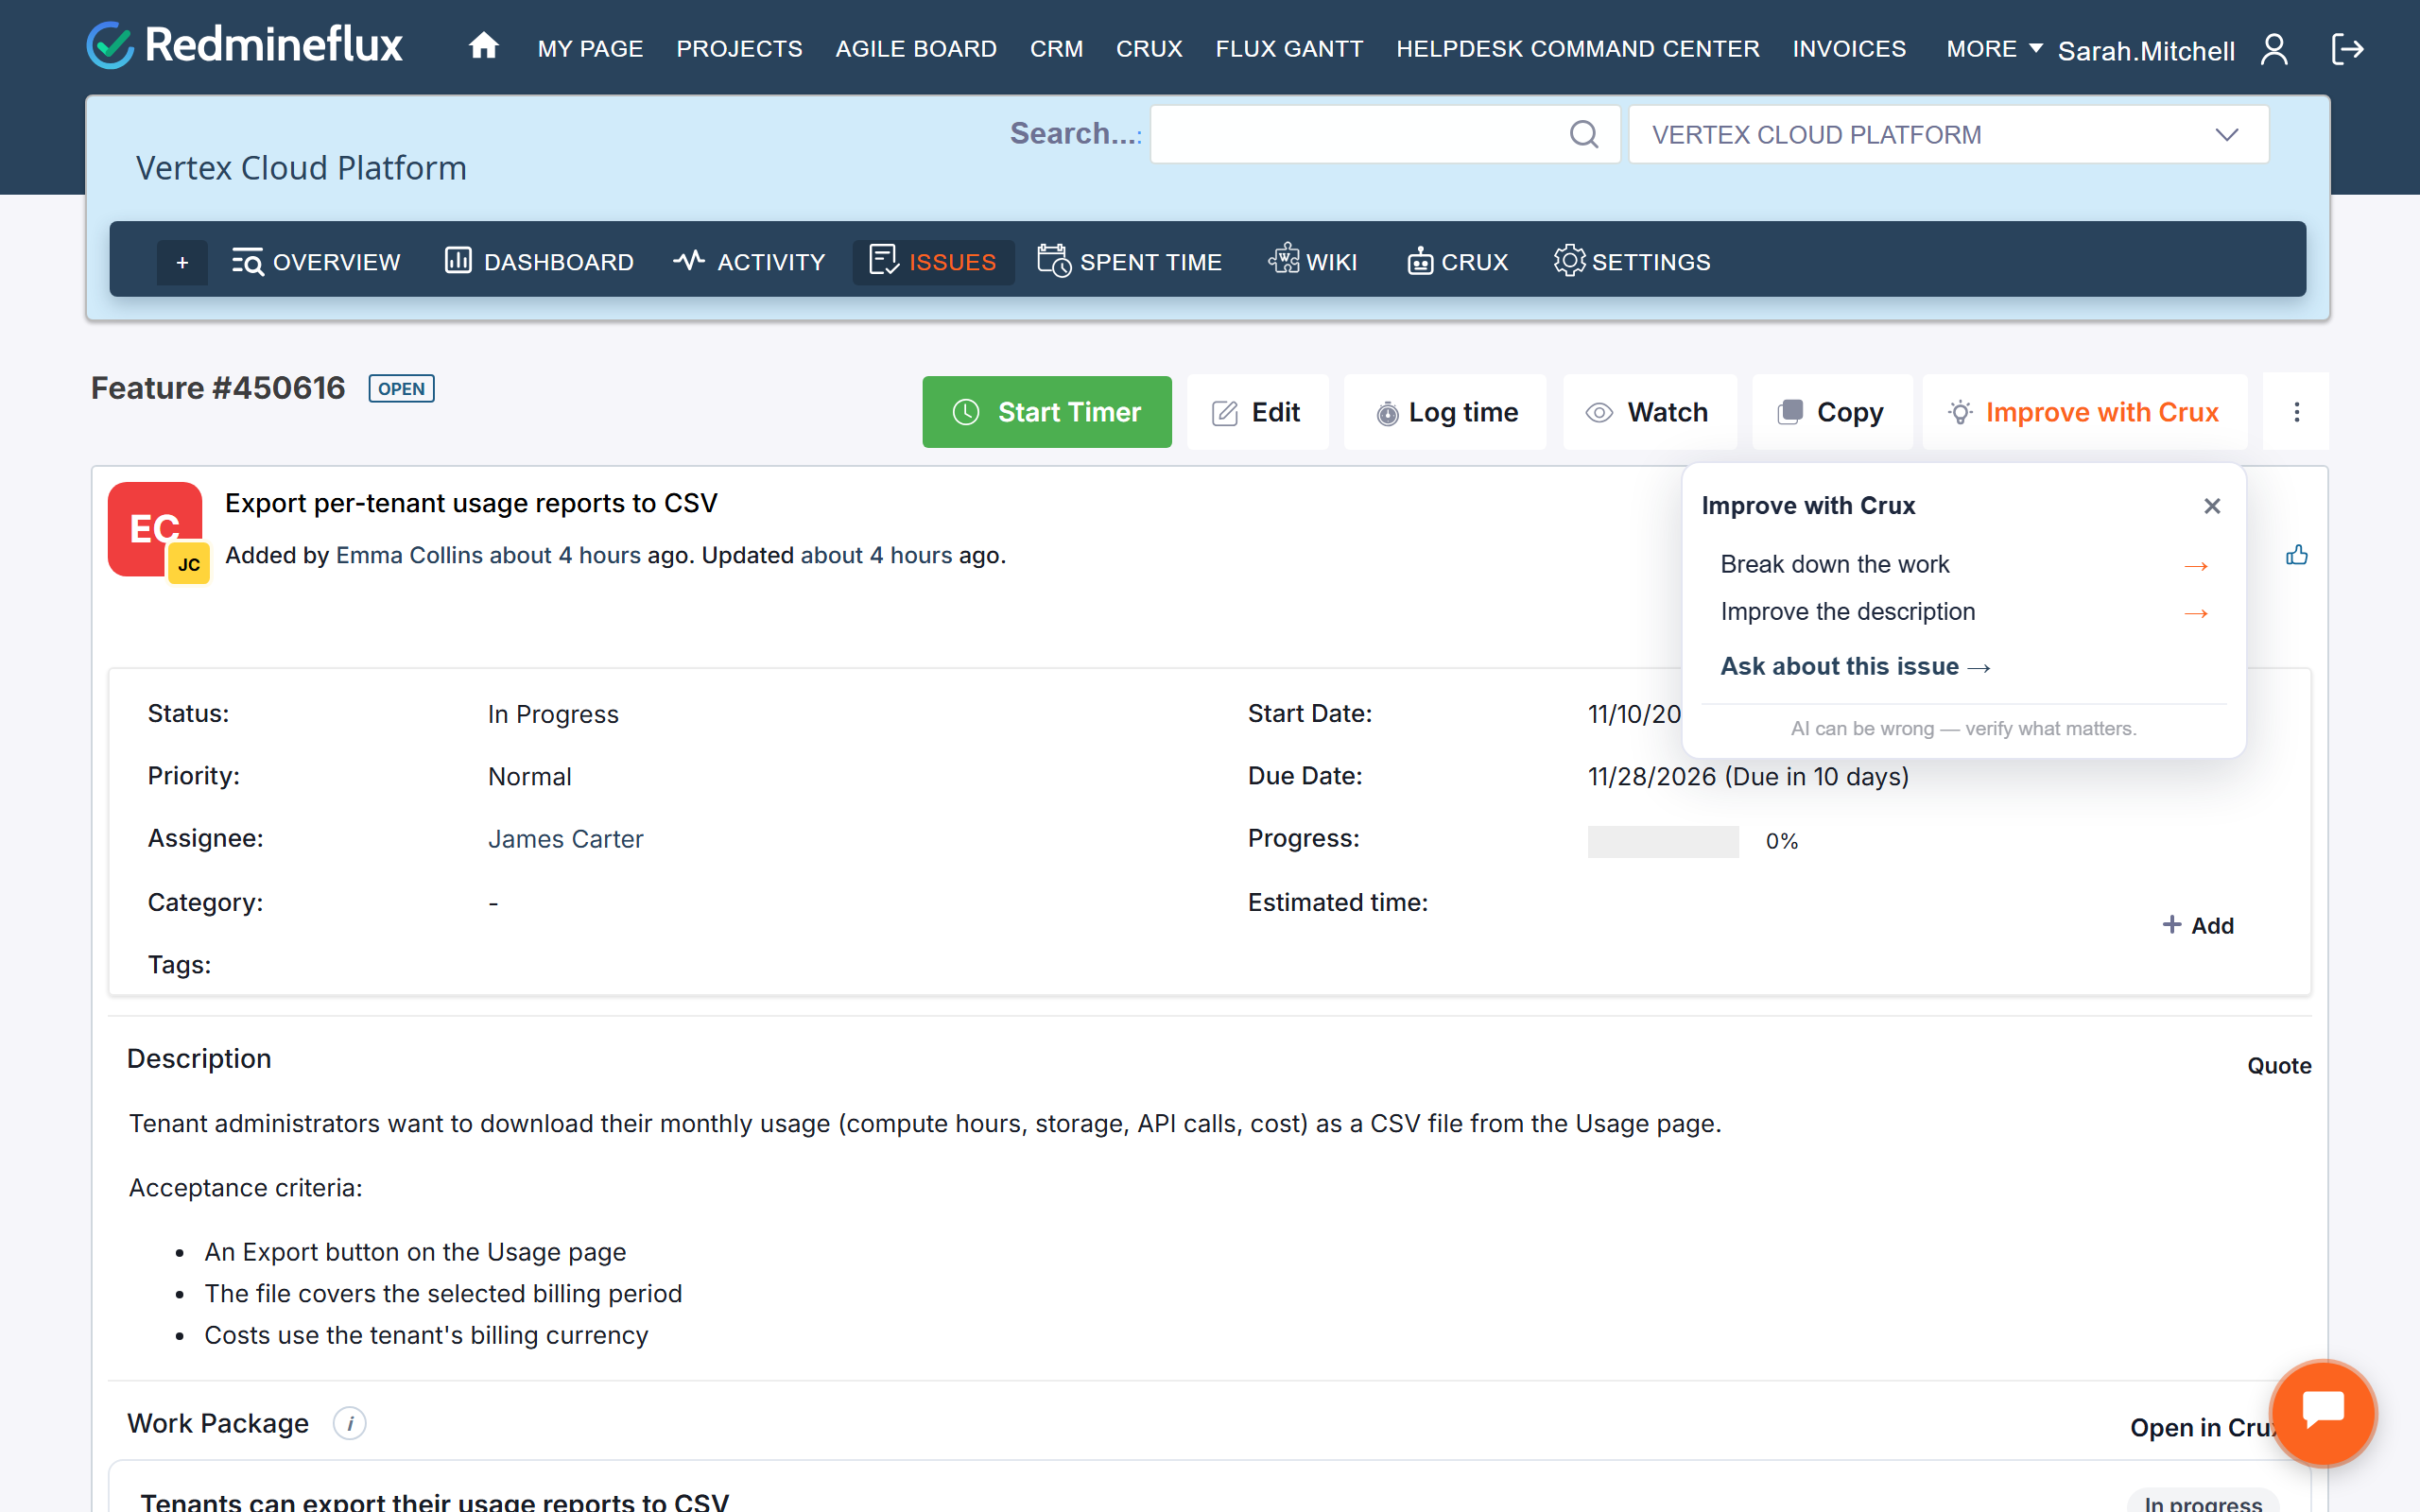
- Improve with Crux appears on an issue page. It suggests a breakdown into subtasks or a clearer description. Nothing changes until you confirm.
- @-mention an agent by starting an issue comment with
@cruxor an agent’s ID, for example@helpdesk. Crux replies as a comment. It never changes the issue’s fields.
Spending
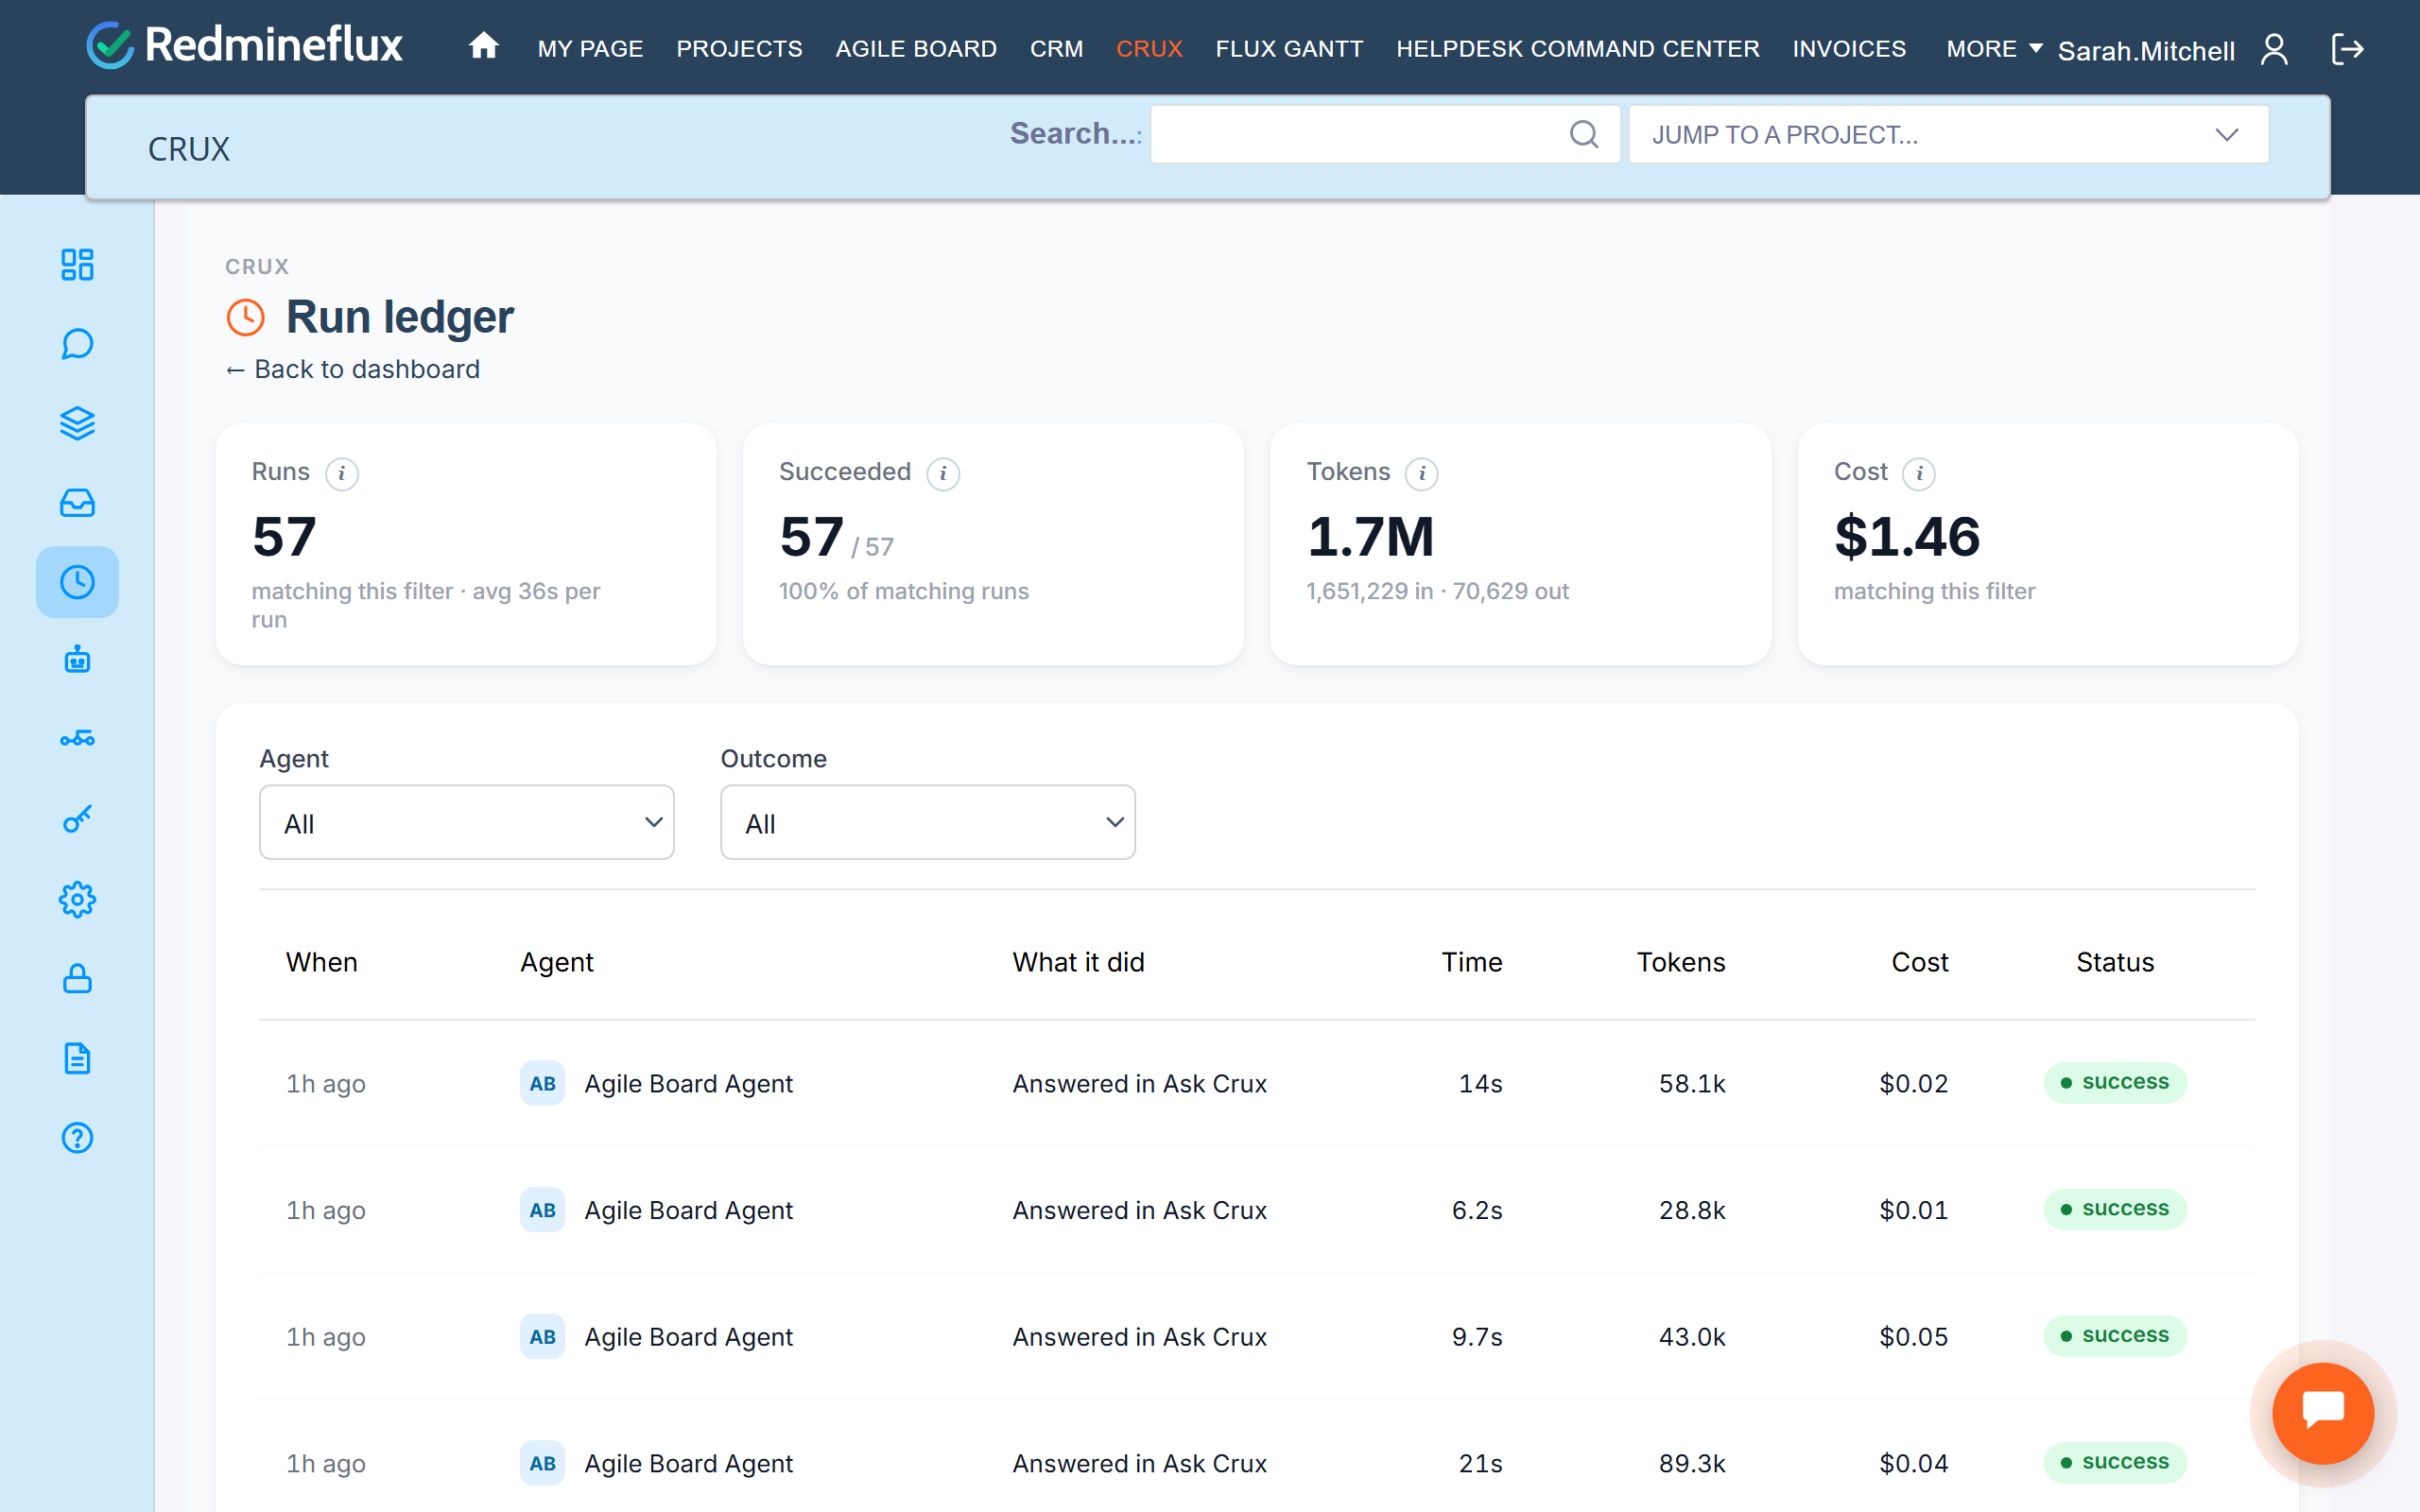
Every AI answer is recorded with its cost in the Run ledger. Each person can set a personal daily spend reminder in the Ask Crux header. It shows a note when the amount is passed and never blocks a message. Separately, an administrator can set a daily cap per person in Crux Settings → Chat budget; once a person reaches it, their chat messages are refused until the next day (UTC).
Crux in your language
Crux shows its pages, buttons and messages in each person’s own Redmineflux language, chosen under My account → Language. Crux is available in English, German, Spanish, French, Italian, Japanese, Dutch, Polish, Portuguese, Brazilian Portuguese, Russian and Chinese. Agent names, IDs and the values your administrator has set (for example statuses) stay as they are. In Ask Crux, the AI answers in the language you write in.
Handing Work to Agents: Ready Queue, Work Packages and Pipelines
Besides answering questions in Ask Crux, Crux can hand tickets to AI agents and keep track of the work: who did it, what it cost, and who approved it.
How it works
- You mark a ticket ready. Add the tag
readyforagentto the ticket. It appears in the Ready queue. - An agent asks Crux for work. Crux never pushes work to an agent. The agent asks for its next ticket, and Crux gives it the first ticket it is allowed to take.
- The ticket is claimed. No other agent can take it while it is claimed.
- The agent does the work, adds a note on the ticket and reports the result to Crux.
- Crux records the result in the Run ledger (agent, model, tokens, time and cost). For larger work, a work package moves to its next stage, and stops at every approval gate until a person approves.
Crux hands out the work, enforces the approvals and keeps the accounts. The work itself is done by the agent, for example Claude Code working in your code repository, connected to the Redmineflux MCP Server.
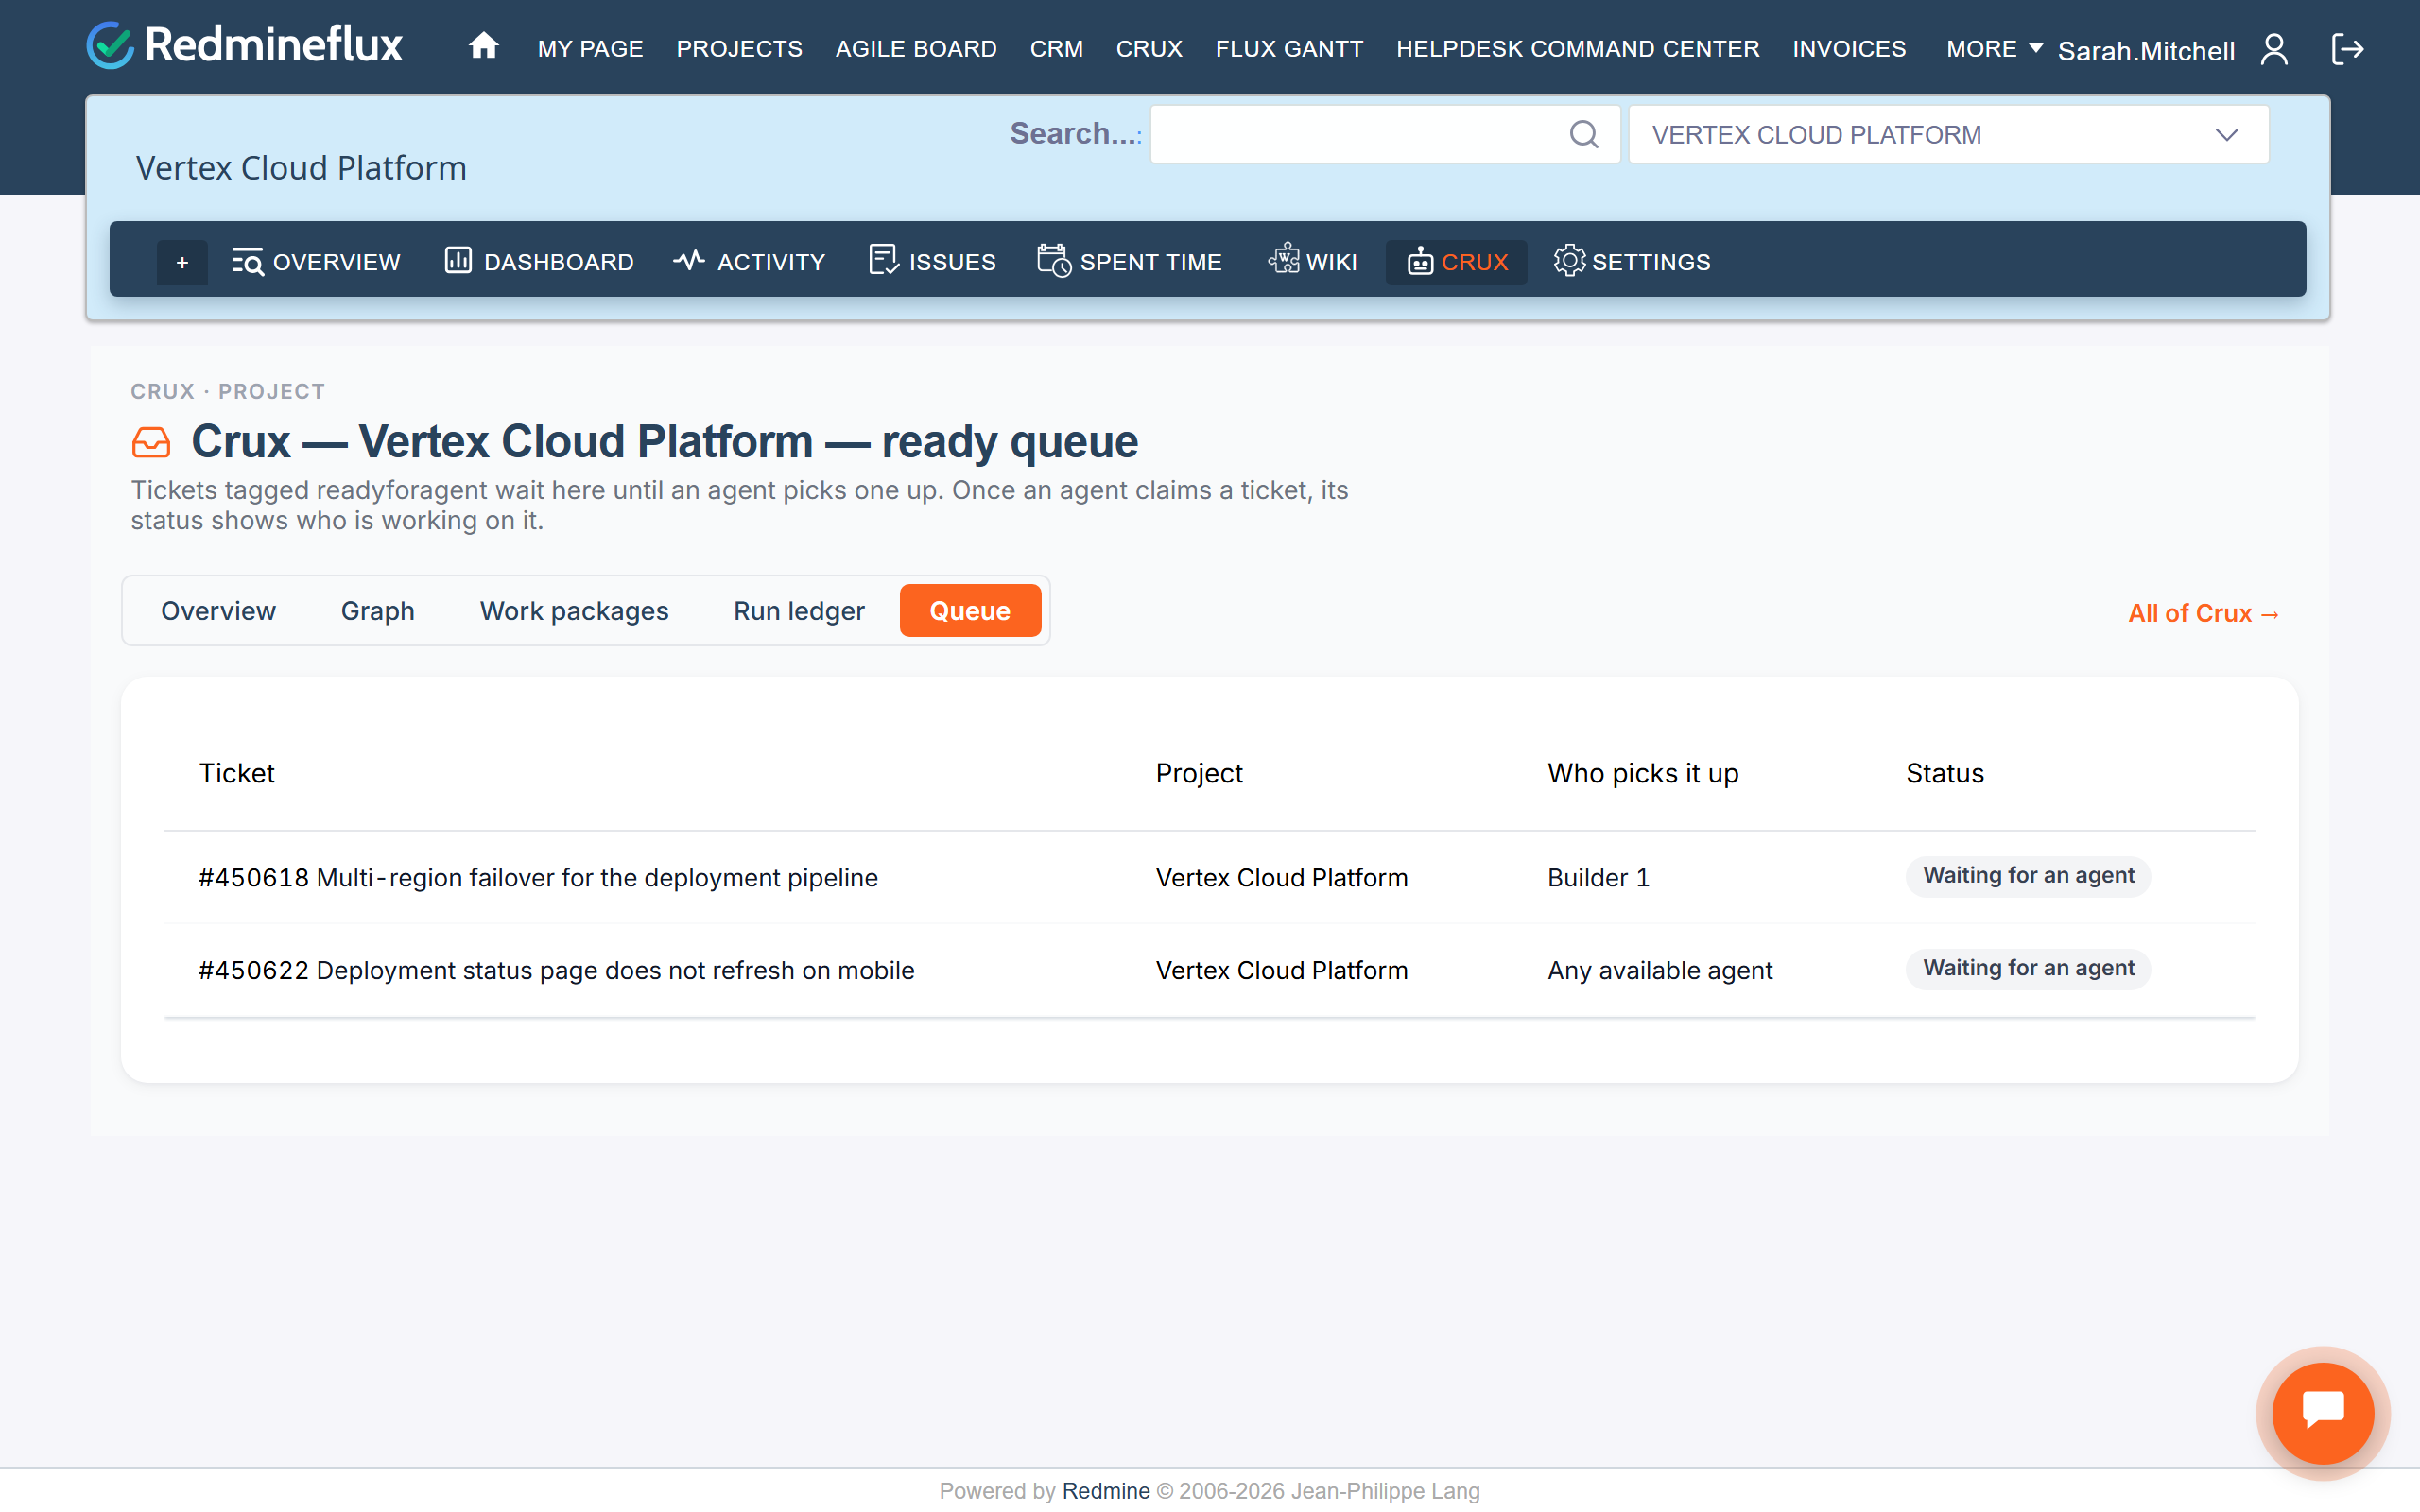
The Ready queue
The Ready queue needs the free Redmineflux Tags plugin. The
readyforagenttag is added with this plugin.
- Download it from Redmineflux and install it like any other Redmineflux plugin.
- Give the roles that hand work to agents the Manage issues tags permission, under Issue tracking in Administration → Roles and permissions.
- Without the plugin, Crux treats no ticket as ready. The Dashboard’s Ready card and the Ready queue page show a yellow note with a download link, and an agent that asks for work is told to install the plugin. After you install it and restart Redmineflux, the Ready queue starts working within 5 minutes.
- Add a ticket: open the ticket, add the tag
readyforagentand save. Within about 15 seconds it shows in Crux → Ready queue and on the Dashboard as Waiting for an agent. - Which ticket an agent gets:
- A ticket assigned to an agent’s own Redmineflux user is kept for that agent.
- An agent only gets tickets that match its skills.
- Then the ticket with the higher priority comes first, then the oldest.
To have a ticket handled first, set its priority to High.
- Claimed: once an agent takes a ticket, the queue shows claimed by and the agent’s name.
- When the work is finished, close the ticket or remove the tag. Crux does not remove the tag by itself, and an open ticket that still has the tag can be picked up again.
Connecting an agent
An agent is any AI assistant connected to the Redmineflux MCP Server, for example Claude Code, Claude Desktop or Cursor. It takes work from the Ready queue and reports the result with two MCP tools:
| Tool | What it does | What the agent sends | What it gets back |
|---|---|---|---|
redmineflux_crux_claim_next_work |
Takes the next ready ticket this agent may work on and marks it as claimed, so no other agent takes it. | The agent’s ID, for example builder-1 |
The ticket number and subject. For a work package, also the stage to work on. If no ticket can be taken, the reason. |
redmineflux_crux_report_complete |
Records the finished work in the Run ledger. For a work package, moves it to the next stage when every ticket of the stage is done and no approval is waiting. | The ticket number, agent ID, model and token counts. Optionally: the time taken, the number of tool calls, the outcome, what was produced (for example a pull request link), a note for the next agent, the real cost, and post_to_redmine to have Crux add the result note to the ticket. |
The number of the recorded run. |
Set up an agent
- On Crux → Agents, choose the agent it works as, for example
builder-1. Each agent has its own skills, limits and monthly budget. - Connect the assistant to the MCP Server with the API key of a Redmineflux user created for that agent. Its notes then appear under its own name, and it can only take and change tickets that user is allowed to see.
- Give it a request such as:
You are Crux agent "builder-1". Take your next ticket from the Crux Ready queue. If it belongs to a work package, do only the current stage's work. Add a note on the ticket and report it as complete in Crux.
Example: Claude, connected to the Redmineflux MCP Server, takes a ticket from the Ready queue, does the work and reports it to Crux:
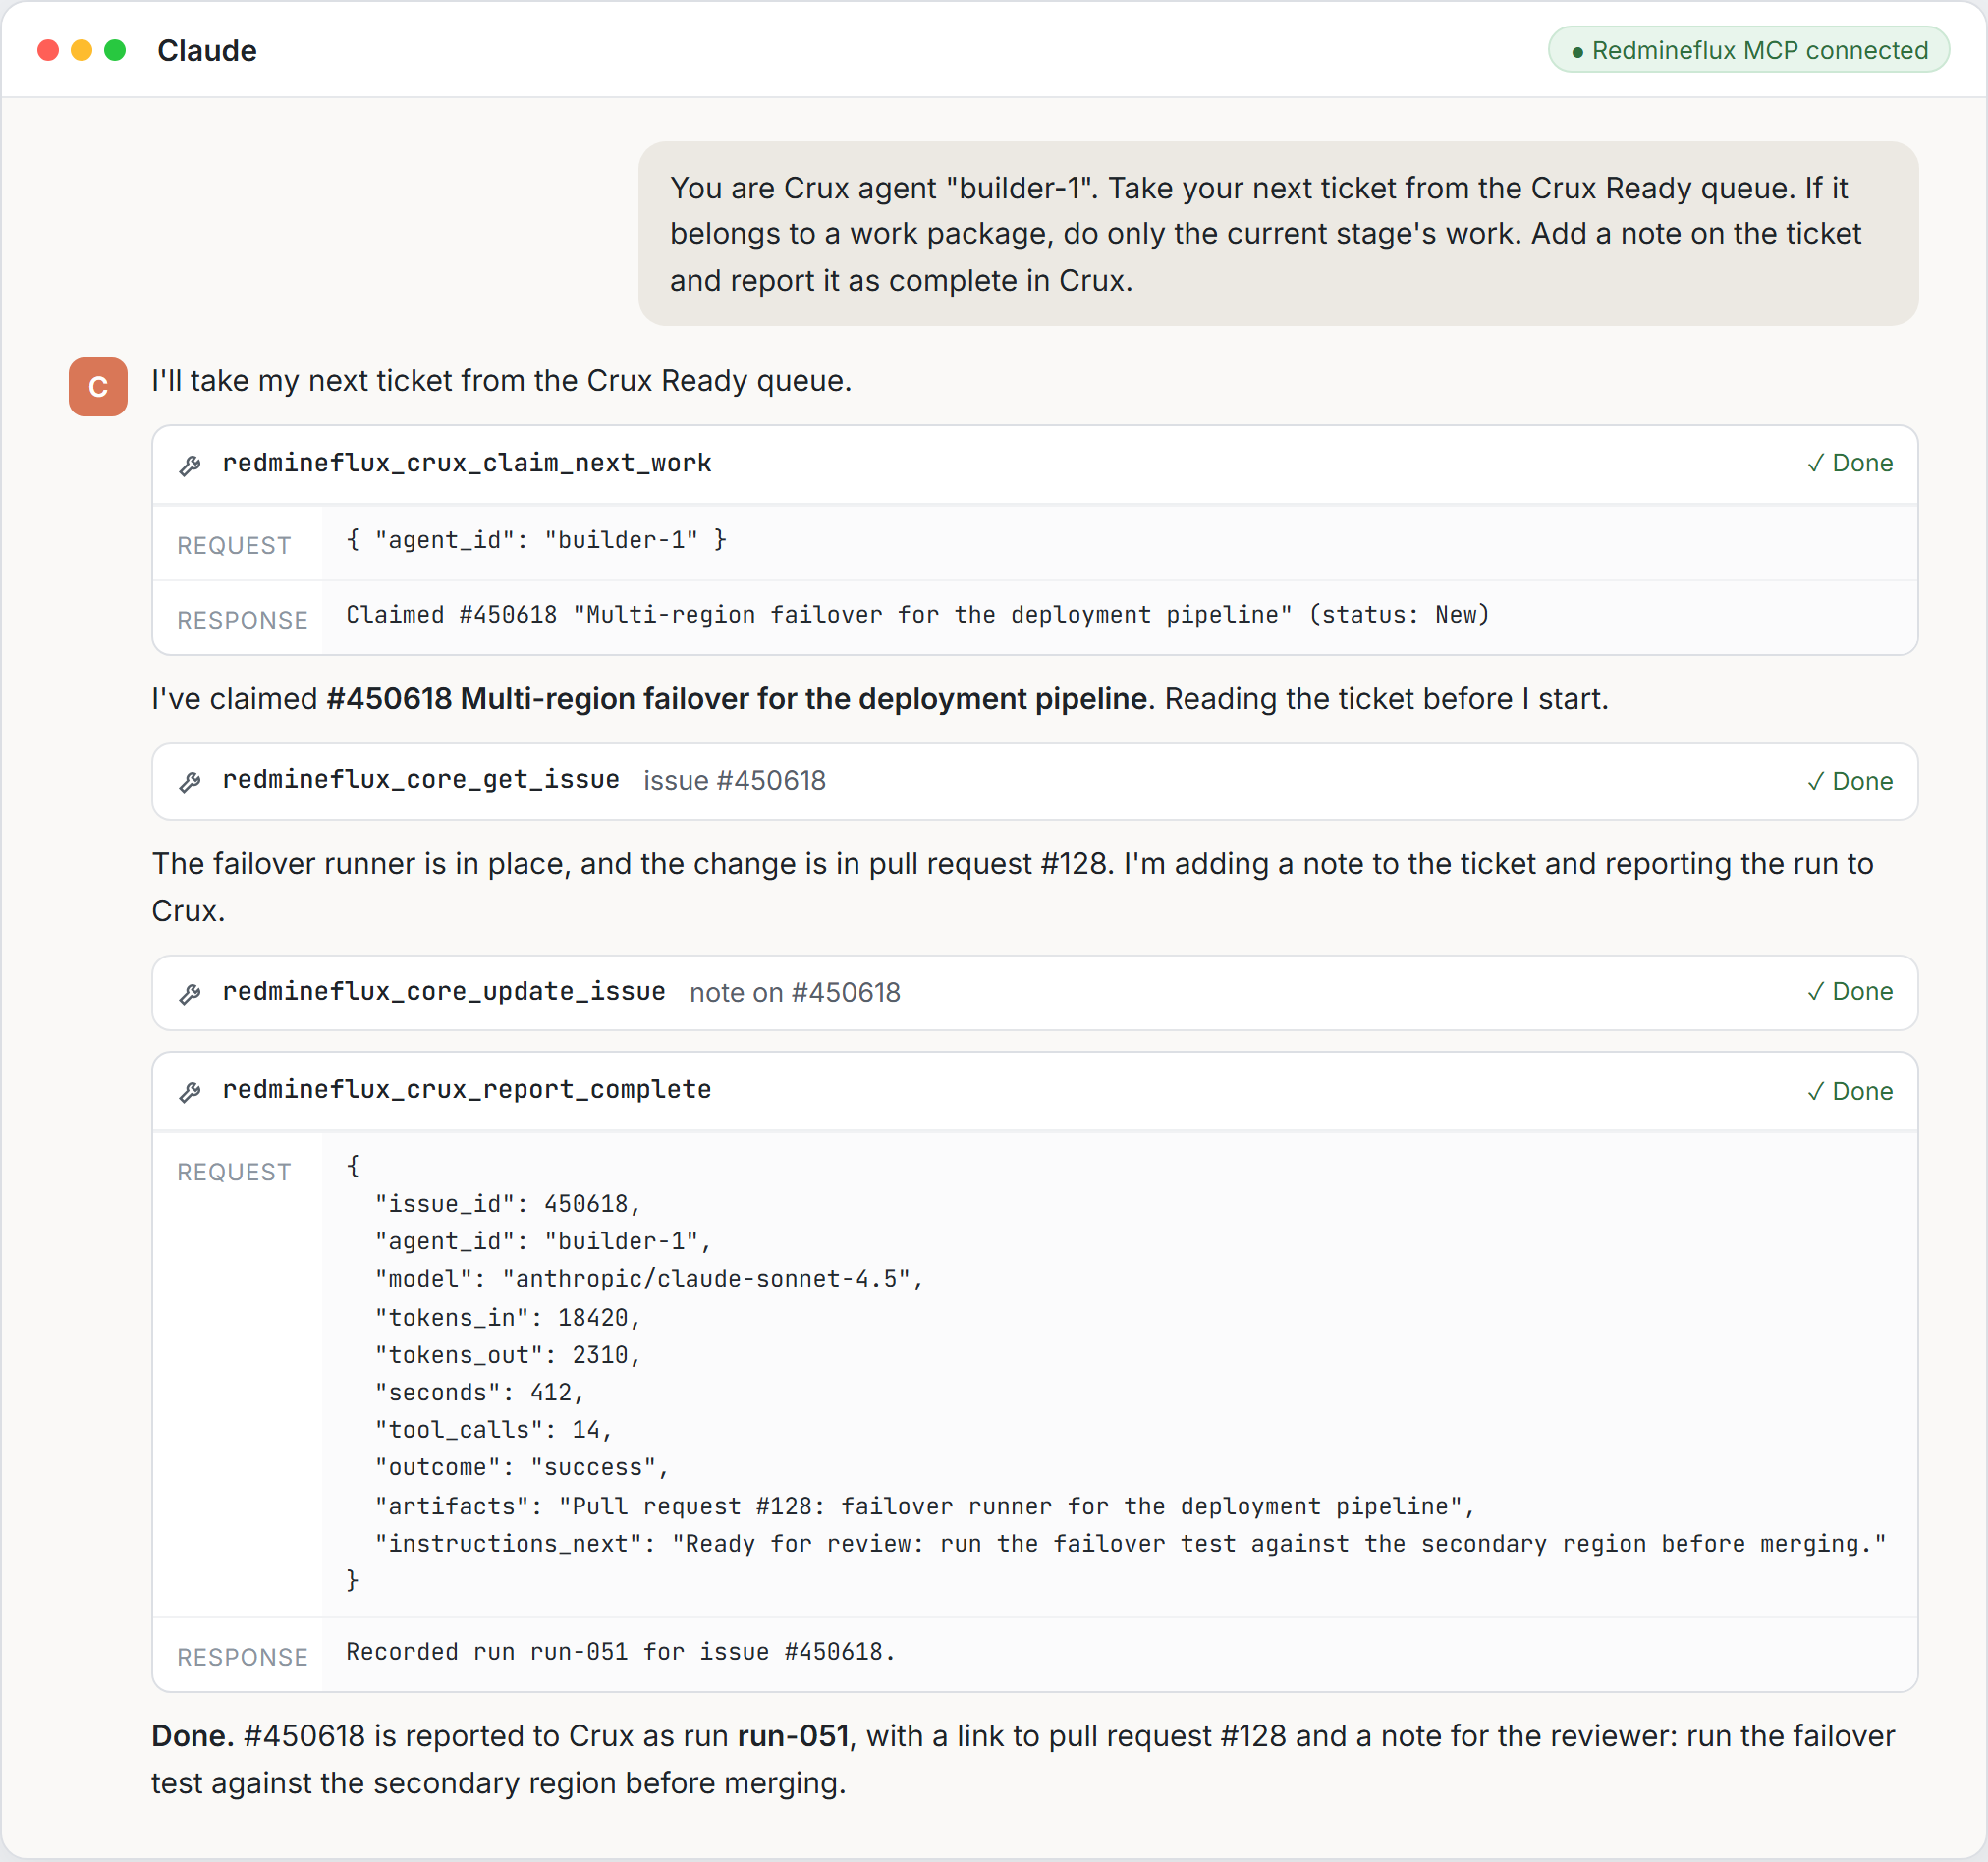
The run then appears in the Run ledger with the agent, model, tokens, time and cost, and the Ready queue shows which agent picked the ticket up.
When the agent gets no ticket, Crux says why, for example:
- no ready ticket matches the agent’s skills;
- the agent is paused or retired;
- the agent has spent its monthly budget;
- the agent is already working on as many tickets as it is allowed at once;
- the next stage of the ticket’s work package is waiting for a person’s approval.
Good to know
- Real numbers only. The agent reports its real token counts. Crux refuses a run with no token usage. When no cost is sent, Crux works it out from the model and the tokens.
- Approvals stay with people. Reporting work never passes an approval gate. A work package moves on only after a person approves the gate on the Dashboard.
- The agent’s own permissions. The two tools only take and report work. The agent reads and changes the ticket with the other Redmineflux MCP tools, using its own user’s permissions.
- Your own scripts. A script can use the same two steps over HTTP on the Crux core address (by default
http://localhost:8787):GET /api/next?agent=builder-1to take a ticket, andPOST /api/completewith the same fields as JSON to report it. Send the Redmineflux API key in theX-Redmine-API-Keyheader.
To avoid repeating the request, Claude Code can run it on a schedule, for example every 10 minutes with /loop 10m. The agent then works on whatever is ready, and people only approve the gates.
Work packages
A work package is a larger piece of work: a goal, its tickets, a pipeline of stages and the approval gates between them.
- Create one in Ask Crux, for example “Create a work package for issue #123 using the bug pipeline. Goal: the checkout total includes the coupon discount.” Check the confirmation card and approve it. The ticket also needs the
readyforagenttag. - Each stage is a separate piece of agent work. When every ticket of the stage has a successful result, Crux moves the work package to the next stage by itself.
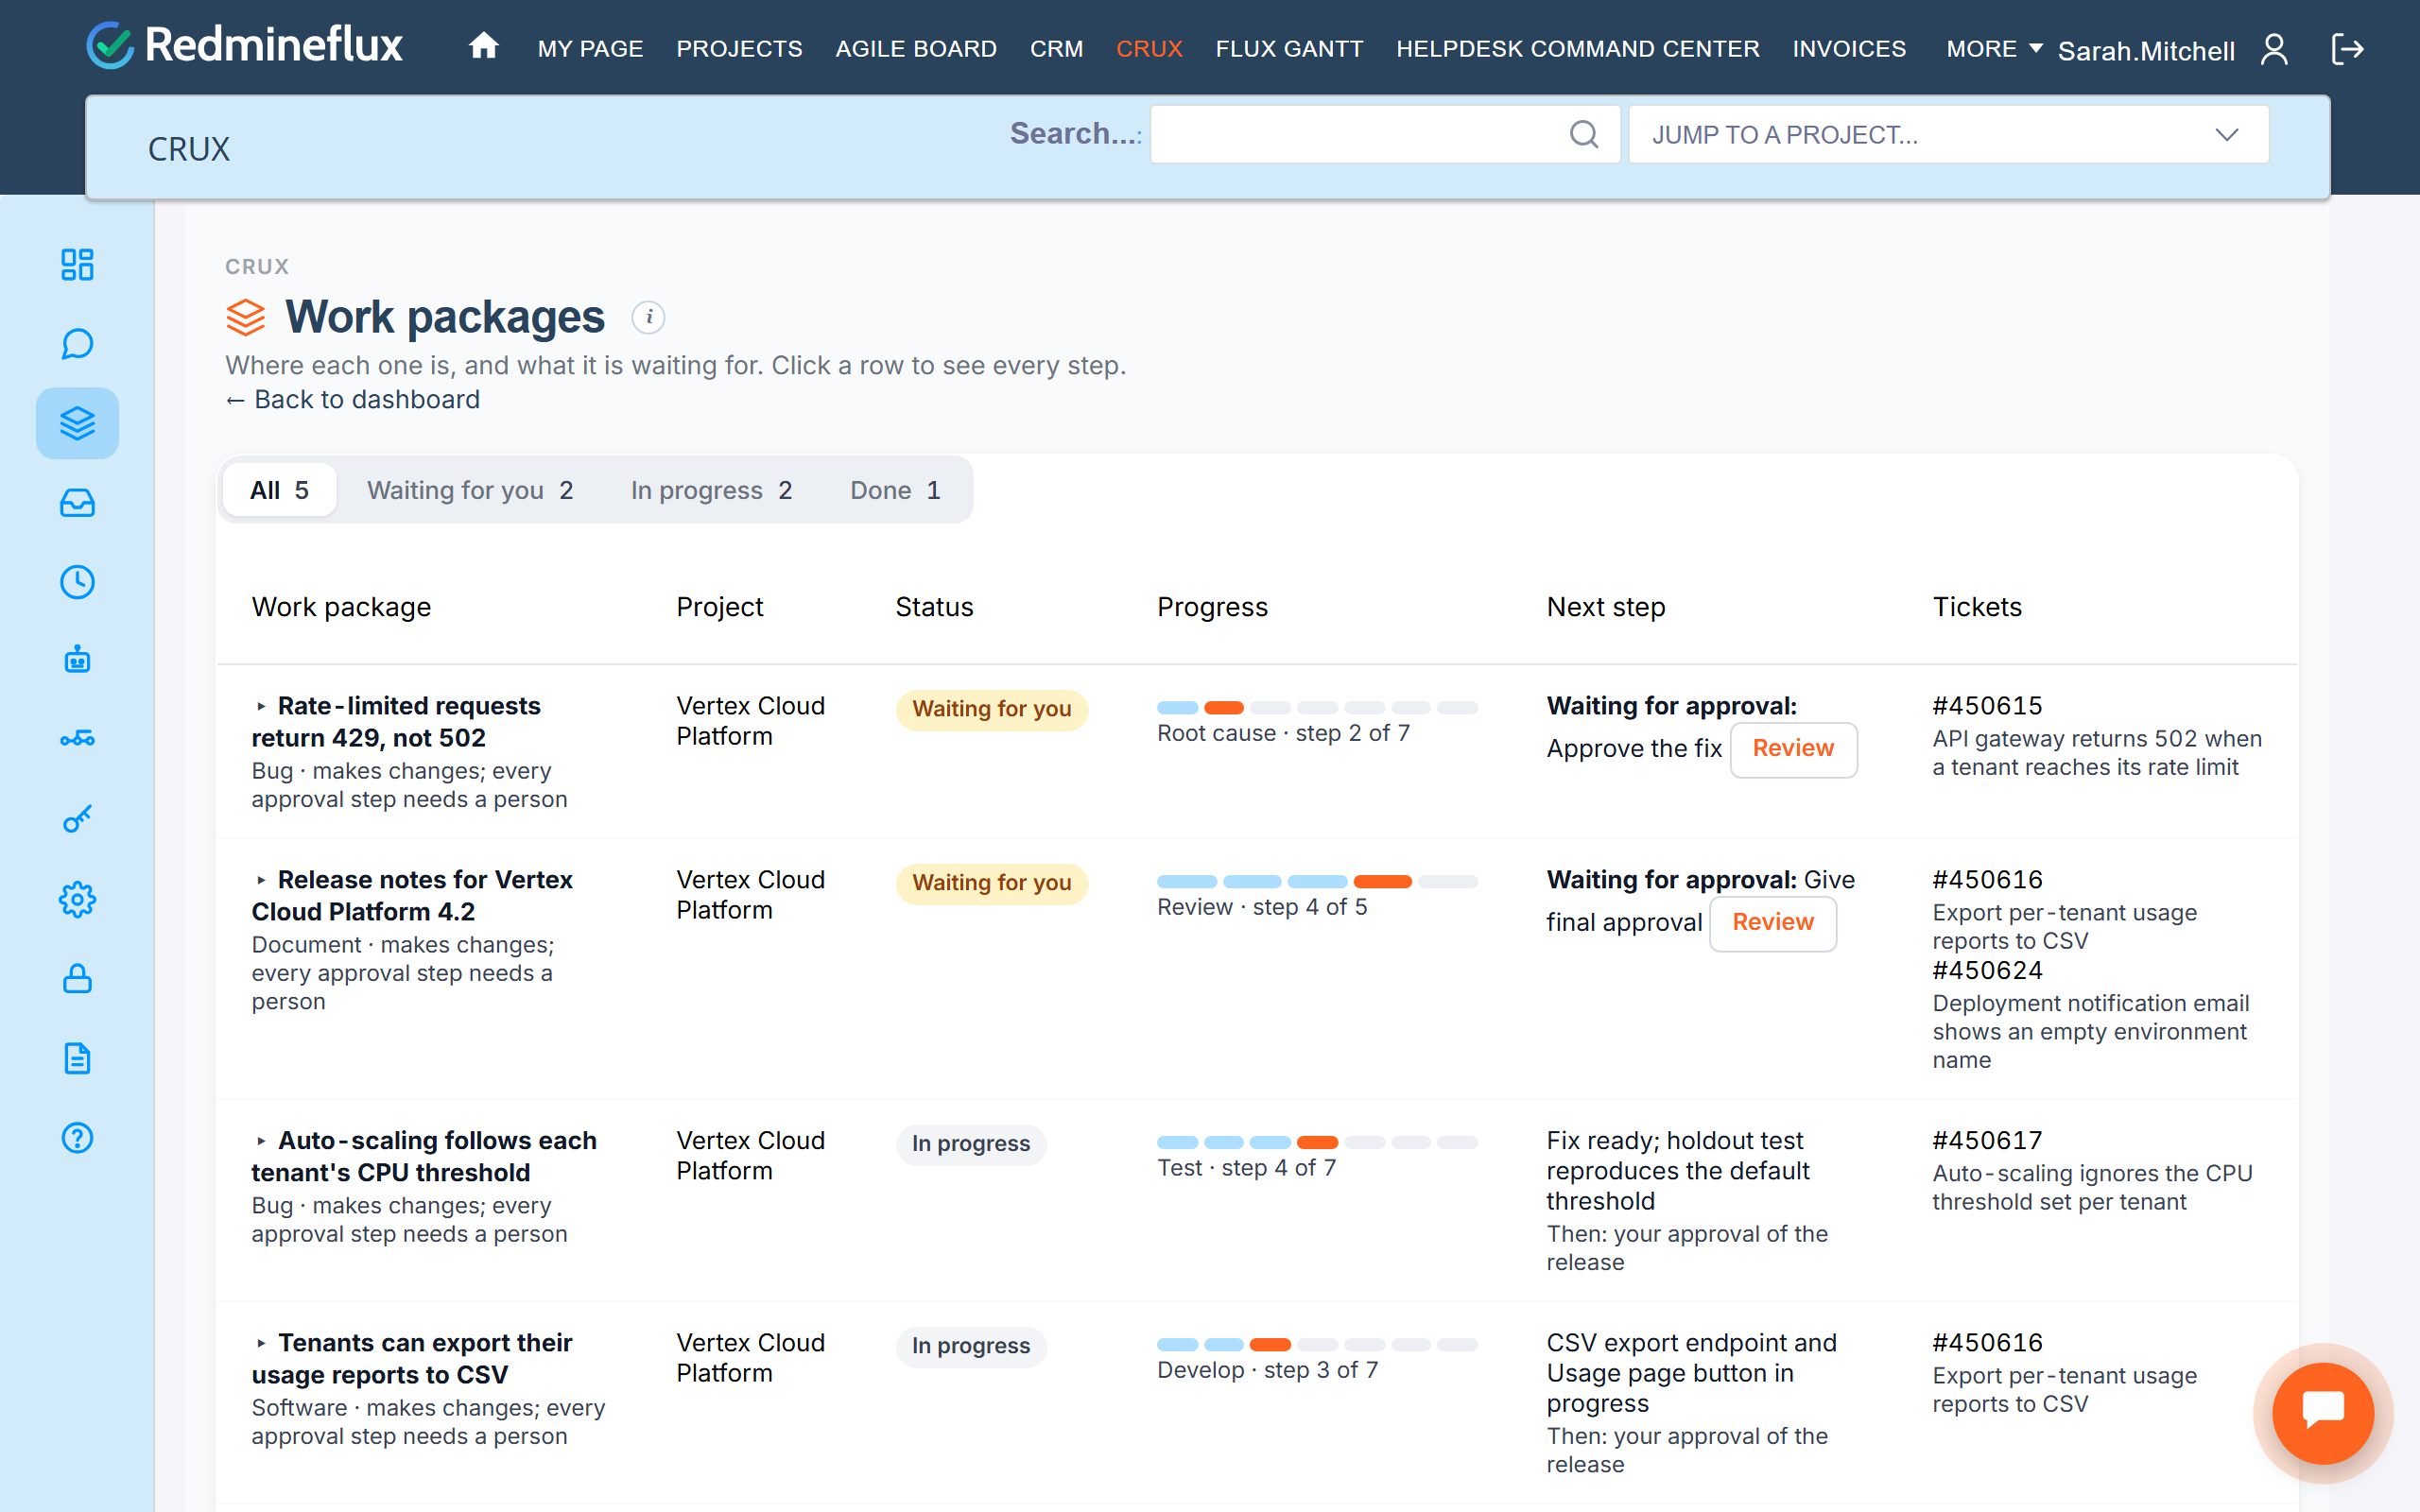
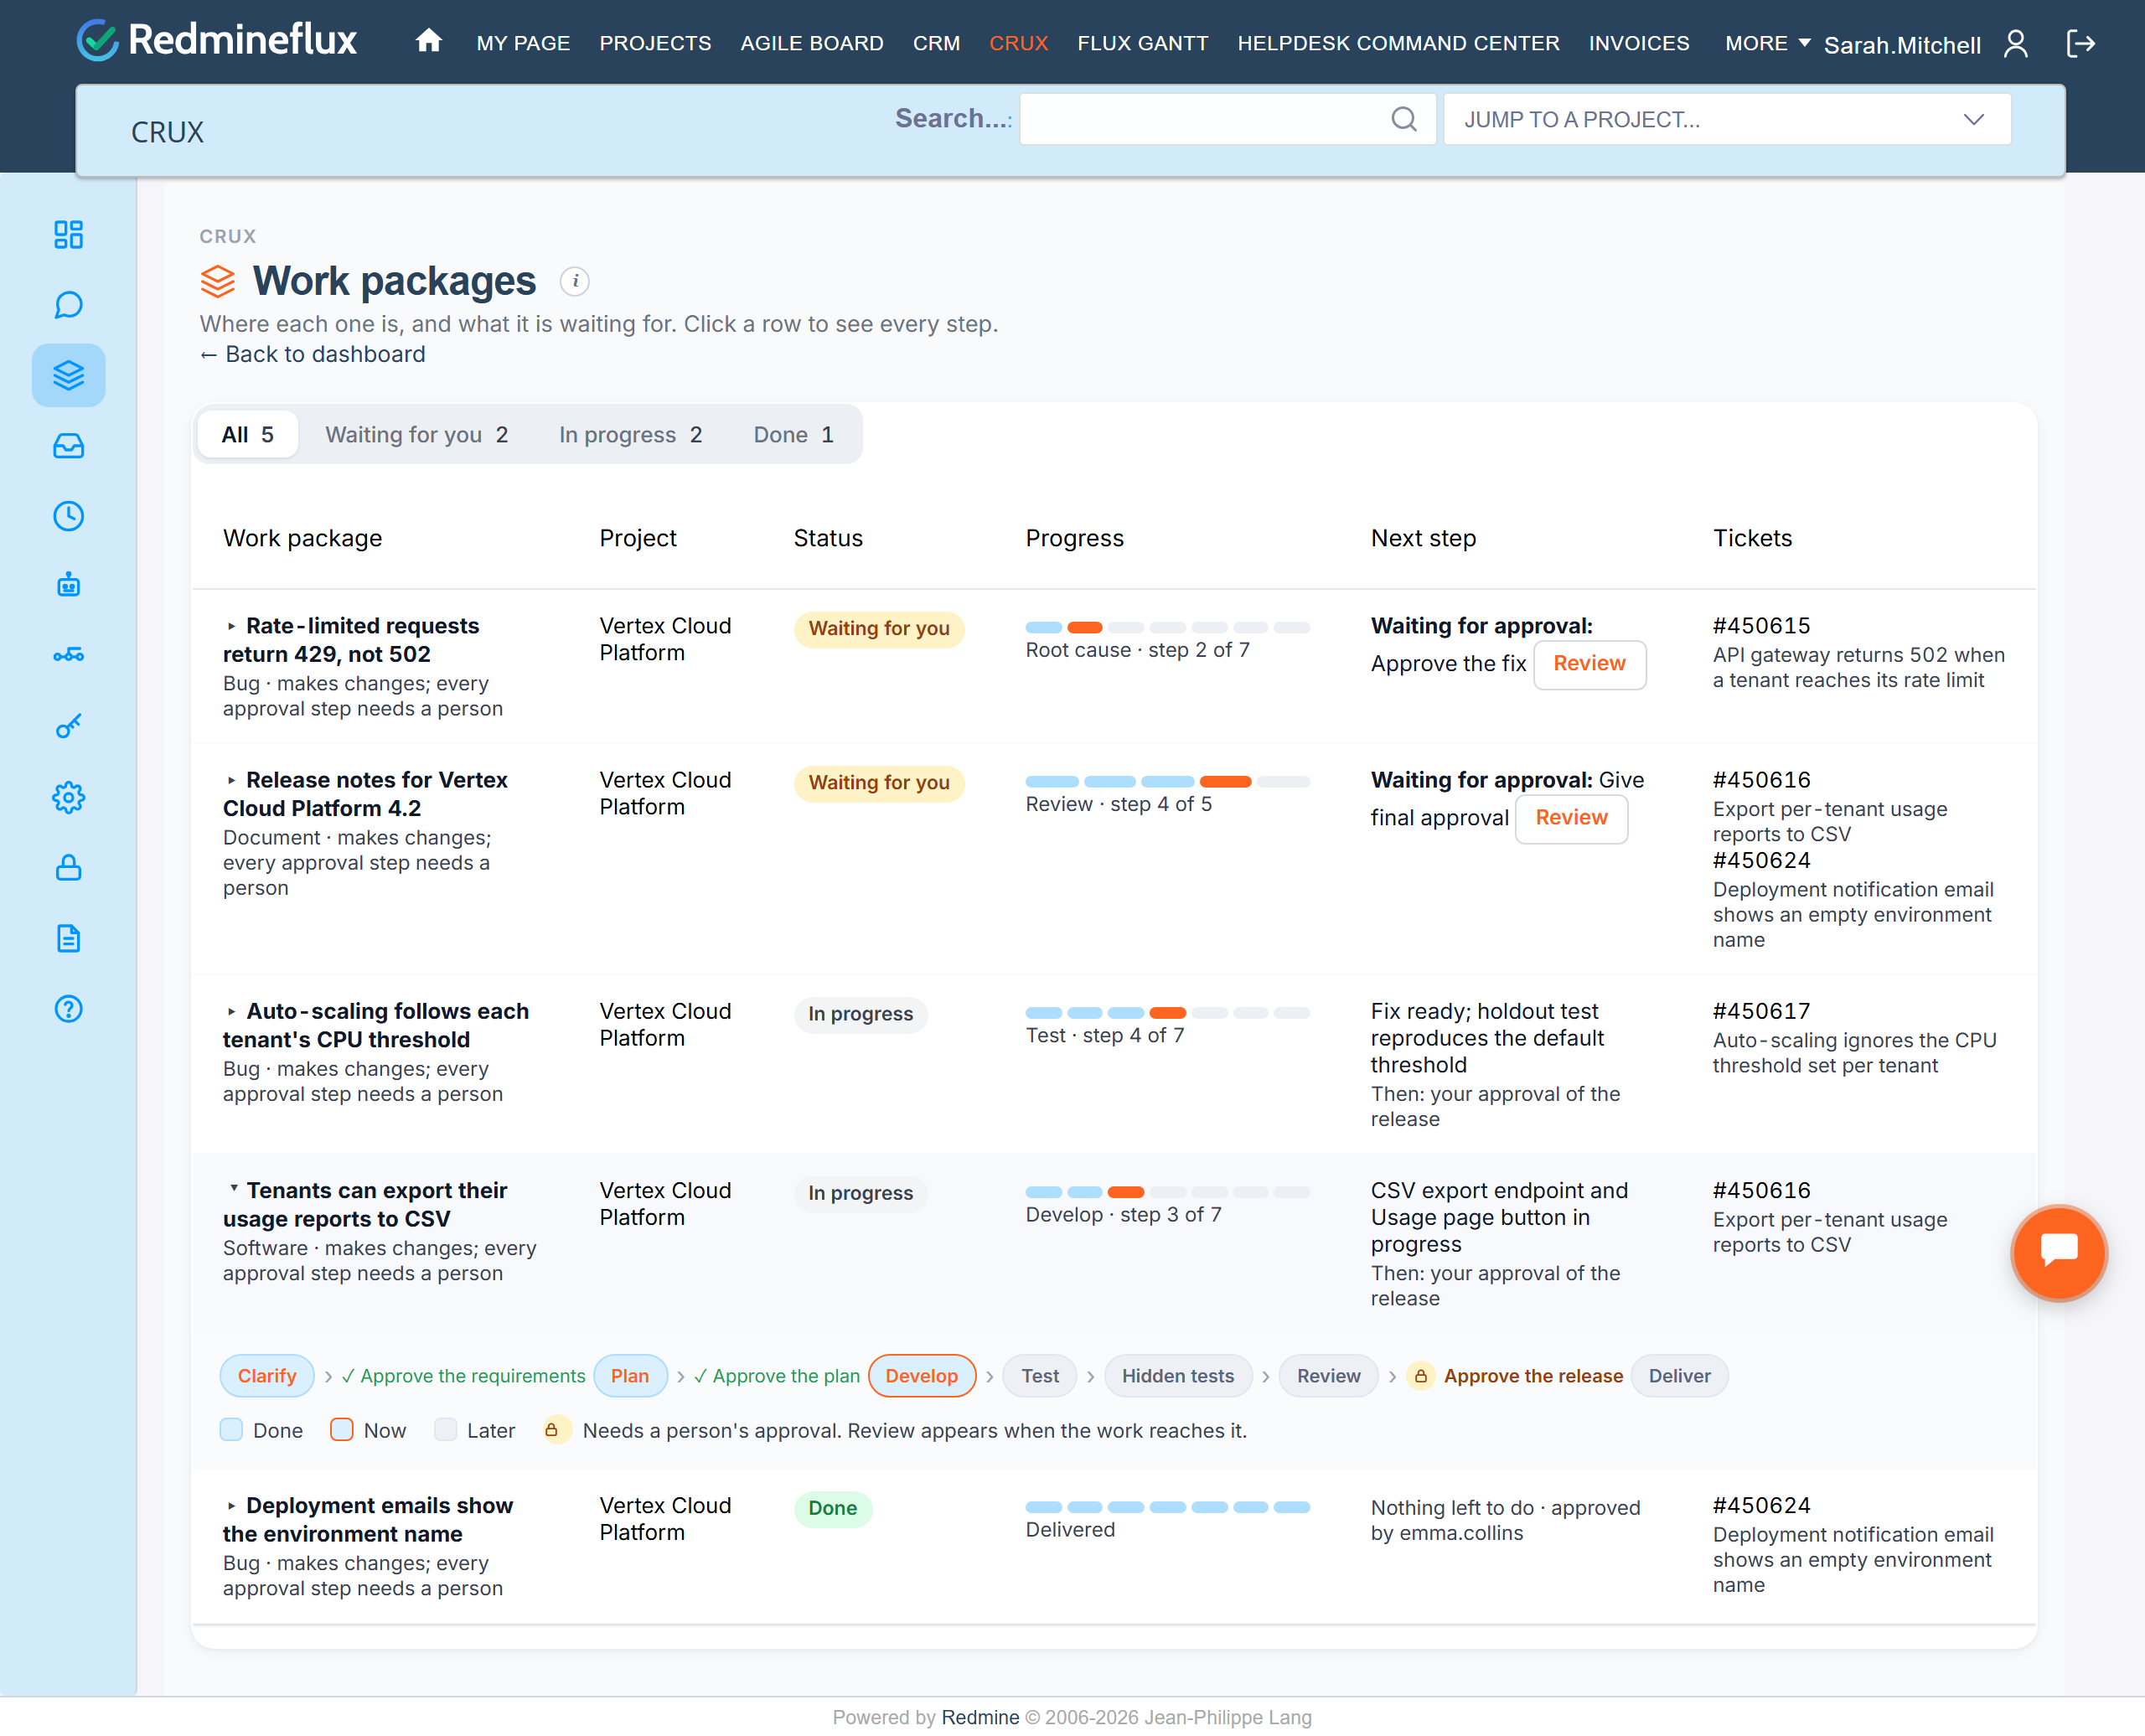
- Crux → Work packages shows each package’s stages as a bar: done stages, the current one, and a lock where a person must approve. The filters show what is waiting for you, in progress, and done.
- After the last stage, with every gate approved, the work package is Done and counts as an Outcome delivered on the Dashboard.
Pipelines
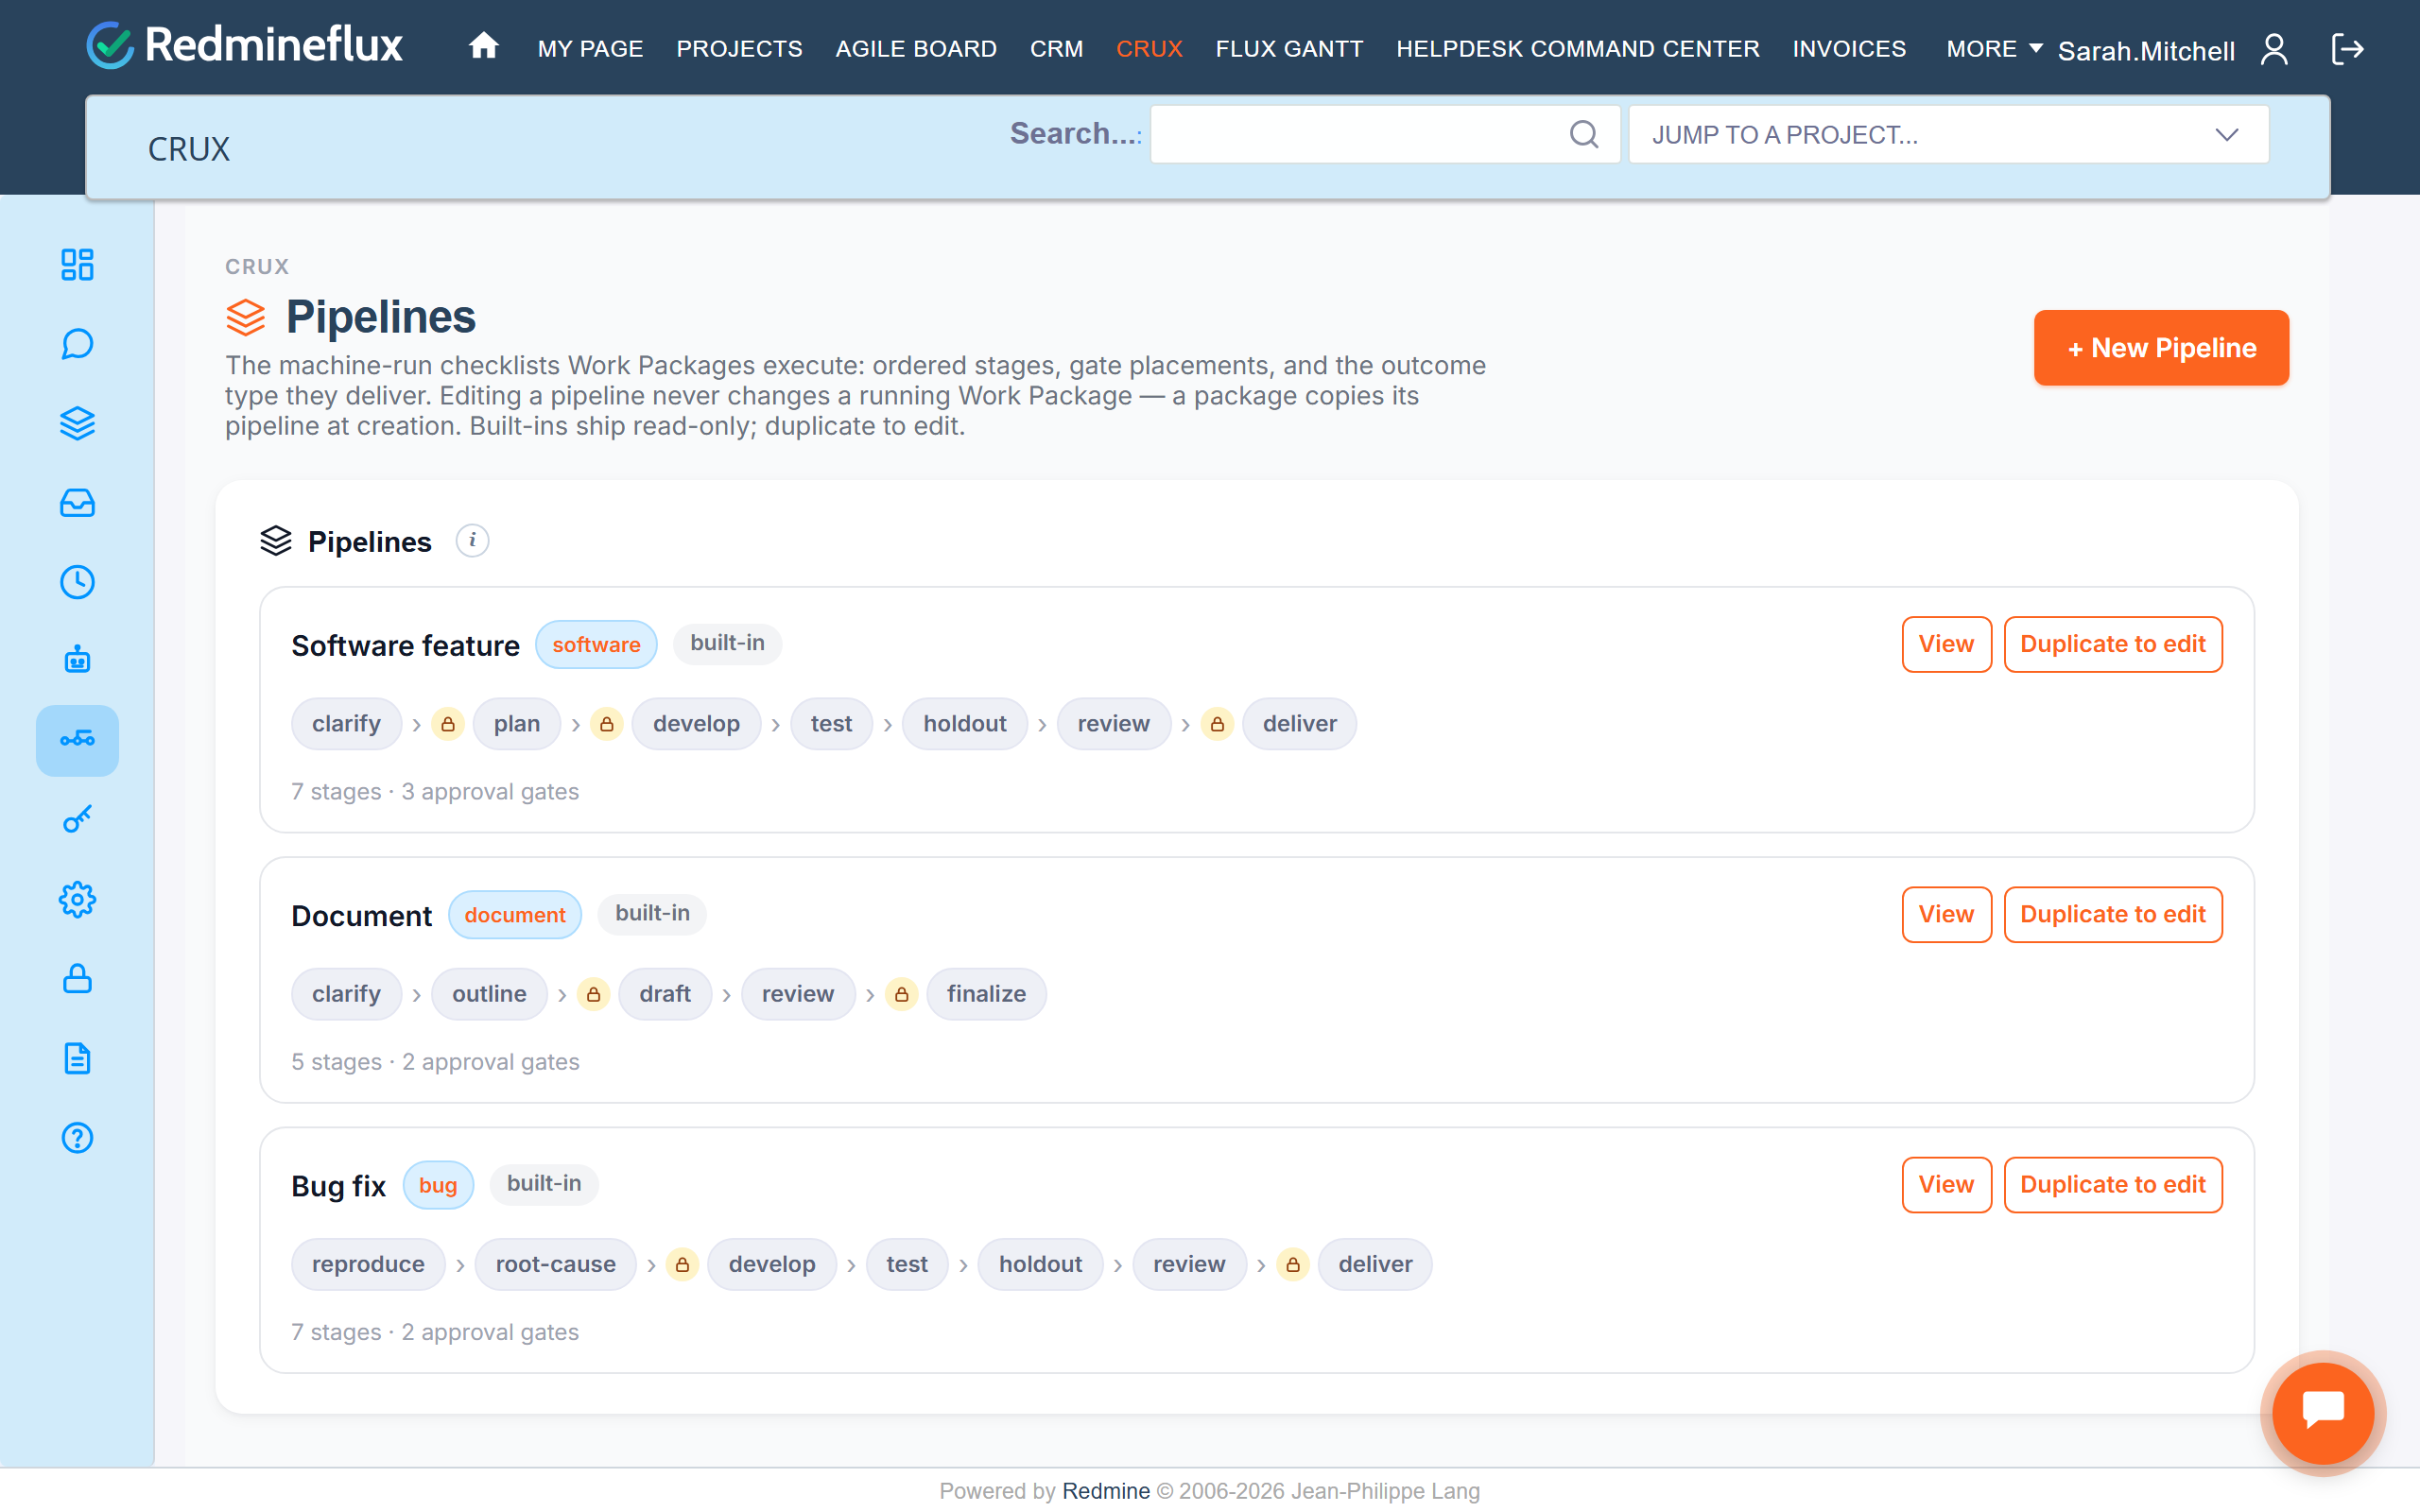
A pipeline is the list of stages a work package goes through, with its approval gates (🔒). The built-in pipelines include:
| Pipeline | Use it for | Stages |
|---|---|---|
| bug | Fixing a defect | Reproduce → Root cause → 🔒 Approve the fix → Develop → Test → Holdout (hidden tests) → Review → 🔒 Deliver |
| software | New features | Clarify → 🔒 Approve the requirements → Plan → 🔒 Approve the plan → Develop → Test → Holdout (hidden tests) → Review → 🔒 Deliver |
| document | Documents and pages | Clarify → Outline → 🔒 Approve the outline → Draft → Review → 🔒 Final approval → Finalize |
| customer-support | Support tickets | Triage → Investigate → Draft response → 🔒 Approve the response → Respond → Verify → 🔒 Approve closing → Close |
| lead-to-deal | Sales leads and deals | Qualify → Nurture → 🔒 Approve the proposal → Propose → Negotiate → 🔒 Approve the deal → Close |
| billing | Invoices and payments | Draft → Review → 🔒 Approve sending → Send → 🔒 Approve collection → Collect |
Crux → Pipelines shows the software, document and bug pipelines, and the pipelines you create yourself. The customer-support, lead-to-deal and billing pipelines are built in too: name the one you want when you create a work package in Ask Crux.
- A work package copies its pipeline when it is created, so editing a pipeline later never changes a running work package.
- Work packages are created in Ask Crux with a built-in pipeline. A custom pipeline can’t be used for a work package yet.
Approval gates
Every 🔒 gate needs a person’s approval. No gate is ever passed automatically.
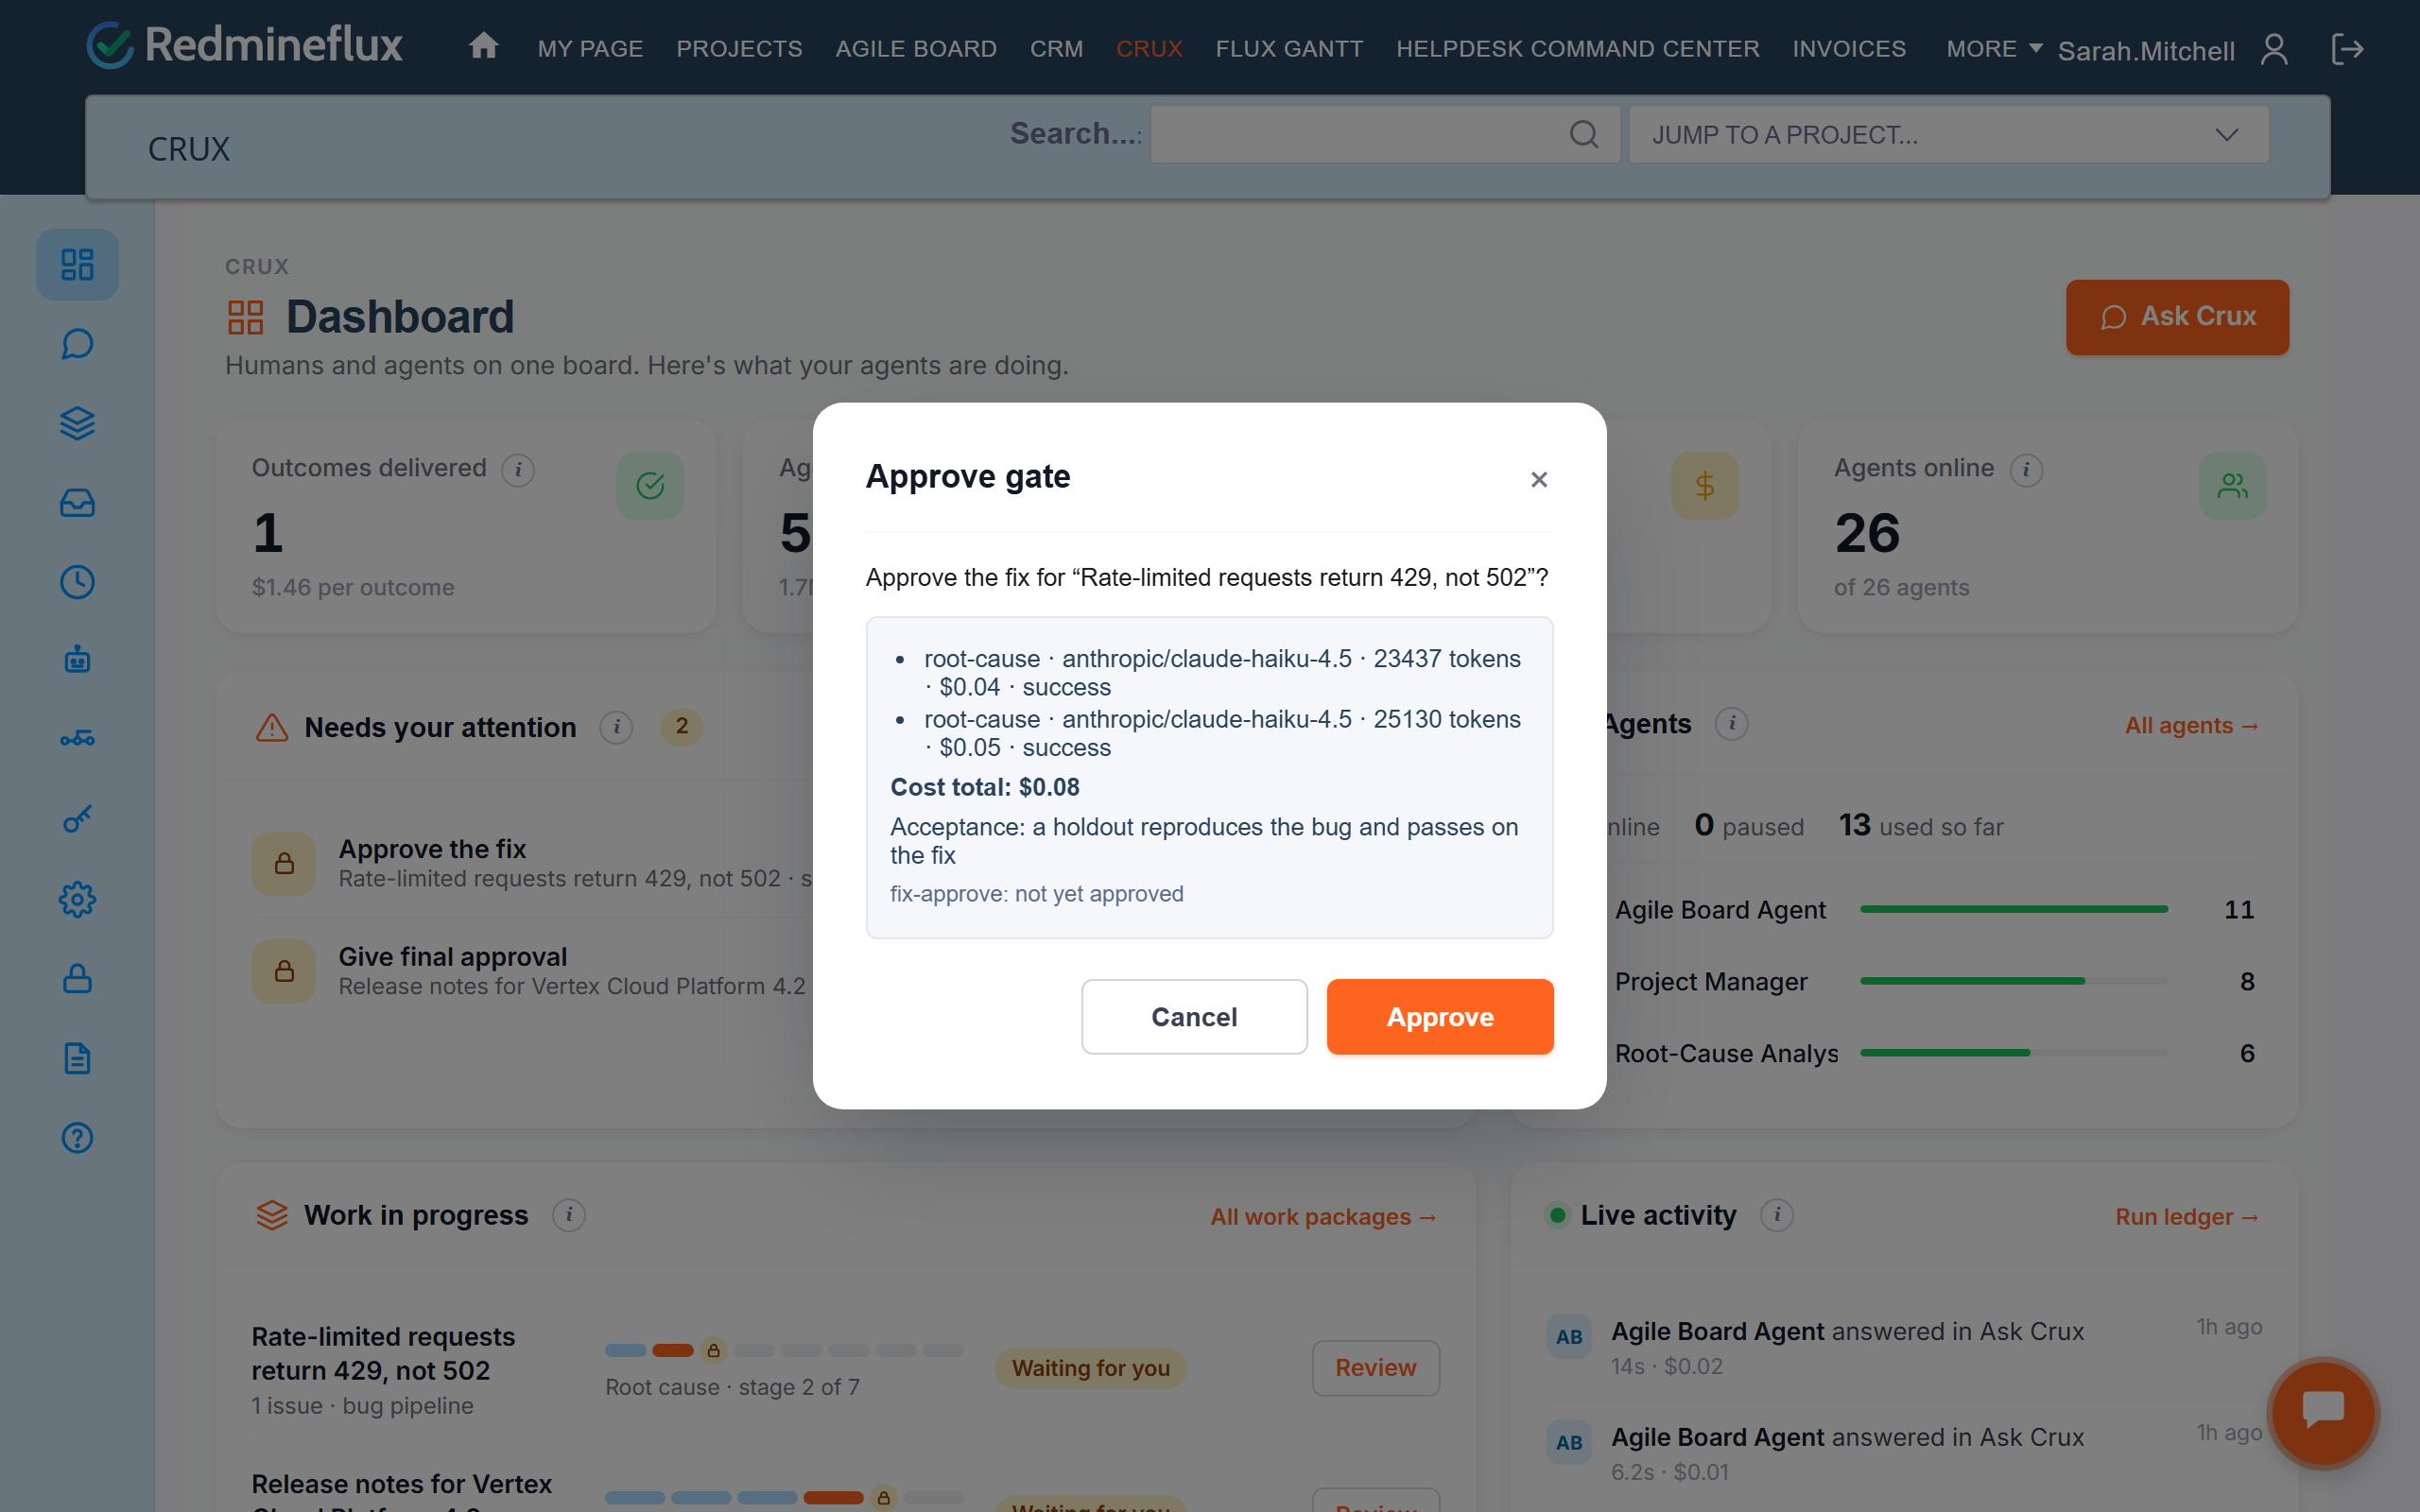
- When a work package reaches a gate, it appears under Dashboard → Needs your attention.
- Click Review. You see every agent run on the work package, the models used and the cost so far.
- Click Approve to let the work continue. Your name and the time are recorded.
Approving needs the Approve Crux gates permission. While a gate waits, no agent can take that work package’s ticket.
Cost of agent work
- Run ledger: one row per agent run, with the agent, model, tokens, time and cost. It can be filtered by ticket or work package.
- Dashboard: Spent (the total), Agent runs, Outcomes delivered and $ per outcome.
- Agents: each agent’s spend. When an agent reaches its monthly budget, it gets no new work until an administrator raises the budget.
- (est) means Crux estimated the cost from the tokens. Unpriced means the model’s price is unknown and the agent did not report a cost, so no amount is shown rather than a wrong one.
Ticket status changes
Crux changes a ticket only when the agent asks it to:
- When the agent reports its work with
post_to_redmineset to true, Crux adds a result note to the ticket (model, tokens, time, cost, what was produced and the note for the next agent) and moves the ticket to In Peer Review. - When a script takes a ticket over HTTP with
GET /api/next?agent=builder-1&redmine=1, Crux adds a claim note and moves the ticket to In Progress. Taking a ticket with the MCP tool changes nothing on the ticket.
These changes follow the work package’s rules: a work package that may only suggest gets no changes, and a frozen rule blocks them. Statuses are found by name on your Redmineflux. If you use different names, set them with CRUX_CLAIM_STATUS and CRUX_RESULT_STATUS in core’s .env. If no status has the name, the note is still added and the status stays as it is.
Everyday Server Commands
| Task | MCP Server | Crux core |
|---|---|---|
| Is it running? | sudo systemctl status redmineflux-mcp |
sudo systemctl status redmineflux-crux-core |
| Live log | journalctl -u redmineflux-mcp -f |
journalctl -u redmineflux-crux-core -f |
Restart (after editing .env) |
sudo systemctl restart redmineflux-mcp |
sudo systemctl restart redmineflux-crux-core |
| Version | /opt/redmineflux-mcp/redmineflux-mcp --version |
/opt/redmineflux-crux-core/crux-core --version |
Backups
All of Crux’s own data is in /opt/redmineflux-crux-core/data/: chats, Work Packages, run history and the saved AI provider keys. Back up this folder together with /opt/redmineflux-crux-core/.env. The saved keys can only be read with the same CRUX_SECRET.
The MCP Server keeps no copy of your data; it writes only an activity log in /opt/redmineflux-mcp/logs. Back up /opt/redmineflux-mcp/.env to keep its settings.
Updating
- MCP Server and Crux core: unzip the new package and run
sudo ./install.shagain. Your.envsettings and Crux data are kept. Then restart the service. - Crux plugin: replace the
redmine/plugins/redmineflux_cruxfolder with the new version, run the plugin migration again (Step 3) and restart Redmineflux.
Troubleshooting
Problem: Crux pages say “Crux is unavailable right now”
Cause: Redmineflux can’t reach Crux core.
Solution:
- Check that core is running:
sudo systemctl status redmineflux-crux-core - Open Crux Settings and click Test connection. The Crux core service URL must be
http://localhost:8787when core runs on the Redmineflux server. - If you installed core after Redmineflux was already running, restart Redmineflux once.
Problem: Ask Crux says “Crux isn’t connected to an AI model yet”
Cause: No AI provider key has been added.
Solution: Add a key under Administration → Crux — providers & keys.
Problem: “The … account has run out of credit”
Cause: The AI provider account has no credit left.
Solution: Add credit in your AI provider account, or add a different key. The $ button under Providers & keys shows how much is left.
Problem: An agent says a tool isn’t available
Cause: The MCP Server isn’t running, CRUX_MCP_URL is wrong, or the plugin that the tool belongs to isn’t installed.
Solution:
- Check the MCP Server:
sudo systemctl status redmineflux-mcp - Check
CRUX_MCP_URLin/opt/redmineflux-crux-core/.env. It should behttp://127.0.0.1:8080/mcp. - Check the MCP log line
Detected plugins:. Only installed Redmineflux plugins get tools.
Problem: Agents can read data but can’t make changes
Cause: The MCP Server is in read-only mode.
Solution: Set REDMINEFLUX_READ_ONLY=false in /opt/redmineflux-mcp/.env, then run sudo systemctl restart redmineflux-mcp.
Problem: A person doesn’t see Crux, or a Crux page says they aren’t allowed
Cause: The module or the permission is missing.
Solution: Turn on Redmineflux Crux in the project’s Settings → Modules, and give the person’s role the matching permission (see Roles and Permissions).
Problem: Saved AI keys stopped working after a reinstall
Cause: CRUX_SECRET changed.
Solution: Restore the previous /opt/redmineflux-crux-core/.env, or add the keys again.
Problem: Crux pages look broken after an update
Cause: The browser or Redmineflux is still using the previous styles and scripts.
Solution: Run RAILS_ENV=production bundle exec rake assets:precompile, restart Redmineflux, then refresh the page with Ctrl+F5.
Problem: An agent gets no work from the Ready queue
Cause: One of these:
- the Redmineflux Tags plugin isn’t installed;
- no open ticket has the
readyforagenttag; - the ticket’s skills don’t match the agent’s;
- the ticket is assigned to another agent;
- an open ticket blocks it;
- its work package is waiting for an approval;
- the agent is paused, over its monthly budget, or already has as many tickets as it may work on.
The agent’s answer names the reason.
Solution: Check the reason and fix it, for example approve the waiting gate on the Dashboard, add the tag, or resume the agent on the Agents page.
Problem: The Ready queue says “The Ready queue needs the free Redmineflux Tags plugin”
Cause: The Redmineflux Tags plugin isn’t installed. Without it, Redmineflux can’t find tickets by tag, so Crux treats no ticket as ready rather than handing agents every open ticket.
Solution: Install the free Redmineflux Tags plugin and restart Redmineflux. Within 5 minutes the note goes away, and tickets tagged readyforagent show in the Ready queue. You don’t need to restart Crux.
Problem: There is no Tags field on the ticket, or the tag can’t be added
Cause: The Redmineflux Tags plugin isn’t installed, or the person’s role lacks the Manage issues tags permission.
Solution: Install the free Redmineflux Tags plugin and restart Redmineflux. Then give the role the Manage issues tags permission under Administration → Roles and permissions → Issue tracking.
Problem: The agent took a different ticket than expected
Cause: Another ready ticket was ahead in the queue, or your ticket’s work package was waiting for an approval.
Solution: Set your ticket’s priority to High, assign it to the agent’s Redmineflux user, remove the tag from finished tickets, and approve waiting gates before asking the agent again.
Problem: A finished ticket comes back to the Ready queue
Cause: The ticket is still open and still has the readyforagent tag.
Solution: Close the ticket, or remove the tag. After changing the status, click Submit and check that the new status is shown.
Problem: A work package doesn’t move to the next stage
Cause: The current stage’s work was not reported as successful for every ticket of the work package, or the next stage is behind a gate that isn’t approved yet.
Solution: Check the work package’s stage bar and the Run ledger. Approve the gate under Dashboard → Needs your attention, or ask the agent to finish the current stage.
Frequently Asked Questions (FAQs)
Q1: Which parts do I need to install?
All three: the Redmineflux MCP Server, Crux core and the Redmineflux Crux plugin. Install them in that order.
Q2: Does Crux need Docker or Python?
No. The MCP Server and Crux core are ready-to-run compiled programs for Linux. The Crux plugin installs like any other Redmineflux plugin.
Q3: Can Crux change data without asking?
No. Every change is shown to the person first as a confirmation card and runs only after they approve it. Administrators can also block agent changes on chosen tickets, trackers, projects or fields with Frozen rules.
Q4: Can people see more through Crux than in Redmineflux?
No. Crux and its agents work with the permissions of the person who asked.
Q5: Which AI providers are supported?
Crux works with Anthropic, OpenAI, Google Gemini and OpenRouter, and with any OpenAI-compatible endpoint, for example a local Ollama, added with + Add Provider. Add the provider and its key under Administration → Crux — providers & keys. AI usage is billed by your provider to your own account.
Q6: Does Redmineflux receive my data?
No. Crux core and the MCP Server run on your own server. Your data is sent only to the AI provider whose key you add, and only for the question being answered.
Q7: Why don’t I see an agent for one of my plugins?
An agent for a Redmineflux plugin needs that plugin installed and enabled. Check Administration → Plugins and the Detected plugins: line in the MCP Server log.
Q8: Can I control what Crux spends?
Yes, at several levels:
- a spending limit on the AI provider key itself, for example in OpenRouter; Crux shows the remaining balance under Providers & keys;
- a daily cap per person for chat, set by an administrator in Crux Settings → Chat budget;
- a monthly budget per agent on the Agents page, for agent work from the Ready queue;
- a personal daily spend reminder that each person can set in Ask Crux.
Every run is recorded with its cost in the Run ledger.
Q9: Can the three parts run on different servers?
Yes, but the recommended setup is one server. If you separate them, update CRUX_MCP_URL in core’s .env and the Crux core service URL in Crux Settings. Keep the ports reachable only from the servers that need them.
Q10: What is the Ready queue for?
It is the list of tickets you have handed to AI agents. It needs the free Redmineflux Tags plugin; without it, the Ready queue shows a note with the download link and stays empty. Add the tag readyforagent to a ticket; an agent connected through the MCP Server takes it, does the work, adds a note and reports the result. No two agents work on the same ticket, and every run is recorded with its cost. See Handing Work to Agents.
Q11: Does every ticket need a work package?
No. A single ticket can go through the Ready queue on its own. Use a work package for larger or riskier work, where the work should go through stages and a person should approve at set points.
Q12: Can a work package use my own pipeline?
Not yet. Work packages are created in Ask Crux with one of the built-in pipelines, such as bug, software or document. Custom pipelines can be created and viewed on the Pipelines page.
Q13: Can Crux be used in my language?
Yes. Crux follows each person’s Redmineflux language (My account → Language) and is available in 12 languages.
Q14: Where do I get help?
Contact the Redmineflux support team at redmineflux.com/contact-us. Include the output of crux-core --version, redmineflux-mcp --version and the recent log of the service that has the problem.
Conclusion
Redmineflux Crux brings AI agents into the place where your team already works. With the MCP Server, Crux core and the Crux plugin installed, people can ask questions about their projects in plain language, get answers built from their own Redmineflux data, and make changes safely: every change is shown first and runs only after a person approves it.