Introduction #
The Redmineflux Timesheet Plugin is a powerful tool that enhances time tracking and reporting capabilities within the Redmine project management system. This user guide will walk you through the installation, configuration, and usage of the plugin, enabling you to efficiently manage and analyze time-related data for your projects.
Version Compatibility #
Redmine Versions
- 4.0.x, 4.1.x, 4.2.x
- 5.0.x, 5.1.x
- 6.0.x
Editor Compatibility #
Fully compatible with CKEditor – Our plugins are designed to integrate with your specific CKEditor setup. Users are responsible for obtaining their own CKEditor license or plan.
Installation #
To install Redmineflux Timesheet Plugin follow these steps
- Make sure you have a working installation of Redmine
- Unzip the archive and upload the Timesheet folder to Redmine/plugins and do not change the plugin folder name.
- Run the following command to install the required dependencies
bundle install
- Run migrate command for database migration
1. In Production
RAILS_ENV=Production bundle exec rails redmine:plugins:migrate
2. In Development
RAILS_ENV=Development bundle exec rails redmine:plugins:migrate
- Restart Redmine server to load the plugin
Rails s
User License Information #
Every Redmineflux license includes support for up to 100 active Redmine users by default. If your organization requires more than 100 active users, you’ll need to purchase additional user licenses.
You have two options to update your user license:
1. Purchase additional user licenses during your initial plugin purchase.
2. After the purchase, go to the “My Account” section in your profile to upgrade the number of users.
Configuration #
- Log in to your Redmine instance using administrative credentials.
- Navigate to the “Administration” section in the top navigation bar.
- Choose “Plugins” from the menu.
- Locate the Redmineflux Timesheet Plugin and click on the “Configure” link.
- Within the submit timesheet frequency options, select your preferred submission frequency.
- To enable the ability for users to Un-submit timesheets, check the corresponding checkbox.
- Activate the feature that allows users to choose their preferred starting day for time tracking within a seven-day period.
- Add the daily hours required to fill the timesheet.
- Choose those users who are exempted from filling the timesheet within the organization.
- Enable the Issues checkbox if you wish to allow time log on tasks assigned to someone else or unassigned.
- Set auto approval timesheet time (in hours): Define the time threshold after which pending timesheets are auto-approved.
- Click “Save” to apply and save the changes.

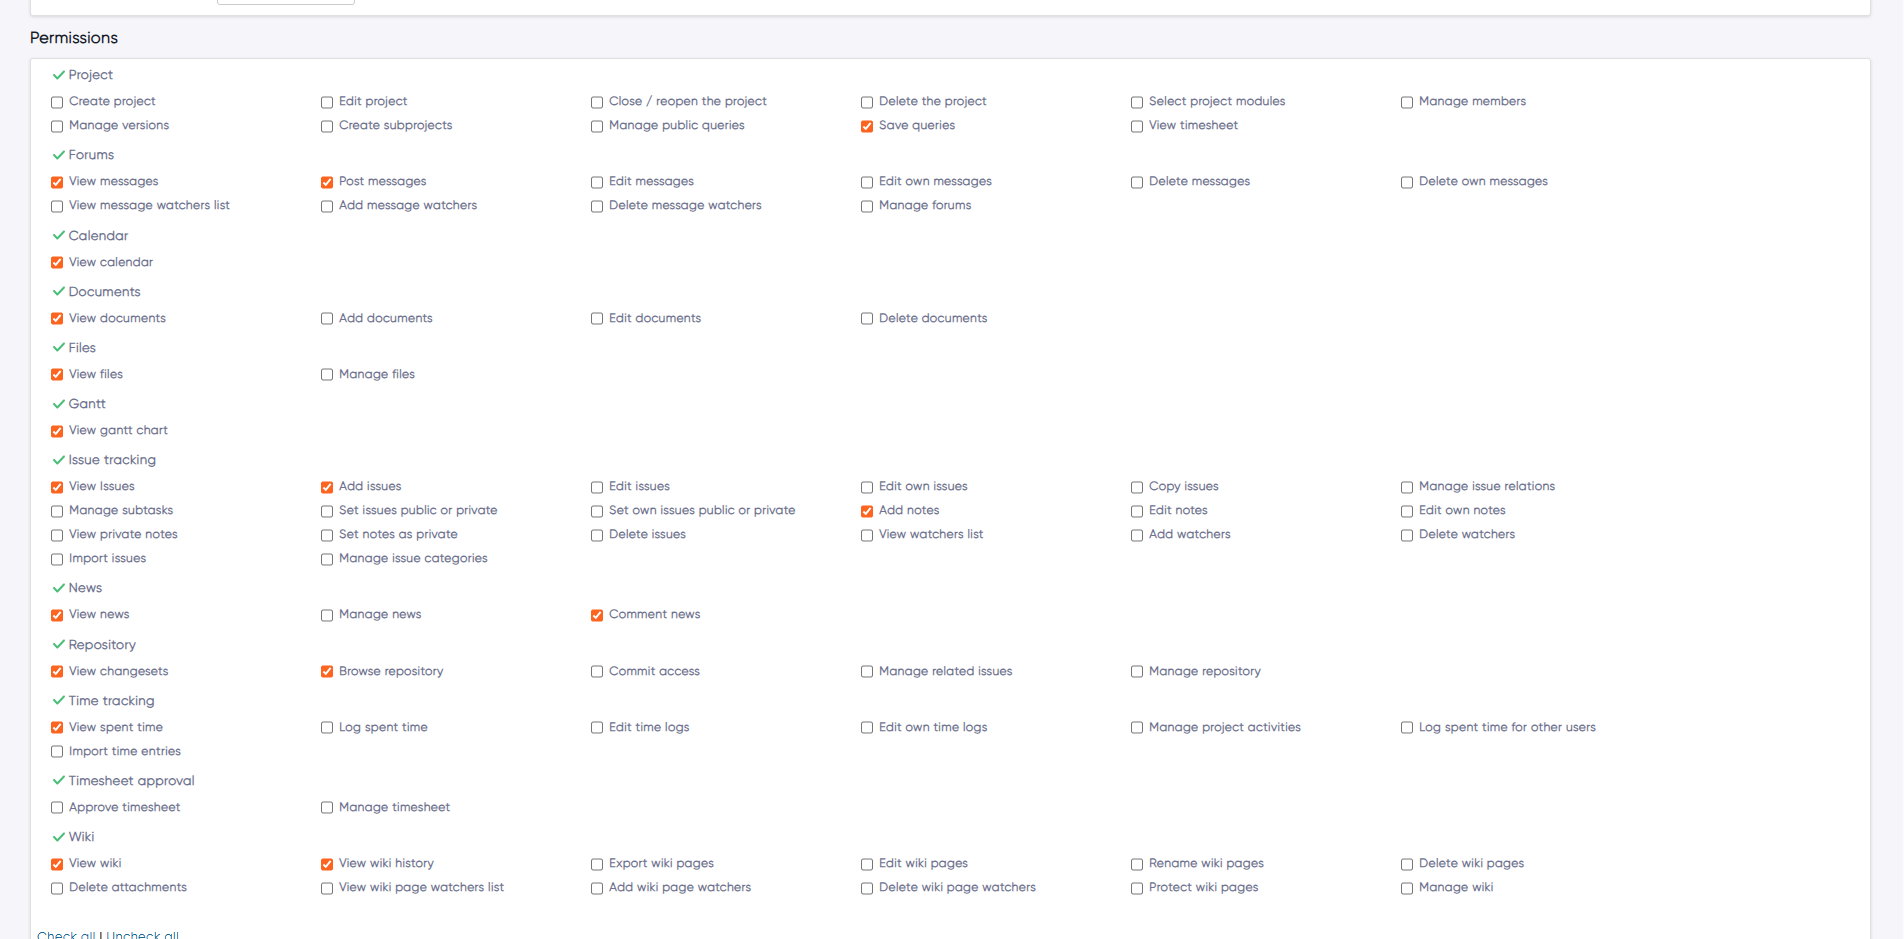
Roles & Permissions #
Project Section #
- View Timesheet
Enable this permission to allow users to view their own timesheets.
Timesheet Approval Section #
- Approve Timesheet
Grant this permission to users who need access to the Timesheet Approval section within the project.
Once enabled, the Timesheet Approval submenu will be visible to them.
- Manage Timesheet
This permission allows users to:
- Approve or reject timesheets of users under their approval level (as per the selected approval schema).
- View timesheets of other users in the same project.
- Be included in the approval level role dropdown when creating or editing levels in the approval schema (only roles with this permission appear).
⚠️ Only roles with the Manage Timesheet permission will be available for selection in schema level creation.

How To #
How to View Timesheet #
To access the timesheet functionality in Flux, please follow these steps
- Open your preferred web browser and go to the Flux login page.
- Enter your credentials (username and password) to log in to Flux.
- After successfully logging in, navigate to the main dashboard or home page.
- Look for the “Timesheet” option in the navigation menu and click on it.
On the Timesheet page, you will find a calendar view displaying the timesheet entries. By default, the current week’s timesheet is visible.
How to Add time entries in the Timesheet Dashboard #
To add a new time entry in the Timesheet Dashboard, follow these steps
- Click on the “Add Issue” button, typically located near the top of the dashboard or Hover over the task cells to initiate the time entry process.
- Choose the date for the time entry. Select the appropriate date from a date picker.
- Specify the activity associated with the time entry.
- Enter the number of hours you spent on the activity. Provide an accurate estimate or measurement of the time spent on the task.
- Optionally, you can add comments or descriptions to provide additional context.
- Once you have filled in the required fields, click on the “Log Time” button to record the time entry in the Timesheet Dashboard.
After clicking “Log Time” the new time entry will be added to the Timesheet Dashboard, reflecting the selected task, date, activity, hours, and any added comments.
How to Update time entry in Timesheet Dashboard #
To update a time entry in the Timesheet Dashboard, follow these steps
- To view previous time entries for a particular task, double click on the task row.
- To view the time entry for a specified date, hover over the cell in the Timesheet Dashboard that contains the time entry. A pop-up will appear, showing the details of the time entry for that date.
- Update the desired fields such as spent time, date, comment, hours, and activity based on the changes you want to make. Modify the necessary information accordingly.
- After confirming the changes, click on the “Log Time” button to update the time entry with the revised information
- To add more time entries on the particular date click on plus icon, fill in all the necessary details for ex. Date, comment, hours and activity and click on “Log Time” button to add new time entries.
How to remove time entries from the Timesheet Dashboard #
To remove time entries from the Timesheet Dashboard, follow these steps
- Access the Timesheet Dashboard.
- Locate the specific task for which you want to remove time entries. To do this, double click on the task to open a pop-up or view that displays the associated time entries.
- Identify the time entry that you wish to remove.
- Look for a “Delete” icon or option associated with the time entry. It may be represented by a trash bin icon or a similar symbol.
- Click on the “Delete” icon to remove the desired time entry.
- The Time entry will be removed from the Timesheet Dashboard.
How to submit Timesheet in Redmineflux Timesheet #
To submit your timesheet in Redmineflux Timesheet, follow these steps
- Log in to Redmineflux with your credentials.
- Navigate to the Timesheet section or Timesheet Dashboard.
- Review and ensure that all your time entries for the desired period are accurately filled in.
- Verify that you have entered the correct hours, and any additional information required for each time entry.
- Double-check any comments or descriptions associated with the time entries to ensure they are complete and provide necessary context.
- Once you are satisfied with the accuracy of your timesheet, look for a “Submit” button within the Timesheet Dashboard or on the timesheet page.
- Click on the “Submit” button to initiate the timesheet submission process.
- A confirmation prompt or notification may appear, indicating that your timesheet has been successfully submitted.
- Your timesheet is now submitted in Redmineflux Timesheet. It will be processed according to the system’s workflow and any approval processes in place.
How to View the Timesheet Approval Dashboard in Redmineflux Timesheet #
- Log in with an valid credentials account (who has the necessary approval permissions).
- Go to the Timesheet module from the main menu.
- Open the Timesheet Approval Dashboard.
- From the “Select Project” dropdown, choose the project you want to review.
- The dashboard will display the timesheet status of all users for the selected project, according to the approval workflow.
ℹ️ Tip: This view helps you track pending, approved, and rejected timesheets across different projects in one place.
How Approval Users Can Approve/Reject Timesheets #
When a user submits a timesheet for a project, approval users (assigned in the approval schema) can take action in two ways:
Method 1: From Within the Project #
- Navigate to the Projects section.
- Open the specific project.
- Click on the Timesheet Approval submenu.
- Select the date range for which the user submitted the timesheet.
- Locate the user’s timesheet entry.
- Click Approve or Reject, fill in the comment, and click Submit.
Method 2: From Timesheet Approval Dashboard #
- Go to the Timesheet module.
- Click on the Timesheet Approval Dashboard.
- Select the project for which the timesheet was submitted.
- Choose the relevant date range.
- Locate the user’s timesheet.
- Click Approve or Reject, fill in the comment, and click Submit.
Approval Flow Logic #
- Timesheets follow a sequential approval process based on the selected approval schema for the project.
- A higher-level approver cannot take action until the lower-level approver has approved or rejected the timesheet.
- If an approval user submits their own timesheet, it will be forwarded to the next-level approver in the schema.
- If the user is the final-level approver (e.g., HR), then only the Admin can approve or reject that timesheet.
⚠️ Approval responsibility strictly follows the schema’s hierarchy — no level can skip another.
✅ Email Notification:
After each approval or rejection at any level, the user who submitted the timesheet will receive an email notification informing them of the action taken and any comments provided.
How to Search for Tasks or Users in the Timesheet #
The Redmineflux Timesheet feature allows users to conveniently search for tasks within the Timesheet dashboard using task ID or subject. Additionally, users can search for specific users by utilizing user ID or name.
How to View the Timesheet of Different Projects #
To view timesheets across various projects in the Redmineflux Timesheet Plugin, follow these steps:
- Go to the Timesheet module from the top menu.
- Locate the “Filter by Project” dropdown at the top of the page.
- Click the dropdown and select the desired project whose timesheet data you want to view.
- The plugin will automatically update the view to show timesheet entries related to the selected project.
🔒 Note: You must have the necessary permissions or project access to view timesheets for that project. Admins and project managers typically have access to multiple projects.
How to View the Timesheet for a Custom Date Range in Redmineflux Timesheet #
To view the Timesheet for a custom date range in Redmineflux Timesheet, follow these steps
- Locate the date range selector or date picker option.
- Click on the date range selector to open the calendar.
- Choose the start date and end date that define your desired custom date range.
- Once you have selected the appropriate dates, the timesheet plugin will automatically update to display the tasks and time entries within the specified custom date range.
By selecting a custom date range, you can easily analyze and monitor the timesheet of your team or project within a specific timeframe.
Un-submit the Timesheet #
- To Un-submit the timesheet login to your Redmine instance with valid credentials.
- Fill in the timesheet details and click on the “Submit Timesheet” button. If the option to un-submit the timesheet is enabled, the “Un-submit Timesheet” button will appear.
- Click on the “Un-submit Timesheet” button to revert the timesheet submission.
Timesheet Reports #
- Log in to your Redmine instance using valid credentials.
- Only those users can access this timesheet reports section who have Manage Timesheet permission.
- Navigate to the “Timesheet Report” tab from the left sidebar.
- Select your preferred options from the filters and select the group by options the default group by is user.
- If no filter options are selected, then the default filtered record will be according to date.
- Click on “Apply” to generate the reports.
- There are two donut and pie charts that will be available to display reports.
How to Create an Approval Schema #
- Log in as an Admin user.
- Navigate to the Approval Schema section under the Timesheet module.
- You will see a default schema already present (Default Approval Schema).
- To create a new schema:
- Click on the New Approval Schema button.
- Enter a Schema Name (this field is required).
- Optionally, provide a Description.
- Click on the Create button to save the new schema
How to Edit or Delete an Approval Schema #
- Log in as an Admin.
- Navigate to the Approval Schema section under the Timesheet module.
- Locate the schema you want to modify.
- To edit or delete the schema, click on the respective icons (✏️ for edit, 🗑️ for delete) available next to the schema name.
Note: Deleting a schema will remove all associated approval levels. Use this action with caution.
How to Add Levels to a Schema #
- Log in as an Admin user.
- Navigate to the Approval Schema section under the Timesheet module.
- Open any created schema by clicking on its name.
- Click on the Add Approval Level button.
- Fill in the following details:
- Name of the level.
- Select Role (the role responsible for approval at this level).
- Select Level (must be in sequential order, e.g., Level 1, Level 2, etc.).
- Optionally, enable Auto Approval at this level by checking the checkbox.
- You can create between 1 to 5 levels per schema.
- Click on the Create button to save the level.
Edit/Delete Approval Level #
- Log in as an Admin user.
- Navigate to the Approval Schema section under the Timesheet module.
- Open any created schema by clicking on its name.
- Locate the approval level you want to modify.
- To edit or delete the approval level, click on the respective icons (✏️ for edit, 🗑️ for delete) next to the level entry.
Note: Editing allows you to change the level name, role, level number, or auto-approval setting. Deleting a level will permanently remove it from the schema.
How to Select Approval Schema While Creating a Project and Enable Timesheet Approval Menu #
- Log in using valid credentials.
- Navigate to the Projects section.
- Click on the Create New Project button.
- Fill in the required project details.
- Under the Timesheet Settings:
- Select the desired Approval Schema from the dropdown.
- Check the Timesheet Approval checkbox to enable the Timesheet Approval workflow for the project.
- Once selected and saved, the Timesheet Approval submenu will become visible inside the project.
How to Add an Approval User to a Project #
- Log in using valid credentials.
- Navigate to the Projects section.
- Open the desired project and go to the project’s Settings.
- Navigate to the Members tab.
- Click on New Member.
- Select the user you want to add.
- Assign the appropriate Approval Role based on the roles defined in the selected approval schema.
- Click Add to save the changes.
- Once assigned, the user will receive an email notification informing them about their approval responsibility in the project.
The assigned user can now approve timesheets according to their approval level.
How to be customize Time Formats Redmineflux Timesheet #
To add time conversion in a Timesheet, follow these steps:
- Login into Redmine as an administrator.
- Navigate to the administration.
- Go to settings.
- Click on the “Display” tab.
- Choose the preferred time span format, either decimal or colon.
- Depending on the selected format, the time will be displayed on timesheet dashboard.
How to allow employees to log time on unassigned issues #
- Log in to Redmine as an administrator. .
- Navigate to administration tab.
- Now navigate to the plugins section.
- Select the Redmineflux Timesheet plugin configuration.
- Within the plugin configuration settings, find the option labeled “Allow time log in issues other than assigned.
- Check the checkbox to enable time log for issues assigned to other users.
- Save the changes to apply the configuration.
- After enabling this option, the time log entries for assigned issues to other users will be displayed.
How to customize Timesheet frequency #
- Log in to Redmine as an administrator.
- Navigate to the plugins section.
- Select the Redmine Timesheet plugin configuration.
- Within the plugin configuration settings, find the option label “Submit timesheet frequency.” There 3 options are available in the drop down.
- Partial (custom): Select a custom date range to Submit the timesheet.
- Weekly: With this you can set timesheet submission frequency as weekly
- Monthly: Submit your timesheet once a month.
- Now save your choice, this change can be seen on the timesheet dashboard.
How to View a Custom Field in the Timesheet #
- Log in to Redmine using your credentials.
- Navigate to Administration > Custom fields.
- Select Spent time and click New custom field.
- Fill in the necessary details for the custom field (e.g., name, format, visibility).
- Click the Create button to save the custom field.
- Navigate to Timesheet and click Log time.
- A popup will open where the custom field is displayed.
How to Export the Timesheet Approval Dashboard in PDF, CSV, or Excel format #
- Go to the Timesheet Approval Dashboard.
- Click on the Export button.
- A menu will appear with options like PDF, Excel (XLSX), and CSV.
- Select your desired format.
- The file will be downloaded automatically.
- Make sure filters (date range, project) are applied correctly before downloading to get relevant data.
Troubleshooting #
Ensure the Timesheet Plugin is Installed and Enabled
Check if the Timesheet plugin is installed in your Redmine instance. If not, install the plugin and restart Redmine.
Check User Permissions
Make sure that the user has the necessary permissions to access and use the Timesheet functionality. Check their roles and permissions in the Redmine administration panel.
Clear Browser Cache
If you encounter display issues or outdated information in the Timesheet Dashboard, clear your browser cache and refresh the page.
Verify Plugin Compatibility
Ensure that the Timesheet plugin version is compatible with your Redmine version. Check the plugin’s documentation or website for compatibility information.
Review Plugin Settings
Double-check the plugin settings in the Redmine administration panel. Make sure the settings are configured correctly and match your requirements.
Check for Conflicting Plugins
Disable other Redmine plugins temporarily to check if there are any conflicts affecting the Timesheet plugin’s functionality.
Restart Redmine
If you encounter persistent issues with the Timesheet plugin, try restarting the Redmine server to refresh the plugin and its dependencies.
Update or Reinstall the Plugin
If you are using an outdated version of the Timesheet plugin, update it to the latest compatible version. Alternatively, reinstall the plugin to resolve any potential installation or configuration issues.
Consult the Plugin’s Documentation or Support
Refer to the Timesheet plugin’s documentation or support resources for specific troubleshooting steps and common issues. Check if there are any known issues or FAQs that address your problem.
Report the Issue
If you are unable to resolve the issue, consider reporting it to the plugin’s developers or support team. Provide detailed information about the problem, including steps to reproduce it and any error messages encountered.
Remember to always backup your Redmine instance before making any significant changes or modifications to plugins or configurations.
Frequently Asked Questions (FAQ’s) #
Q1: How do I install the Redmine Timesheet plugin?
A1: To install the Redmine Timesheet plugin, click on the link:
Q2: How can I access the Timesheet Dashboard?
A2: To access the Timesheet Dashboard, log in to your Redmine instance and navigate to the Timesheet section. It is usually available at the top menu.
Q3: Can I view timesheets for specific teams?
A3: Yes, the Redmine Timesheet plugin typically allows you to view timesheets for specific teams. You can select the desired team from the dropdown menu or use the provided filters in the Timesheet Dashboard.
Q4: How do I add a new time entry in the Timesheet Dashboard?
A4: To add a new time entry, follow these steps
- click on the “Add Issue” button or hover over the task cells.
- Select the desired task for which you want to fill the time.
- Choose the date, activity, and enter the number of hours spent.
- Optionally, add comments.
- Click the “Log Time” button to record the time entry.
Q5: How can I update or edit existing time entries?
A5: To update a time entry, follow these steps:
- Double click on the task row to view the previous time entries for that task.
- Hover over the particular cell to see the time entry for a specific date.
- Update the desired fields such as spent time, date, comment, or activity.
- Click “Log Time” to save the changes and update the time entry.
Q6: Can I generate Timesheet Reports with the plugin?
A6: Yes, the Redmine Timesheet plugin typically provides the functionality to generate Timesheet Reports. You can access the Reports section or Reports Dashboard and customize the report based on parameters such as date range and teams.
Q7: How do I approve or reject timesheets in the Redmine Timesheet plugin?
A7: To approve or reject timesheets, you need appropriate permissions and access to the Timesheet Approval section or Approval Dashboard. From there, you can review the timesheets and click on the “Approve” or “Reject” buttons accordingly. You may also provide comments or feedback during the approval or rejection process.
Q8: Can I customize the Timesheet plugin’s settings or configuration?
A8: Yes, the Redmine Timesheet plugin usually offers configuration options in the Redmine administration panel. You can customize settings related to timesheet display, permissions, notifications, and other aspects to match your requirements.
Q9: What should I do if I encounter issues or errors with the Timesheet plugin?
A9: If you face any issues or errors, try the following steps
- Clear your browser cache and refresh the page.
- Verify the plugin compatibility with your Redmine version.
- Check for conflicting plugins and disable them temporarily.
- Review the plugin’s documentation or support resources for troubleshooting guidance.
- Report the issue to the plugin’s developers or support team, providing detailed information about the problem.
Uninstallation of Plugin #
To uninstall the Redmineflux Timesheet Plugin, follow these steps
- Go to the Timesheet Plugin directory in Redmine.
- Delete the entire Timesheet directory from Redmine/plugins directory. This step removes the plugin files from your Redmine installation.
- If the plugin required a migration, run the following command to downgrade your database (make a db backup before):
Bundle exec rake redmine:plugins:migrate Name=plugin name VERSION=0
- Restart the Redmine server to see the changes.
- This will uninstall the Redmineflux Timesheet Plugin from Redmine.
Conclusion #
The Redmine Timesheet Plugin offers a comprehensive solution for tracking, managing, and analyzing time-related data within your Redmine projects. By following this user guide, you can easily install, configure, and utilize the plugin’s features to streamline your time tracking processes.